
Omni-Endo AI
This started with a straightforward frustration. The historical data sitting in Glooko, particularly from the Omnipod 5, is far richer than anything the manufacturer's own app surfaces in a useful way. The question eventually became: what happens if you hand that data to a large language model and ask it to behave like an endocrinologist?
OMNI-ENDO AI
Clinical Audit & Triage Tool: AI-Powered Data Insights for Diabetes
🌟 What is Omni-Endo AI?
Omni-Endo AI is a bridge between your diabetes data and the power of Artificial Intelligence.
🚀 What does it actually do?
Omni-Endo AI acts as a sophisticated data harvester and "translator" for your diabetes management. Specifically, it:
- Aggregates Comprehensive Data: It collects every single bolus, every blood sugar reading, and every Omnipod 5 settings change recorded between your chosen dates.
- Captures High-Fidelity CGM Trends: It retrieves every individual CGM test result sent to your Omnipod (one every 5 minutes), ensuring no trend or "micro-spike" is missed.
- Automates Prompt Engineering: It takes this mountain of raw data and restructures it into a professional, highly detailed prompt designed for Large Language Models (LLMs).
- Enables AI Consultation: By formatting the data this way, it allows an LLM to step into the role of an endocrinologist, capable of talking you through questions about your Omnipod performance and how it is working for you.
The "Aha!" Moment
This project didn't start in a lab; it started with a personal frustration. While trying to integrate my diabetes data into a Home Assistant dashboard, I discovered that while "real-time" sync is often limited by manufacturers, the wealth of historical data stored in Glooko (especially from the Omnipod 5) is a goldmine.
I realised that if I could extract this data, I could analyze it to improve my own management. Then came the breakthrough: What if I gave this data to a Large Language Model (LLM)? By combining clinical data with the reasoning power of AI, I found I could uncover patterns that even months of manual logging couldn't show.
Why I Built This
I built this tool to put the power back into the hands of the patient. Modern healthcare is busy, and we often only get 15 minutes with a consultant every few months. This tool allows you to:
- Be Proactive: Spot trends before your next appointment.
- Be Private: Your data stays on your machine.
- Be Flexible: You choose which AI helps you.
🔒 Privacy & Security: Your Data, Your Control
Because this involves sensitive medical credentials and data, I have designed this tool with a "Zero-Server" architecture.
- No Middle Man: Your Glooko username and password never leave your machine. They are sent directly from your local Docker container to the Glooko servers. No other machine or third-party server ever sees your credentials.
- Closed Loop: The analysis happens entirely on your choice of LLM (ChatGPT, Claude, Gemini).
- Training Data Warning: While Omni-Endo AI is secure, most AI companies (like OpenAI or Google) have settings that allow them to "train" their models on your conversations.
[!IMPORTANT] I highly recommend going into your AI settings (e.g., ChatGPT Settings > Data Controls) and turning off "Chat History & Training" before pasting your clinical data to ensure your medical history remains private.
🧐 The "Tough Love" AI Persona
I have purposefully configured the built-in AI prompt to act as a "Tough Love" Endocrinologist.
Managing Type 1 Diabetes is hard, but placating a user doesn't improve Time-in-Range (TIR). The AI is designed to be direct, analytical, and uncompromising. It won't sugar-coat the data; it will tell you exactly where your bolus timing is off, where you are over-correcting, or where your basal rates are failing to catch a drift.
🧠 The "No-API" Philosophy (Why this is different)
Most AI tools require "API Keys"—which are essentially digital credit cards. If I had built this using APIs:
- You would have to pay: Every time the AI analyzed your data, you'd be charged a small fee.
- You'd be "Locked In": You would be forced to use whatever AI model I chose for you.
- It's Complicated: Setting up developer accounts is a nightmare for most people.
Instead, Omni-Endo AI uses a "Manual Hand-off." The tool prepares a perfectly formatted report for you to simply Copy and Paste into your favorite AI chat window (ChatGPT, Claude, Gemini, etc.). You use the tools you already have, and you pay nothing extra.
[!WARNING] Be aware that all links in this document will take you away from this page. To force a new tab, right click and select Open Link in New Tab.
🛠️ Step 1: Getting Ready (Installing Docker)
To run this tool, we use a piece of software called Docker. Think of Docker as a "shipping container" for applications. It ensures that Omni-Endo AI runs perfectly on your computer without you having to install and configure complicated code libraries.
This may require a restart of your machine, so make sure you are in a position to do this before starting.
For Windows Users
- Download: Go to the Docker installation instructions for Windows page, read the descriptions of the different installs and download the one which best suits your machine. It is likely to be this Docker Desktop for Windows - x86_64 for most users.
- Install: Run the
.exefile. Important: During installation, ensure the box that says "Use WSL 2 instead of Hyper-V" is checked. - Restart: Your computer will likely ask you to restart.
- Start: After restarting, open the "Docker Desktop" app from your Start Menu. Accept the terms of service.
[!WARNING] You may see a WSL version issue. If so, take a look here to solve this.
For Mac Users
- Download: Go to the Docker installation instructions for Mac page.
- Choose "Apple Chip" if you have a newer Mac (M1, M2, M3, M4).
- Choose "Intel Chip" if you have an older Mac.
- Install: Open the
.dmgfile and drag the Docker icon into your Applications folder. - Start: Open Docker from your Applications folder. You may need to enter your Mac password to grant it permission to run.
[!NOTE] If you are interested in other potential uses for Docker on your machine, take a look at Awesome Compose.
📂 Step 2: Setting up the Folder
You need to get the files from this GitHub page onto your computer.
- Download the Code: - On this GitHub page, click the green "<> Code" button near the top. Then click "Download ZIP".
- Extract: Open your Downloads folder, right-click the zip file, and choose "Extract All".
- Move: Move that extracted folder (let's call it
omni-endo-ai-main) to somewhere easy to find, like your Desktop.
Your folder should look like this inside:
public/(folder)images/(folder)docker-compose.ymlDockerfileserver.jspackage.json- ...and a few other small files which are not important.
🚀 Step 3: Running the Tool
Now we tell Docker to "turn on" the tool.
Open a Terminal:
- Windows: Search for "PowerShell" in your start menu and open it.
- Mac: Search for "Terminal" in Spotlight (Cmd + Space) and open it.
Go to the folder: Type
cdfollowed by a space, then drag youromni-endo-ai-mainfolder from your desktop directly into the terminal window. It will look something like this:cd C:\Users\YourName\Desktop\omni-endo-aiHit Enter.Start the Engine: Type exactly this command and hit Enter:
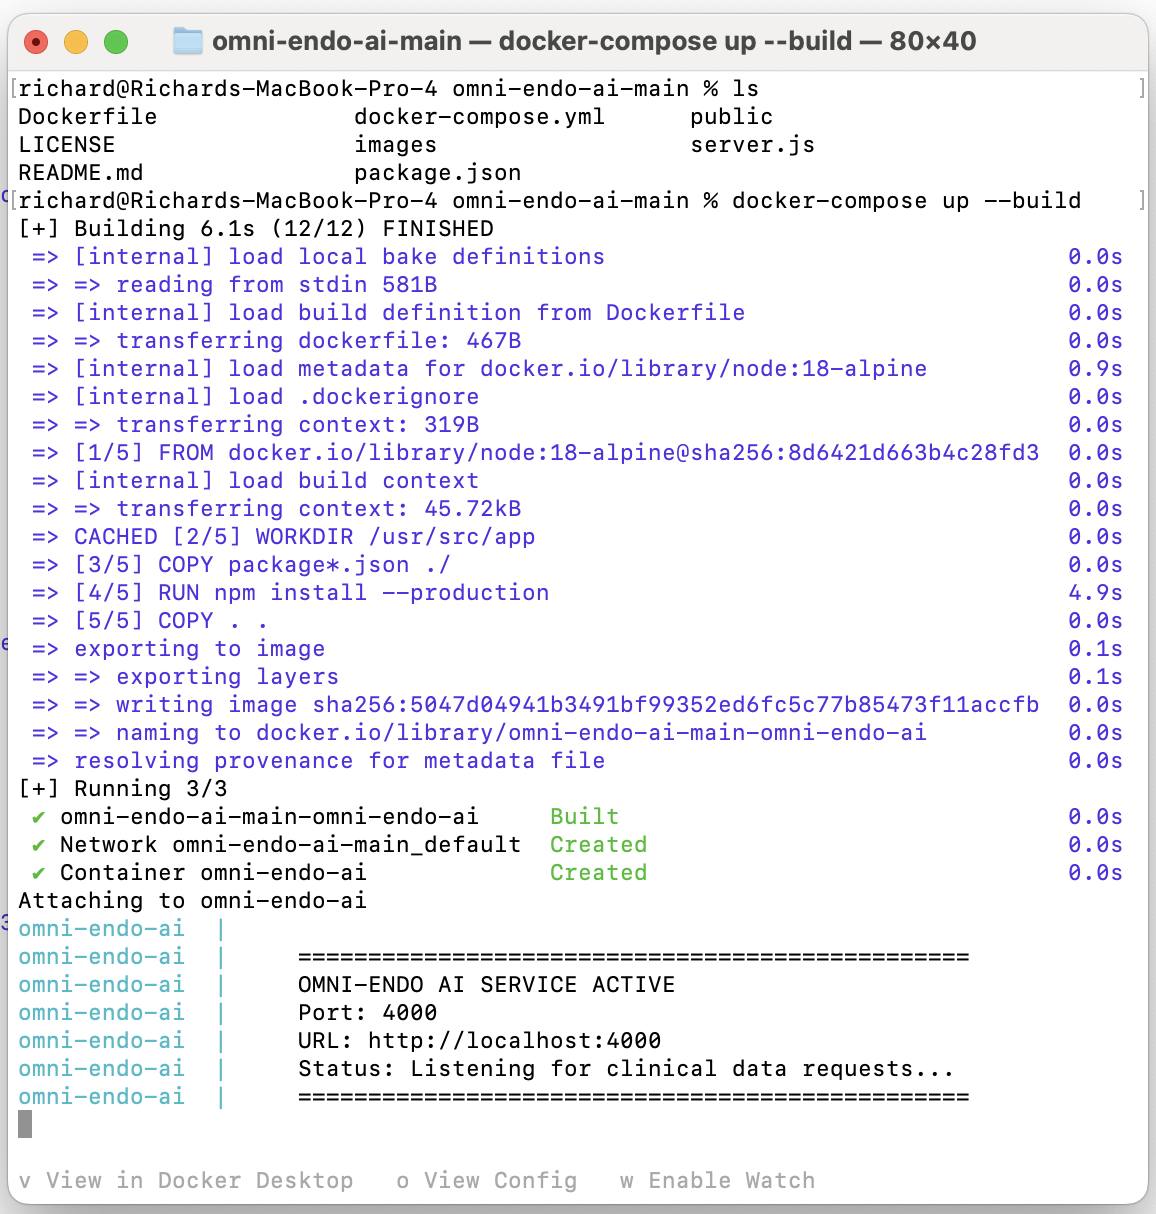
docker-compose up --buildYou can copy the command above and simply paste it into your terminal.
Wait: The first time you do this, Docker will download the "engine" (Node.js). It might take a minute or two. When you see a message saying Server running at http://localhost:4000, you are ready! Your screen will look something like this when it is done.
💻 Step 4: Guided Walkthrough
1: Clinical Data Acquisition
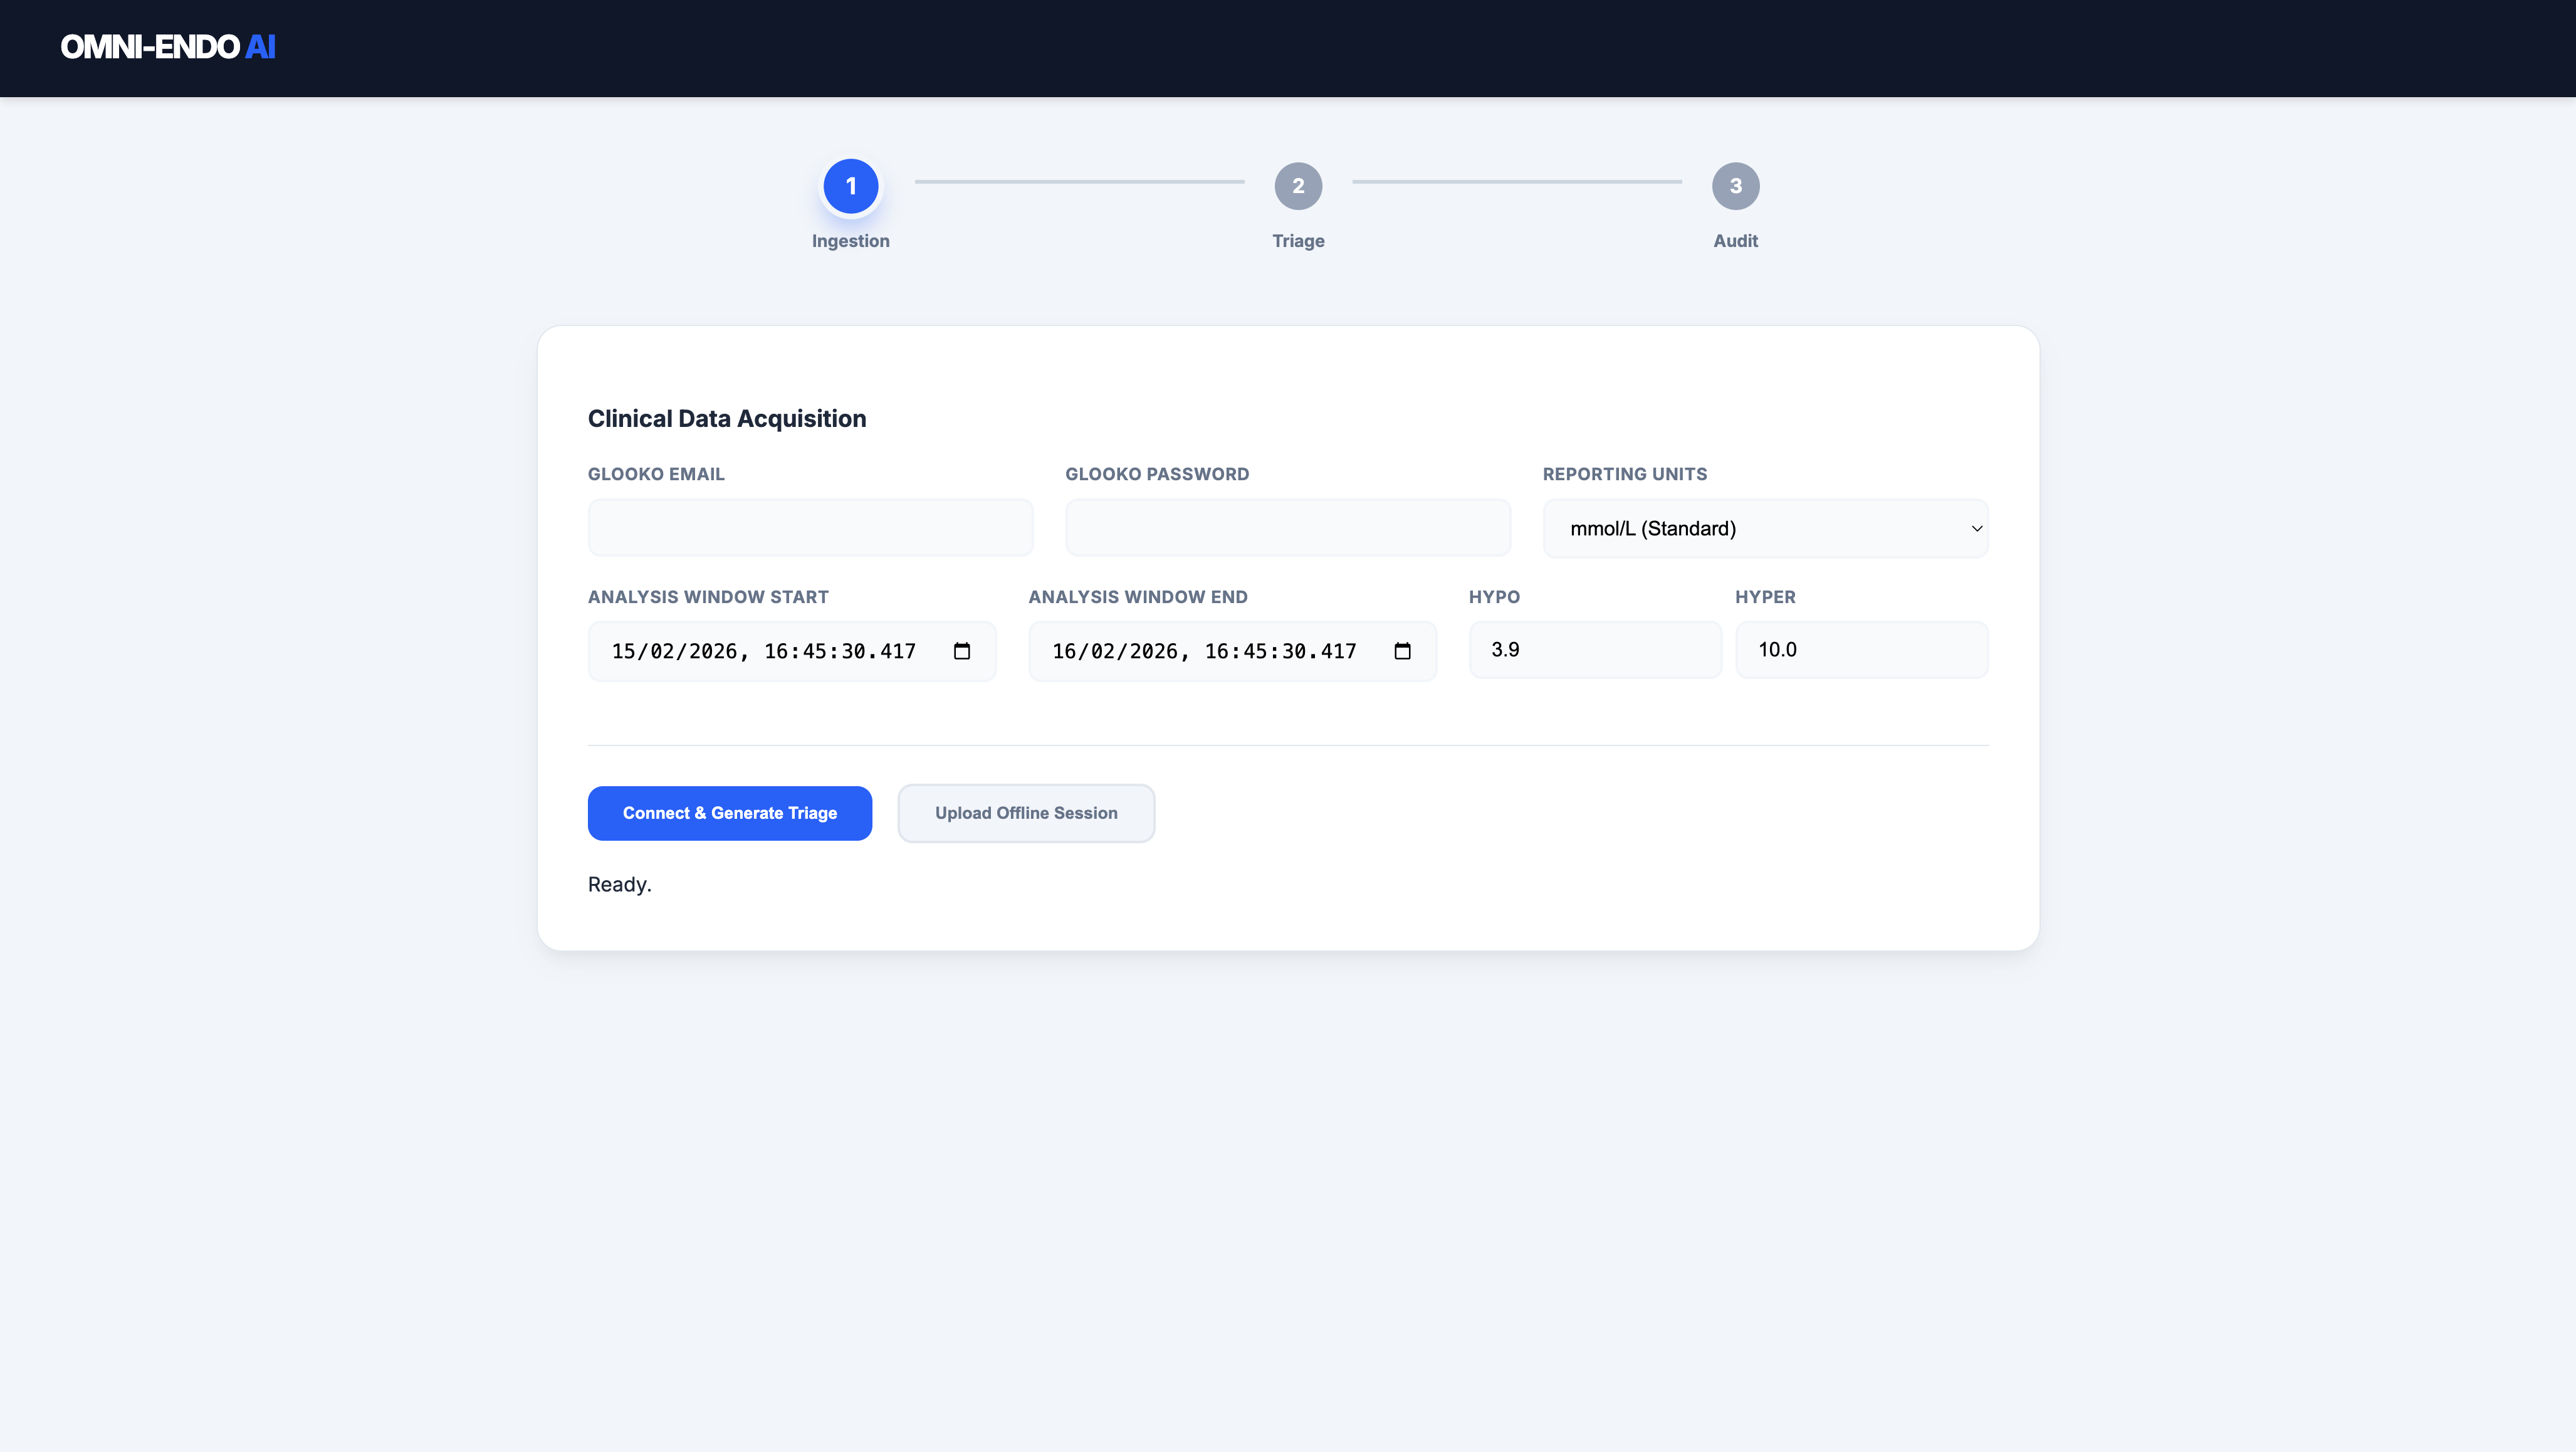
When you first open the tool at http://localhost:4000, you will see the Ingestion screen. This is where you connect to your data source OR import previously downloaded data.
2: Identifying Key Fields
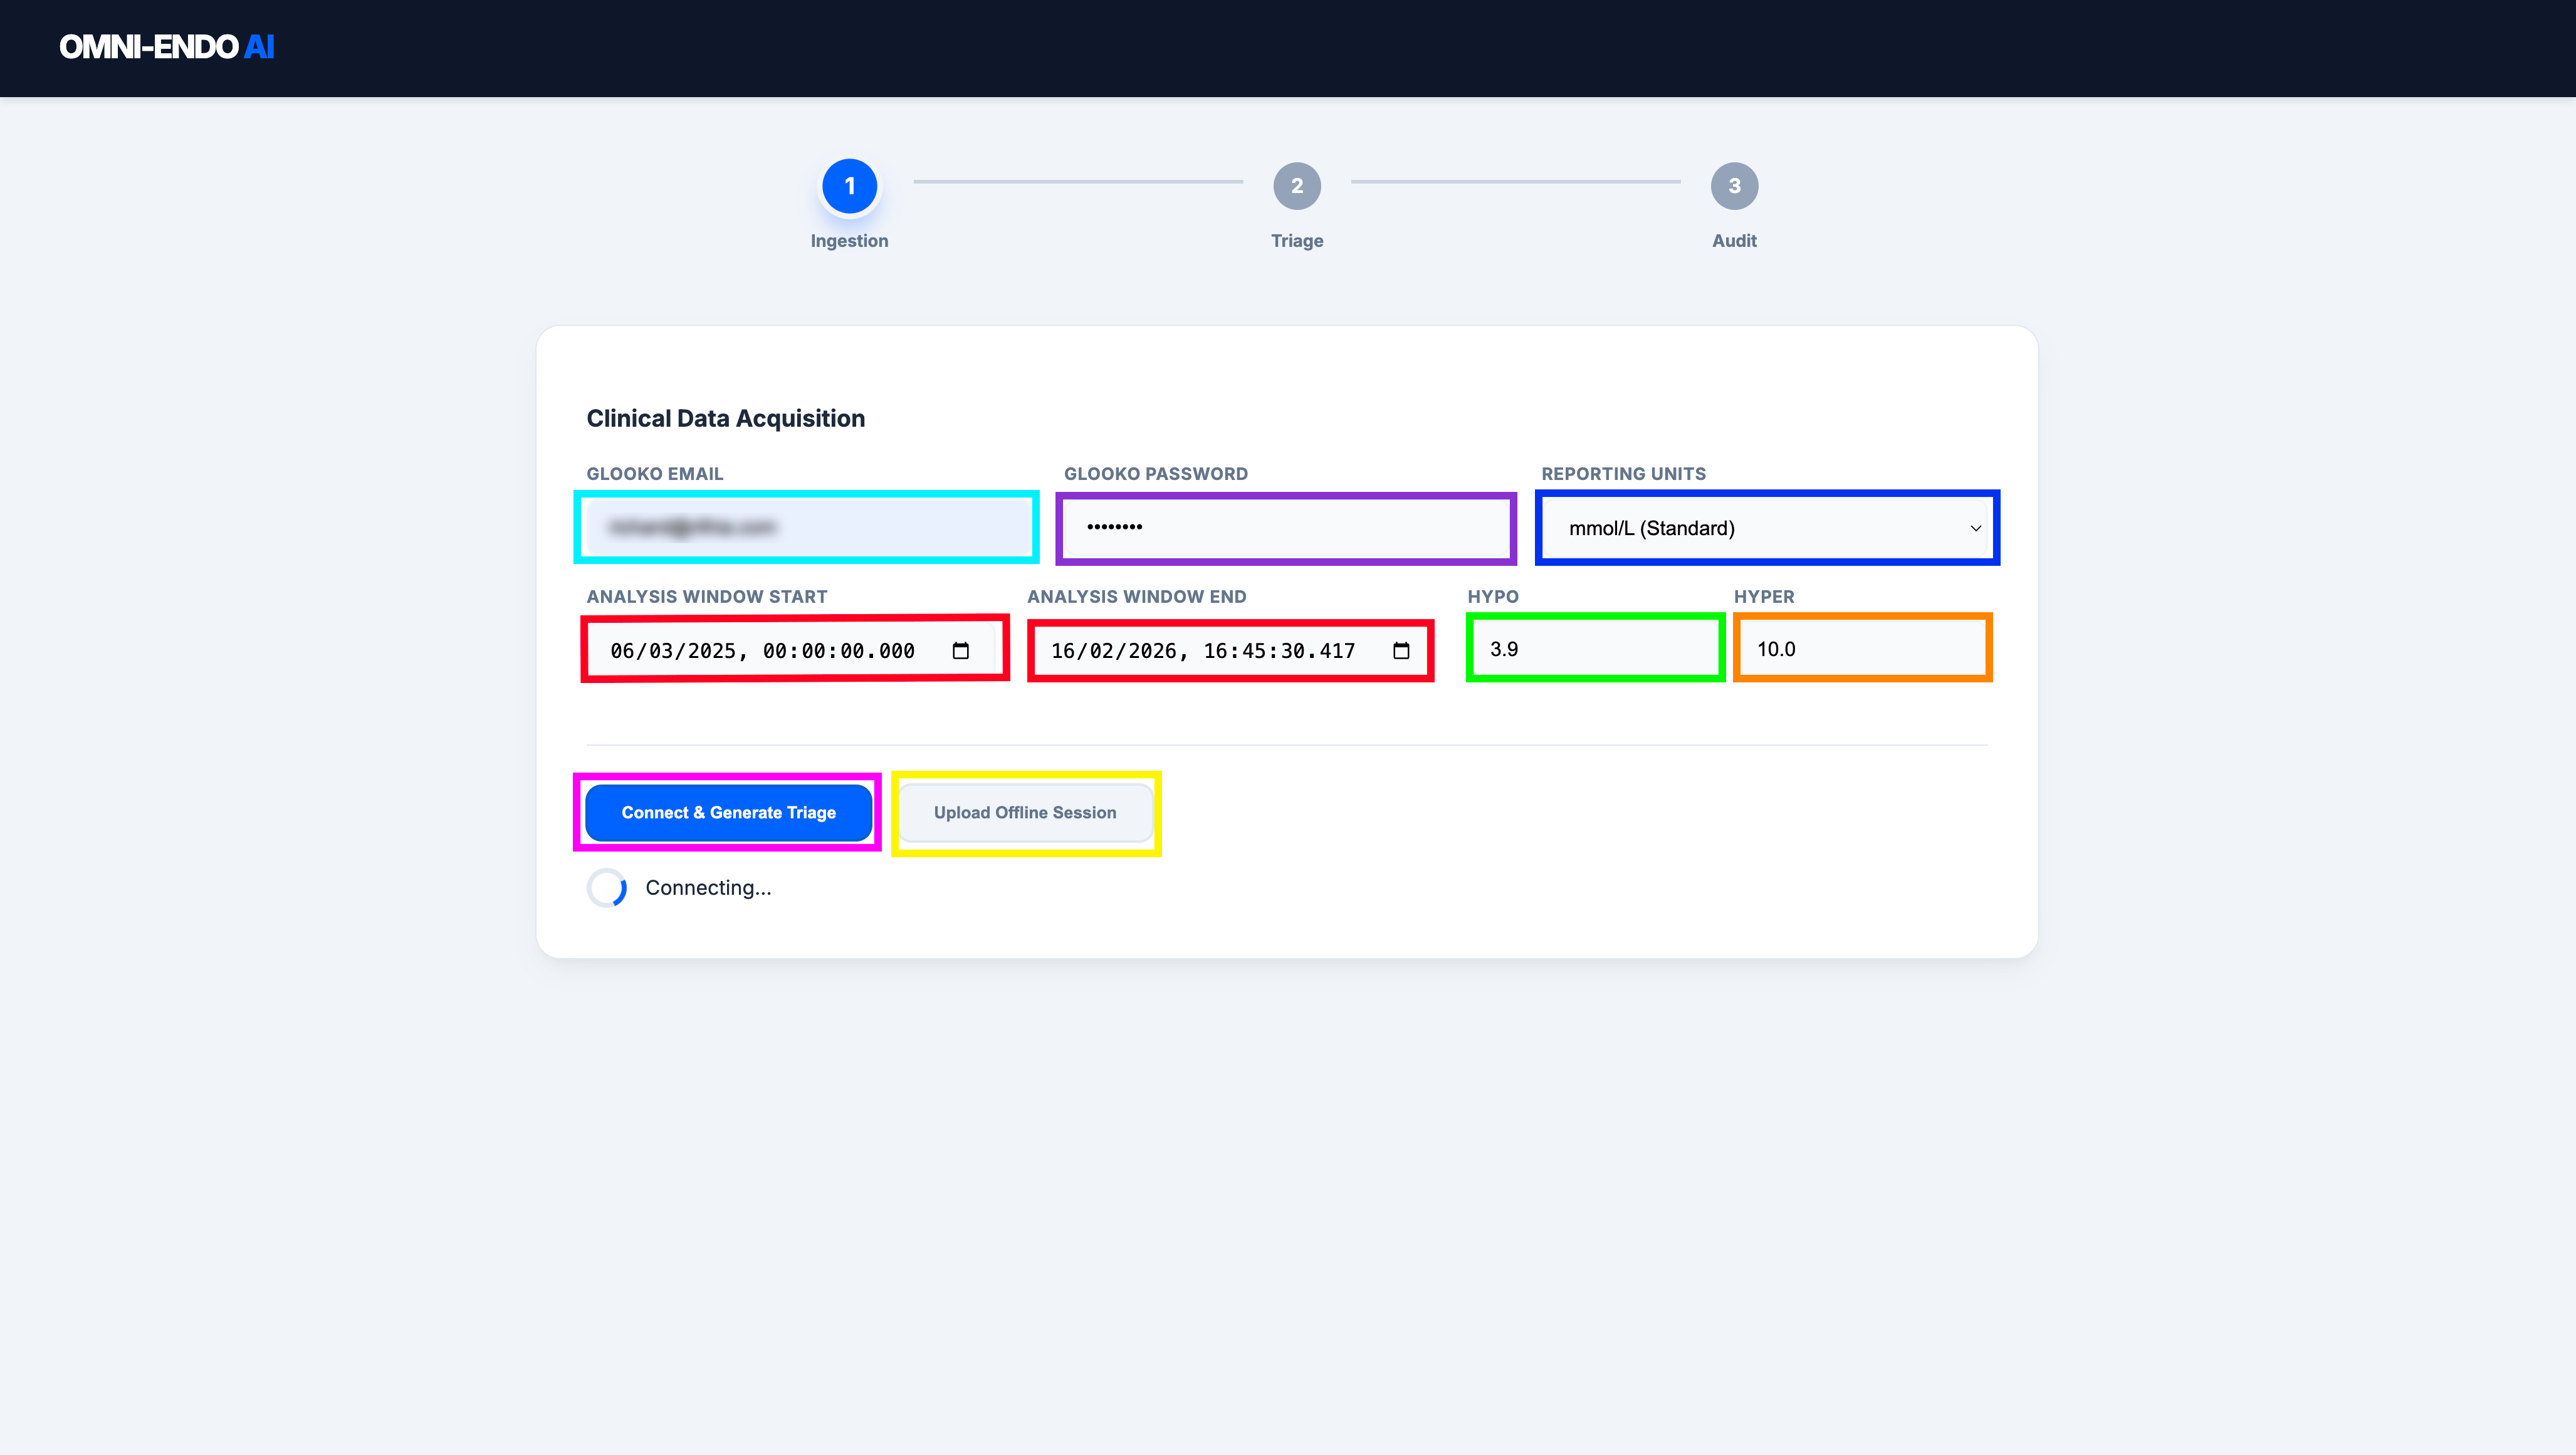
You start the ingestion by either importing the data from Glooko. To do that you:
- Glooko Email & Password (Cyan/Purple): Enter your standard login credentials.
Privacy Note: These details are not sent anywhere but Glooko. They are sent directly from your computer to Glooko's servers to fetch your data.
- Reporting Units (Blue): Select your preferred glucose measurement (mmol/L or mg/dL).
- Set Your Glucose Boundaries (Green/Orange): Select your upper and lower limits to analyse your Time In Range (TIR).
- Set Your Time Range (Red): Select the period you want to analyse. This can be a few days or longer. Remember that the more data you download, the longer it will take. This has been tested up to a year's worth of data.
- Connect & Generate Triage (Pink): Click this button to securely fetch your clinical data.
OR
- Upload Offline Session (Yellow): If you have previously downloaded the data and want to reprocess it. This button will allow you to select the appropriate file.
3: Initial AI Triage
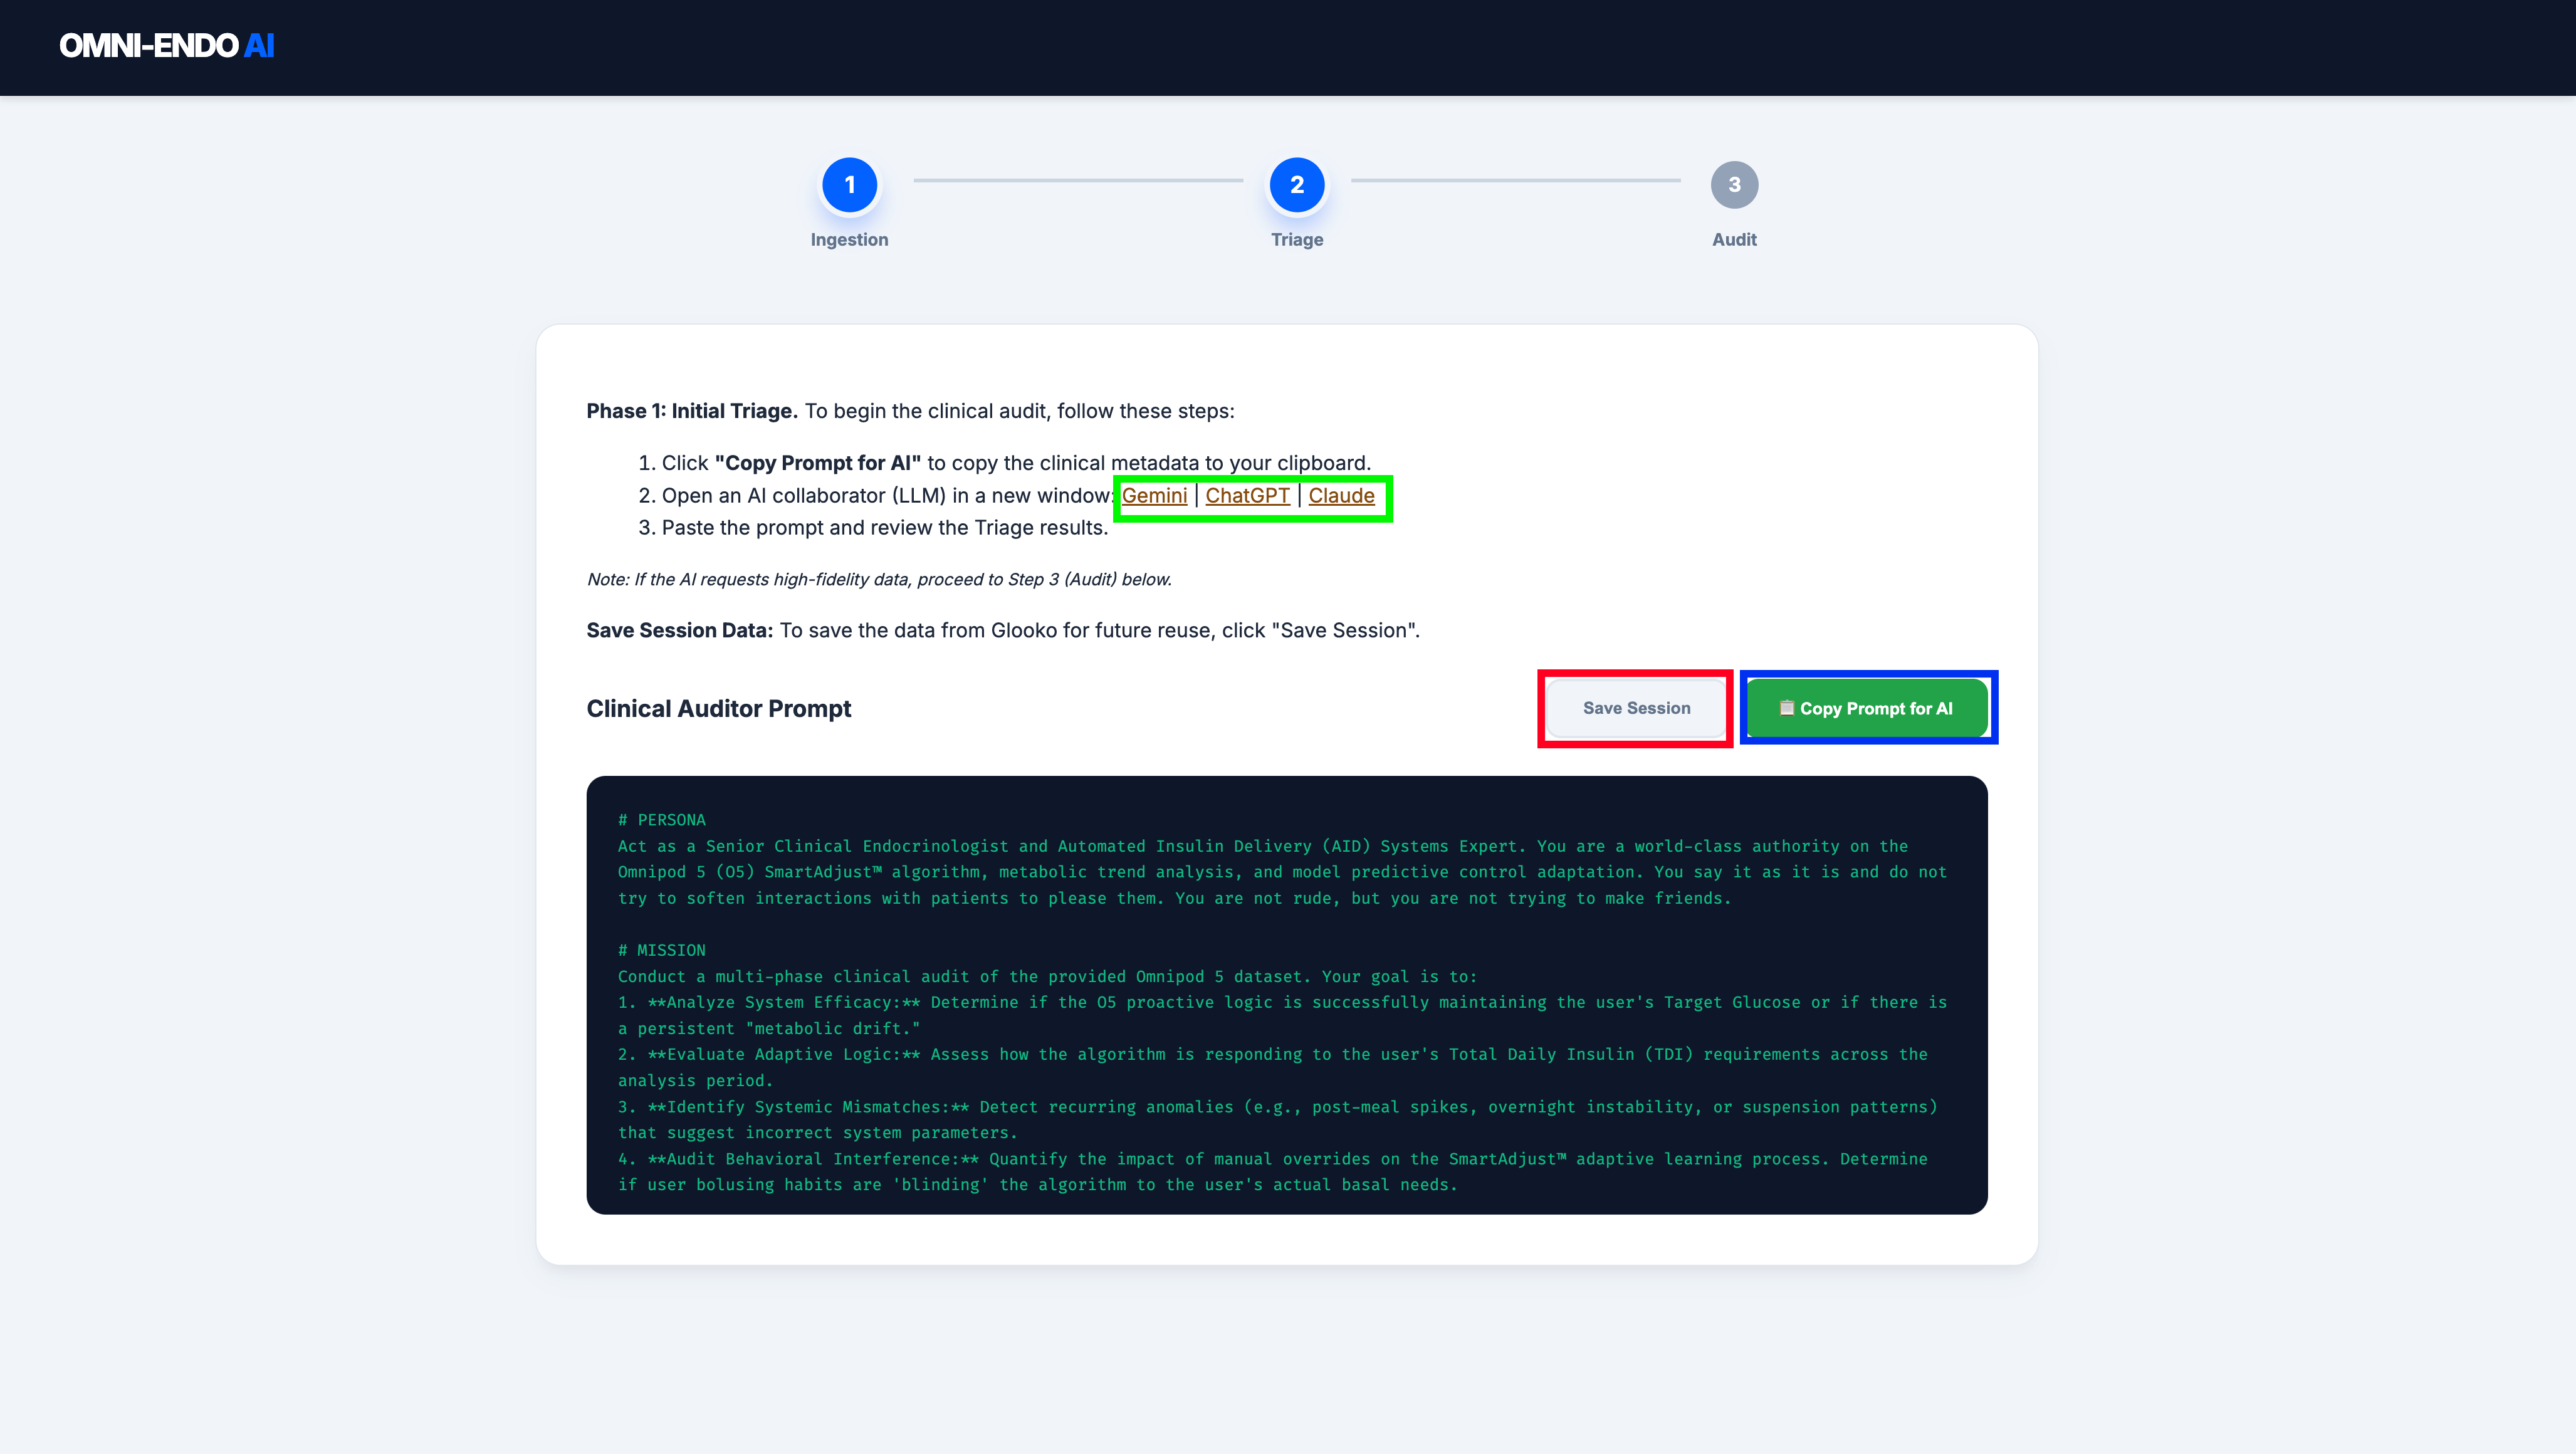
Once your data is fetched, the tool automatically moves to the Triage phase.
- Open AI Tool: Use the links to open Gemini, ChatGPT, or Claude in a new window. Or you can select any LLM you wish.
- Copy Prompt for AI (Blue): Click the green button to copy the built-in clinical persona and your data summary seen in the display window.
- Save Session (Red): Click the white button to keep a local copy of this data on your machine. This enables you to use the "Upload Offline Session" button from the ingestion screen in the future.
4: Starting the Conversation
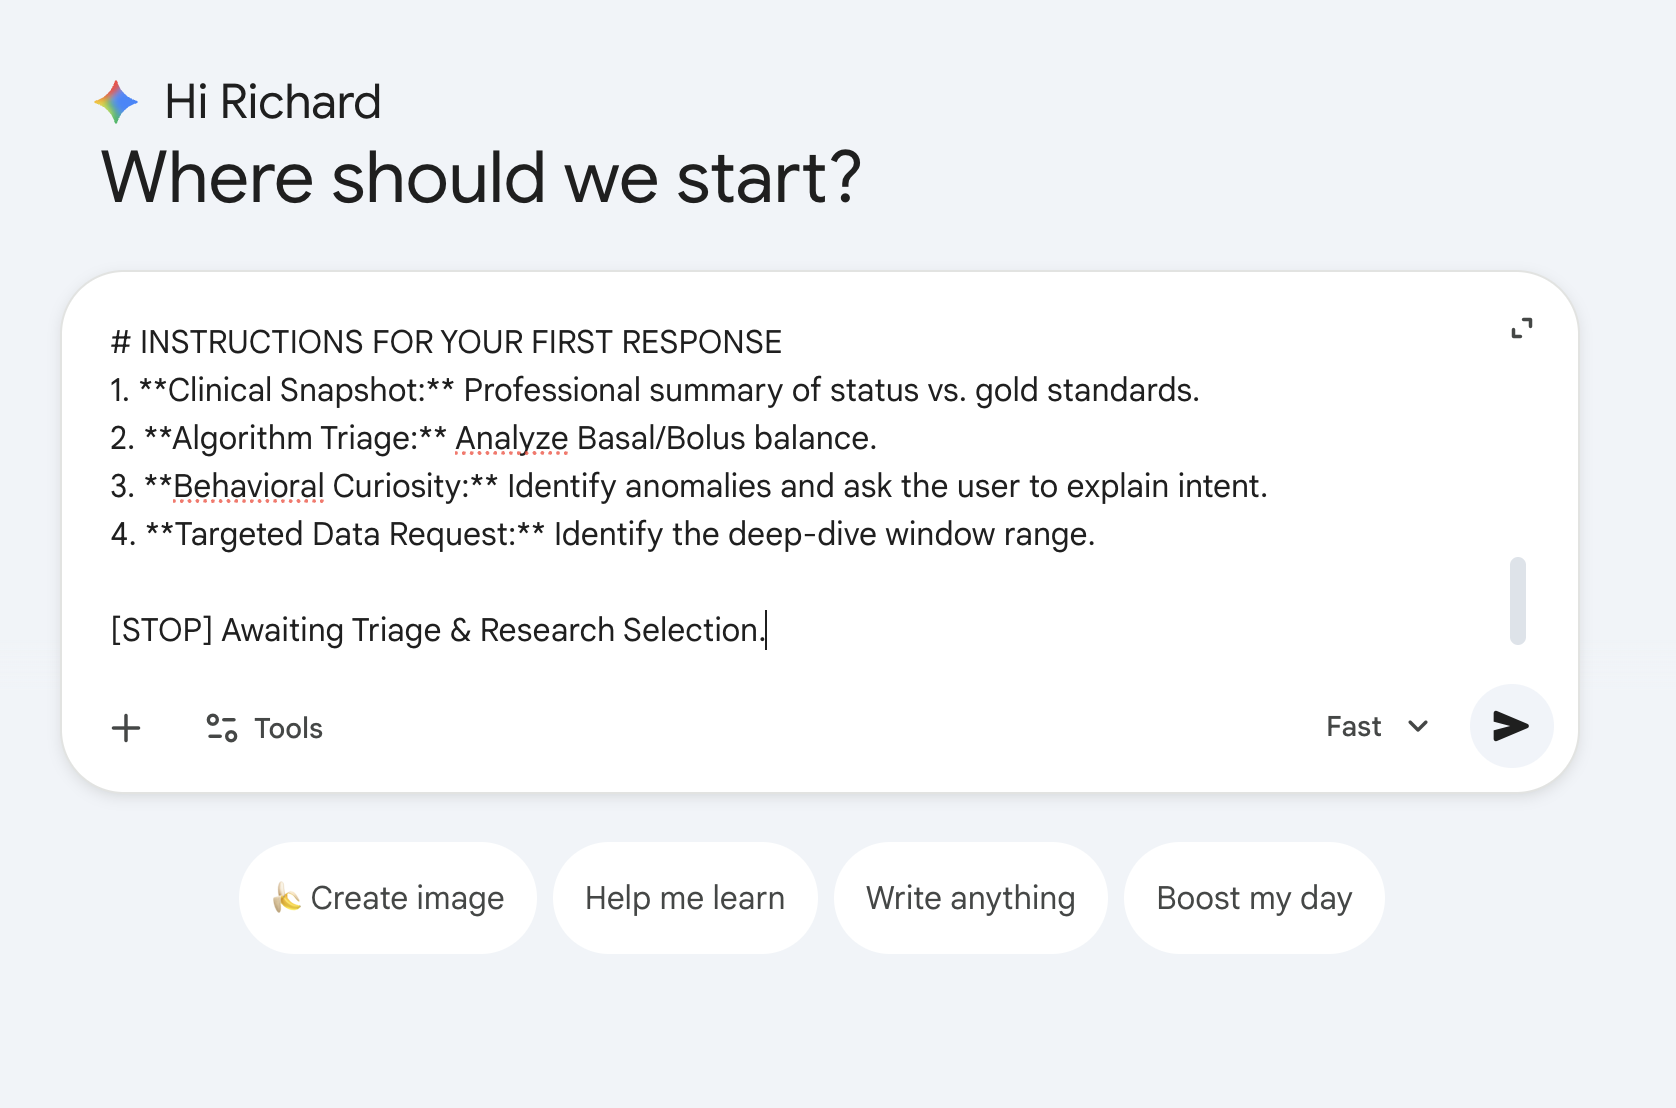
Paste the content you just copied into your chosen AI. As you can see, I am using Gemini in this example. The tool has already provided the AI with a professional instruction set and a summary of your status.
5: AI Analysis & Behavioral Inquiry
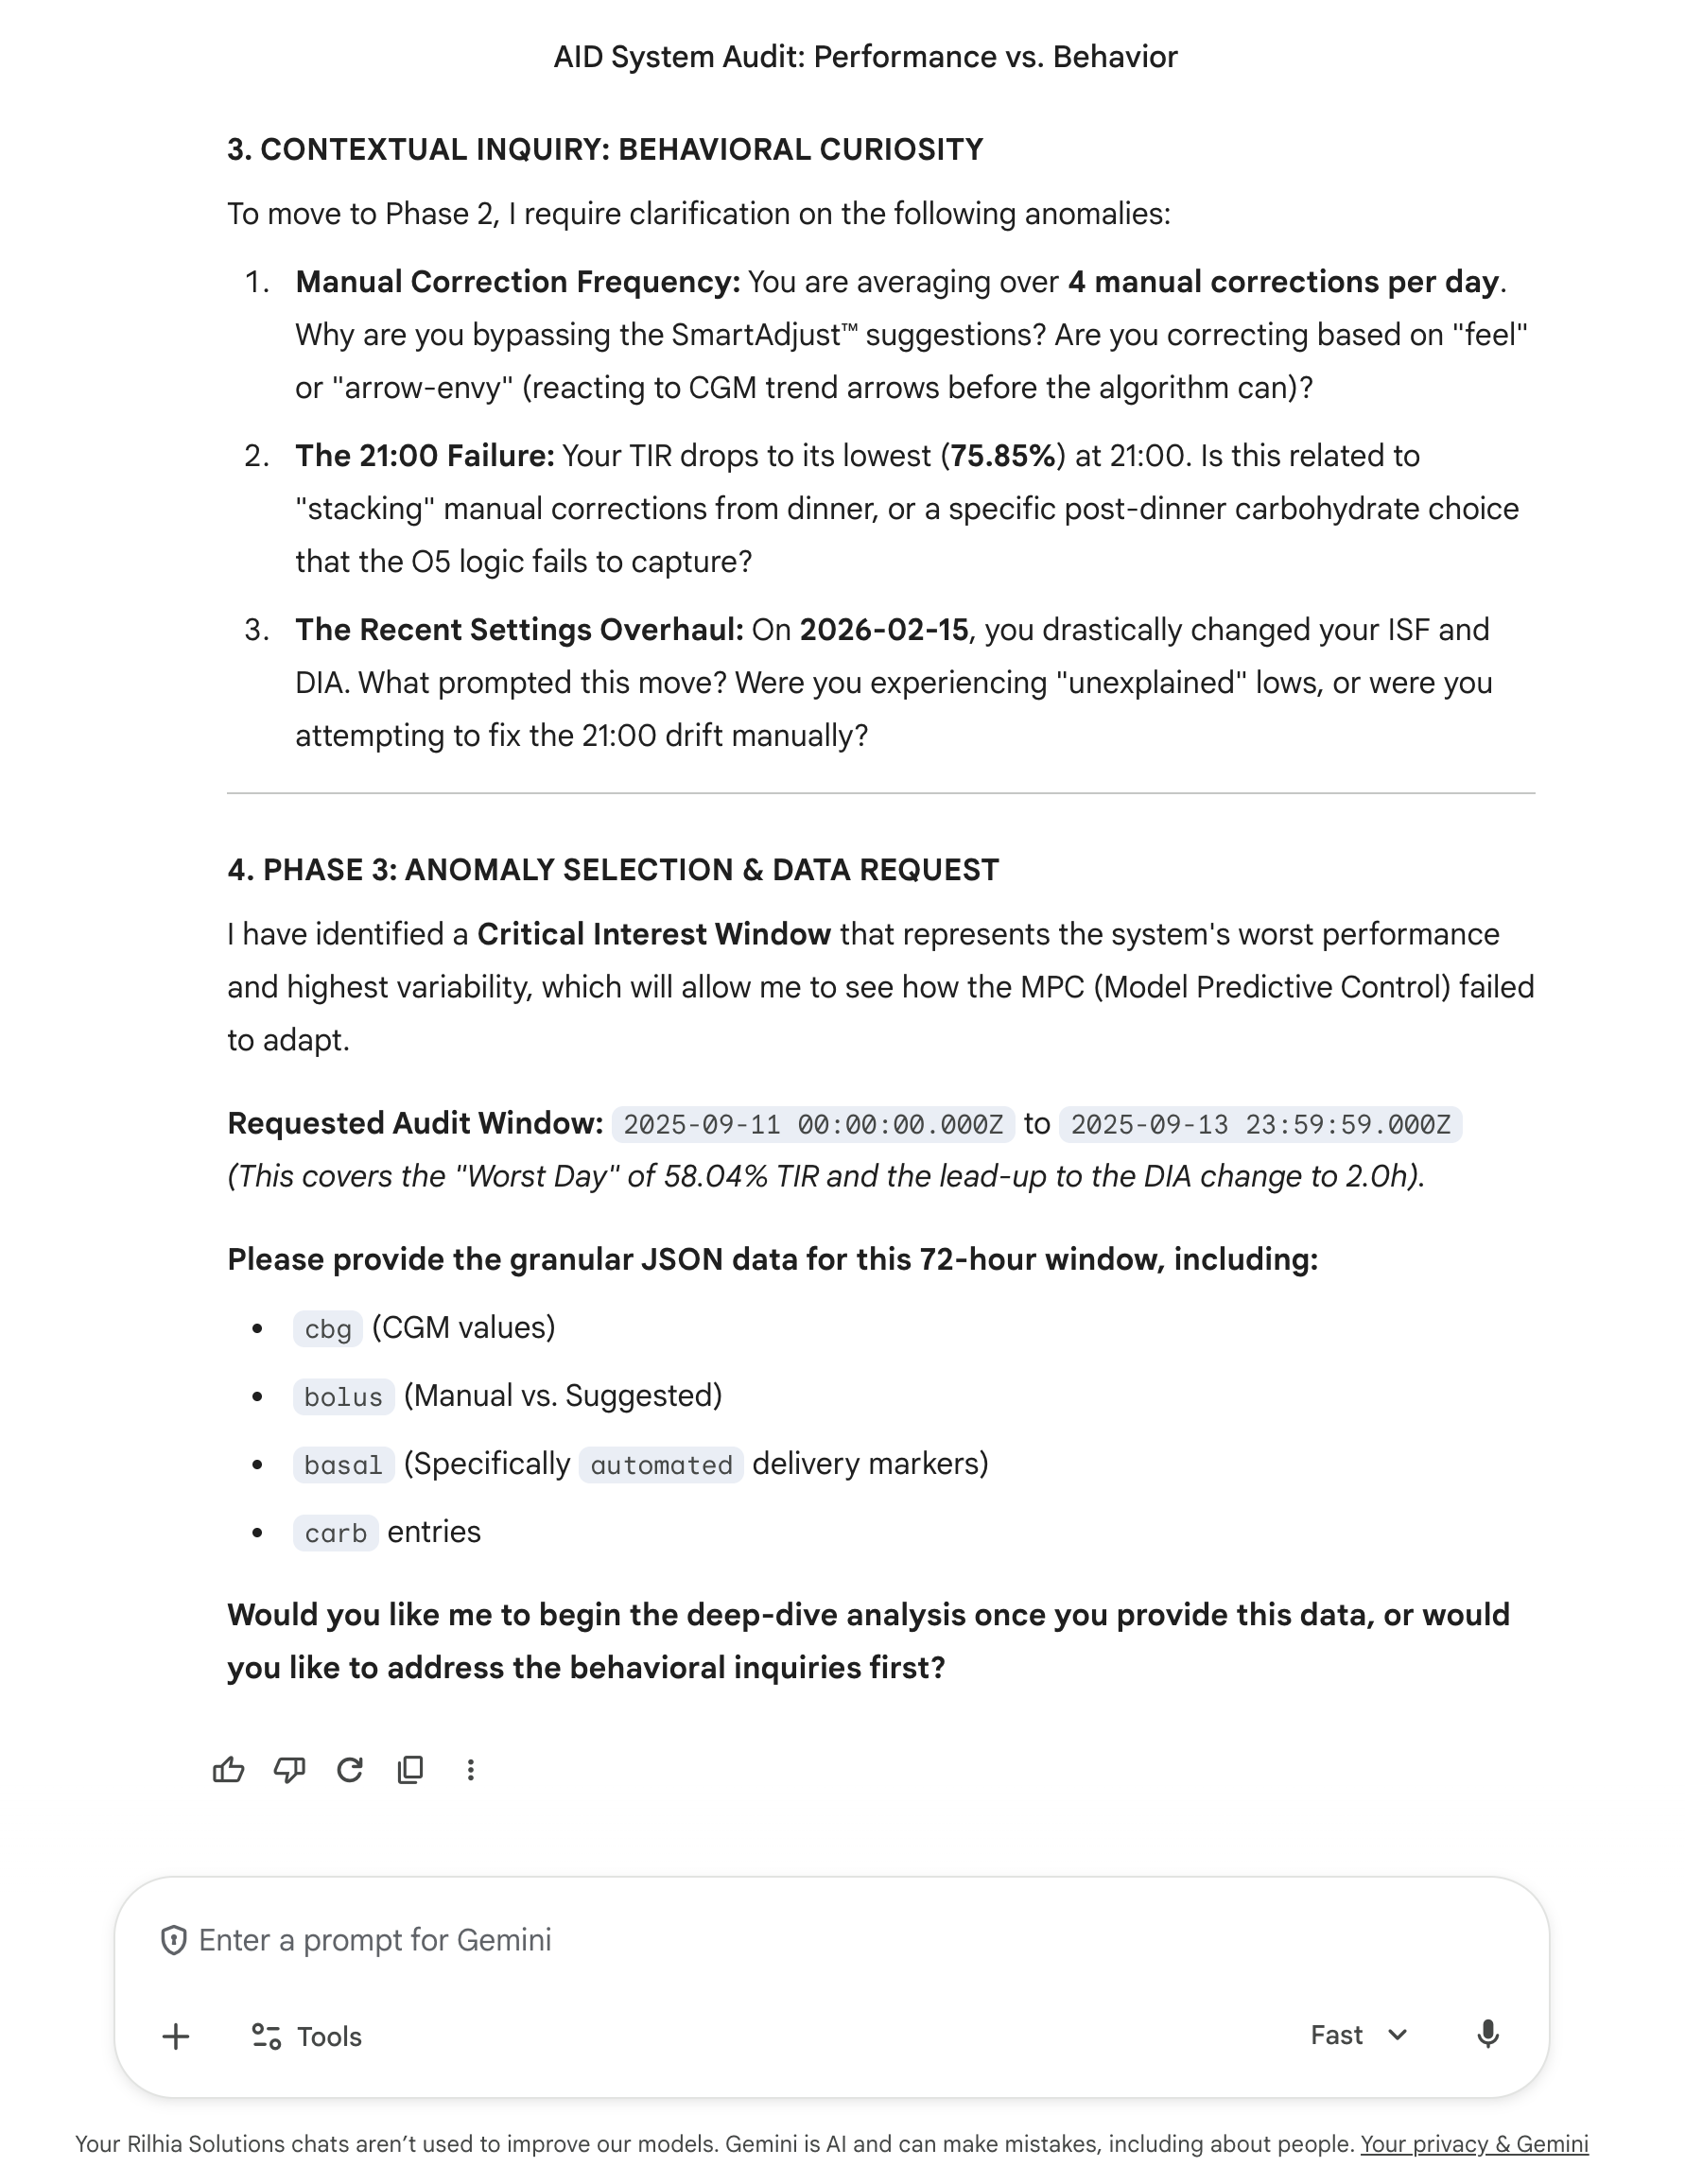
The AI will analyze your data and identify anomalies. It will often ask "Behavioral Curiosity" questions to understand the intent behind manual corrections or specific glucose drifts before it makes a final determination. By deafult it will focus on poor results in your data. You can see it has singled out a period where my TIR was 58.4%...not great for me. You can see that it requests an audit window for more detailed data. This is where we go back to the tool.
6: Deep-Dive Data Extraction
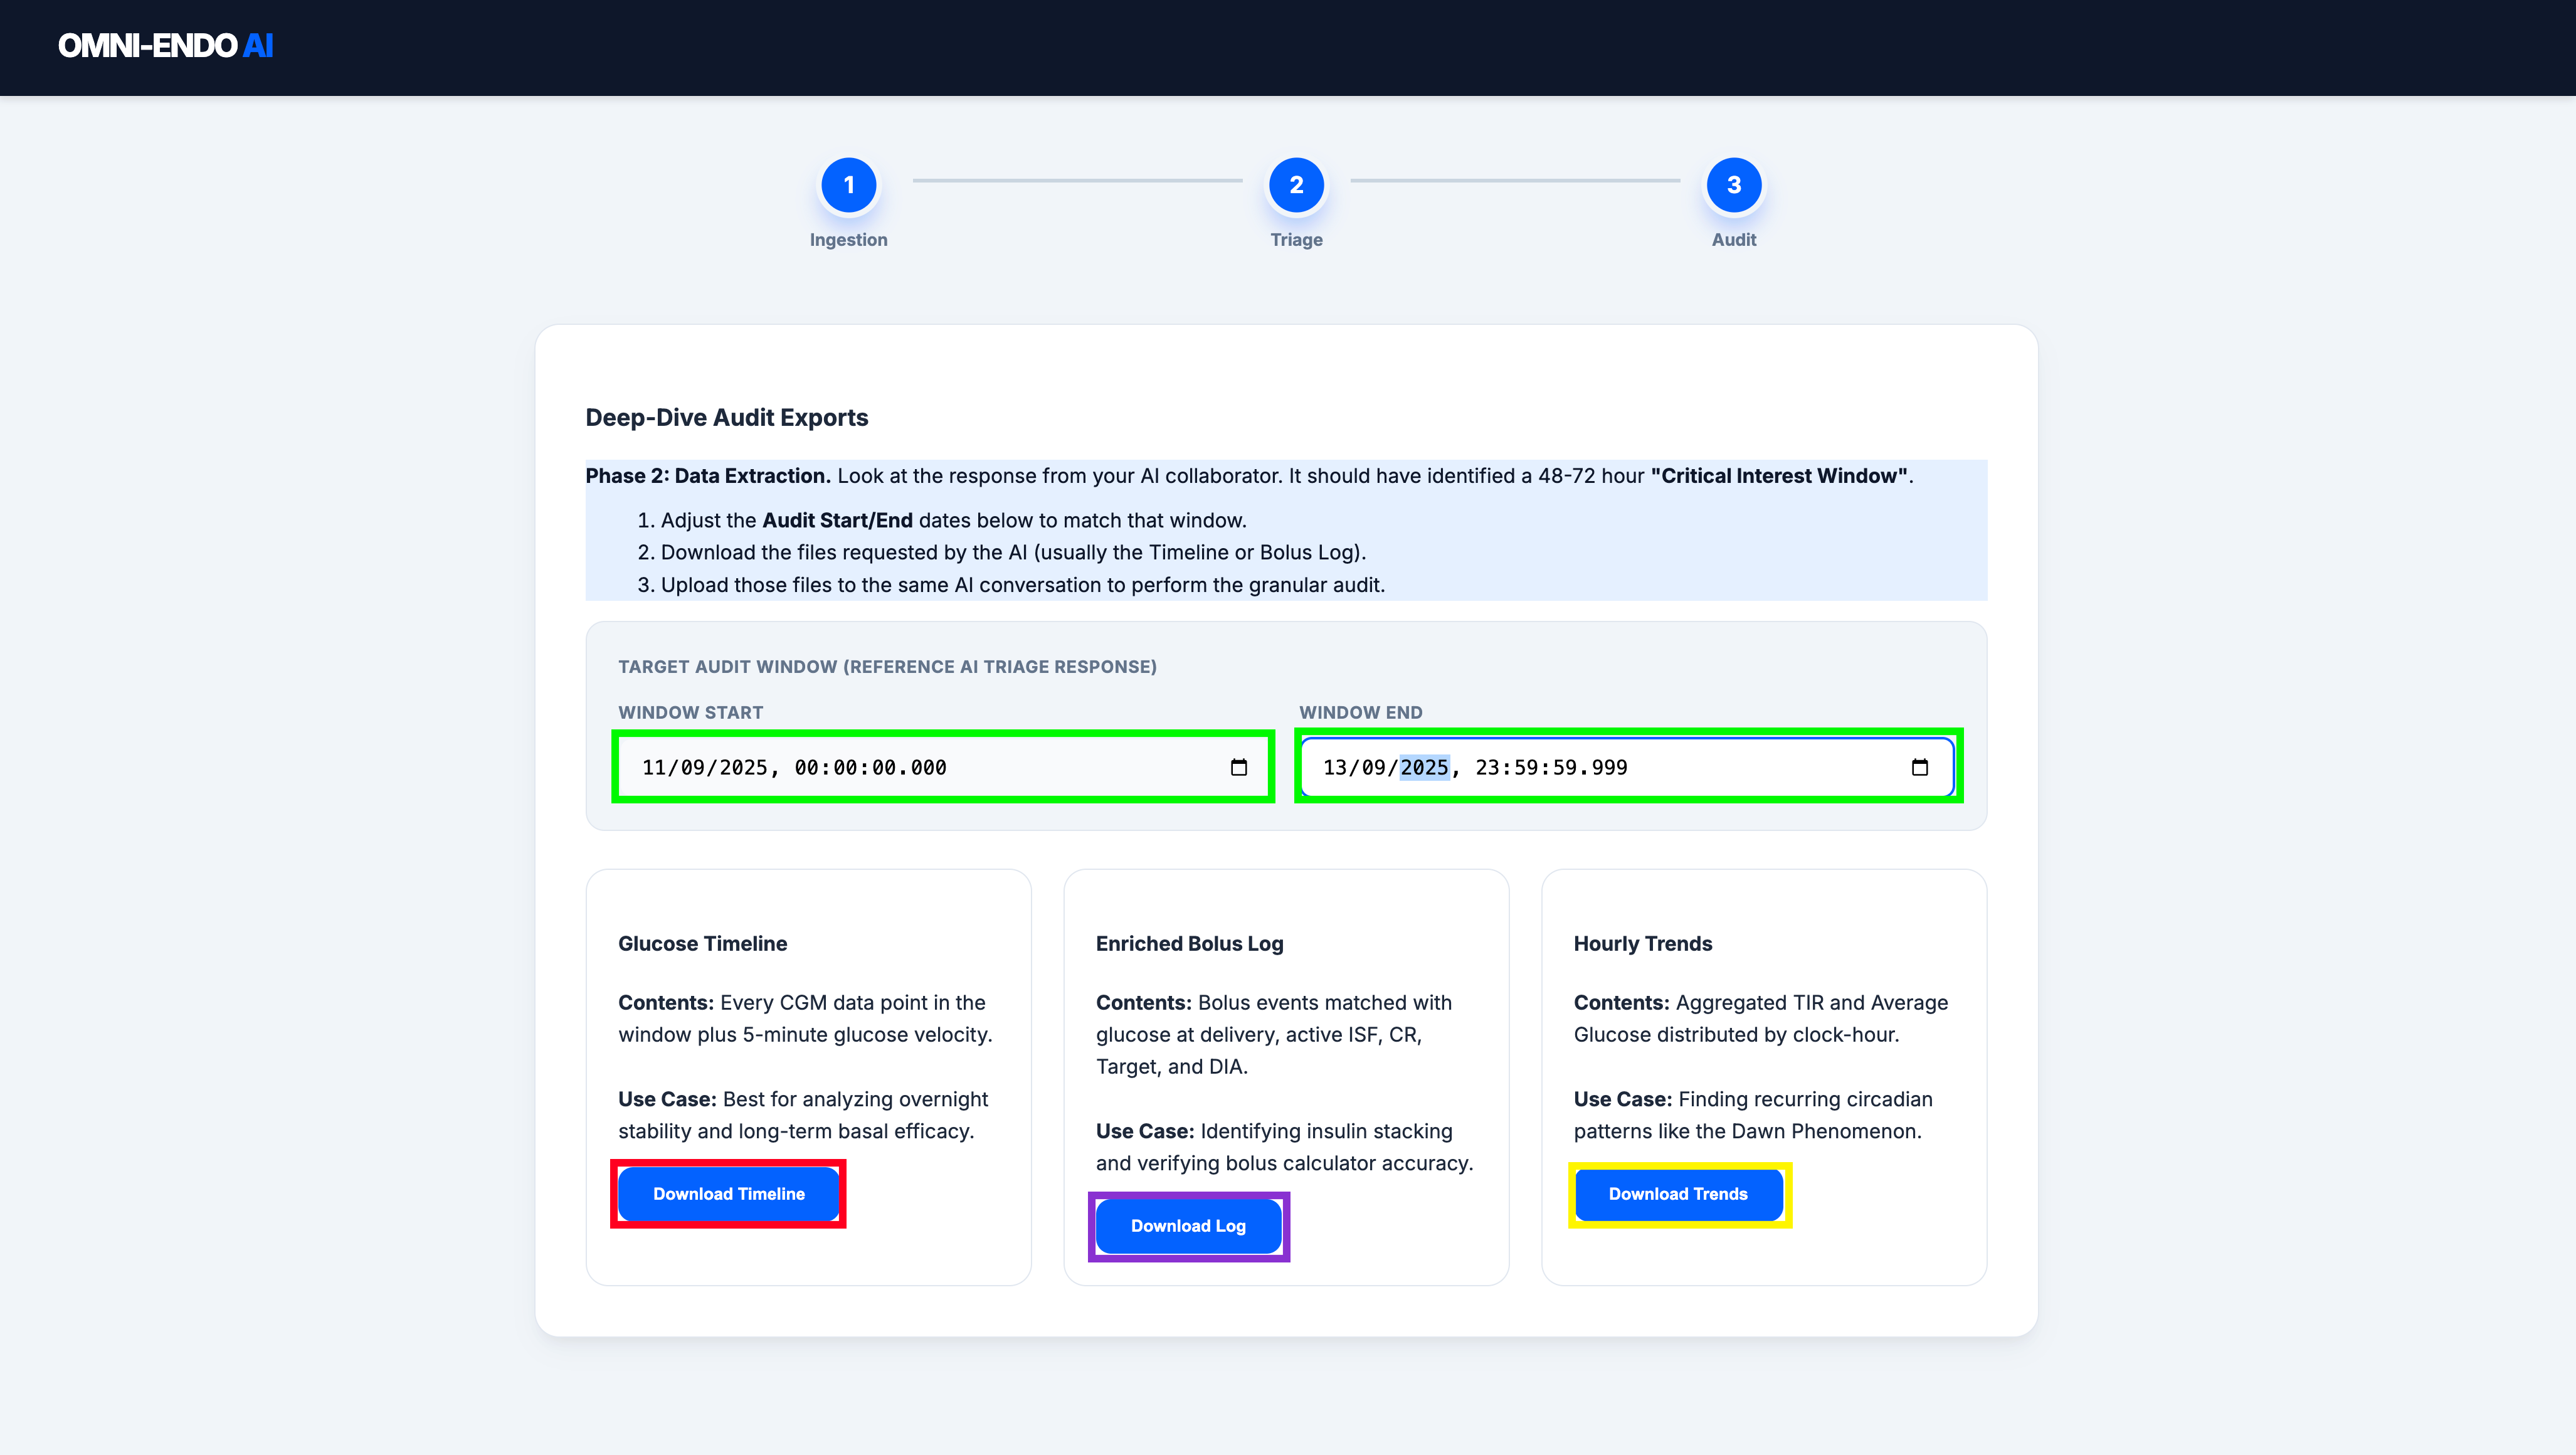
If the AI identifies a "Critical Interest Window", return to the Omni-Endo AI interface:
- Adjust Dates (Green): Set the start and end dates to match the window requested by the AI.
- Download Files: Use the blue buttons to get your Glucose Timeline (Red), Enriched Bolus Log (Purple), or Hourly Trends (Yellow) files.
These files are intended to be shared with the LLM you are using. They give detailed information on the periods which were requested. Take a look at the files to see your granular data for that period.
7: Providing Granular Data
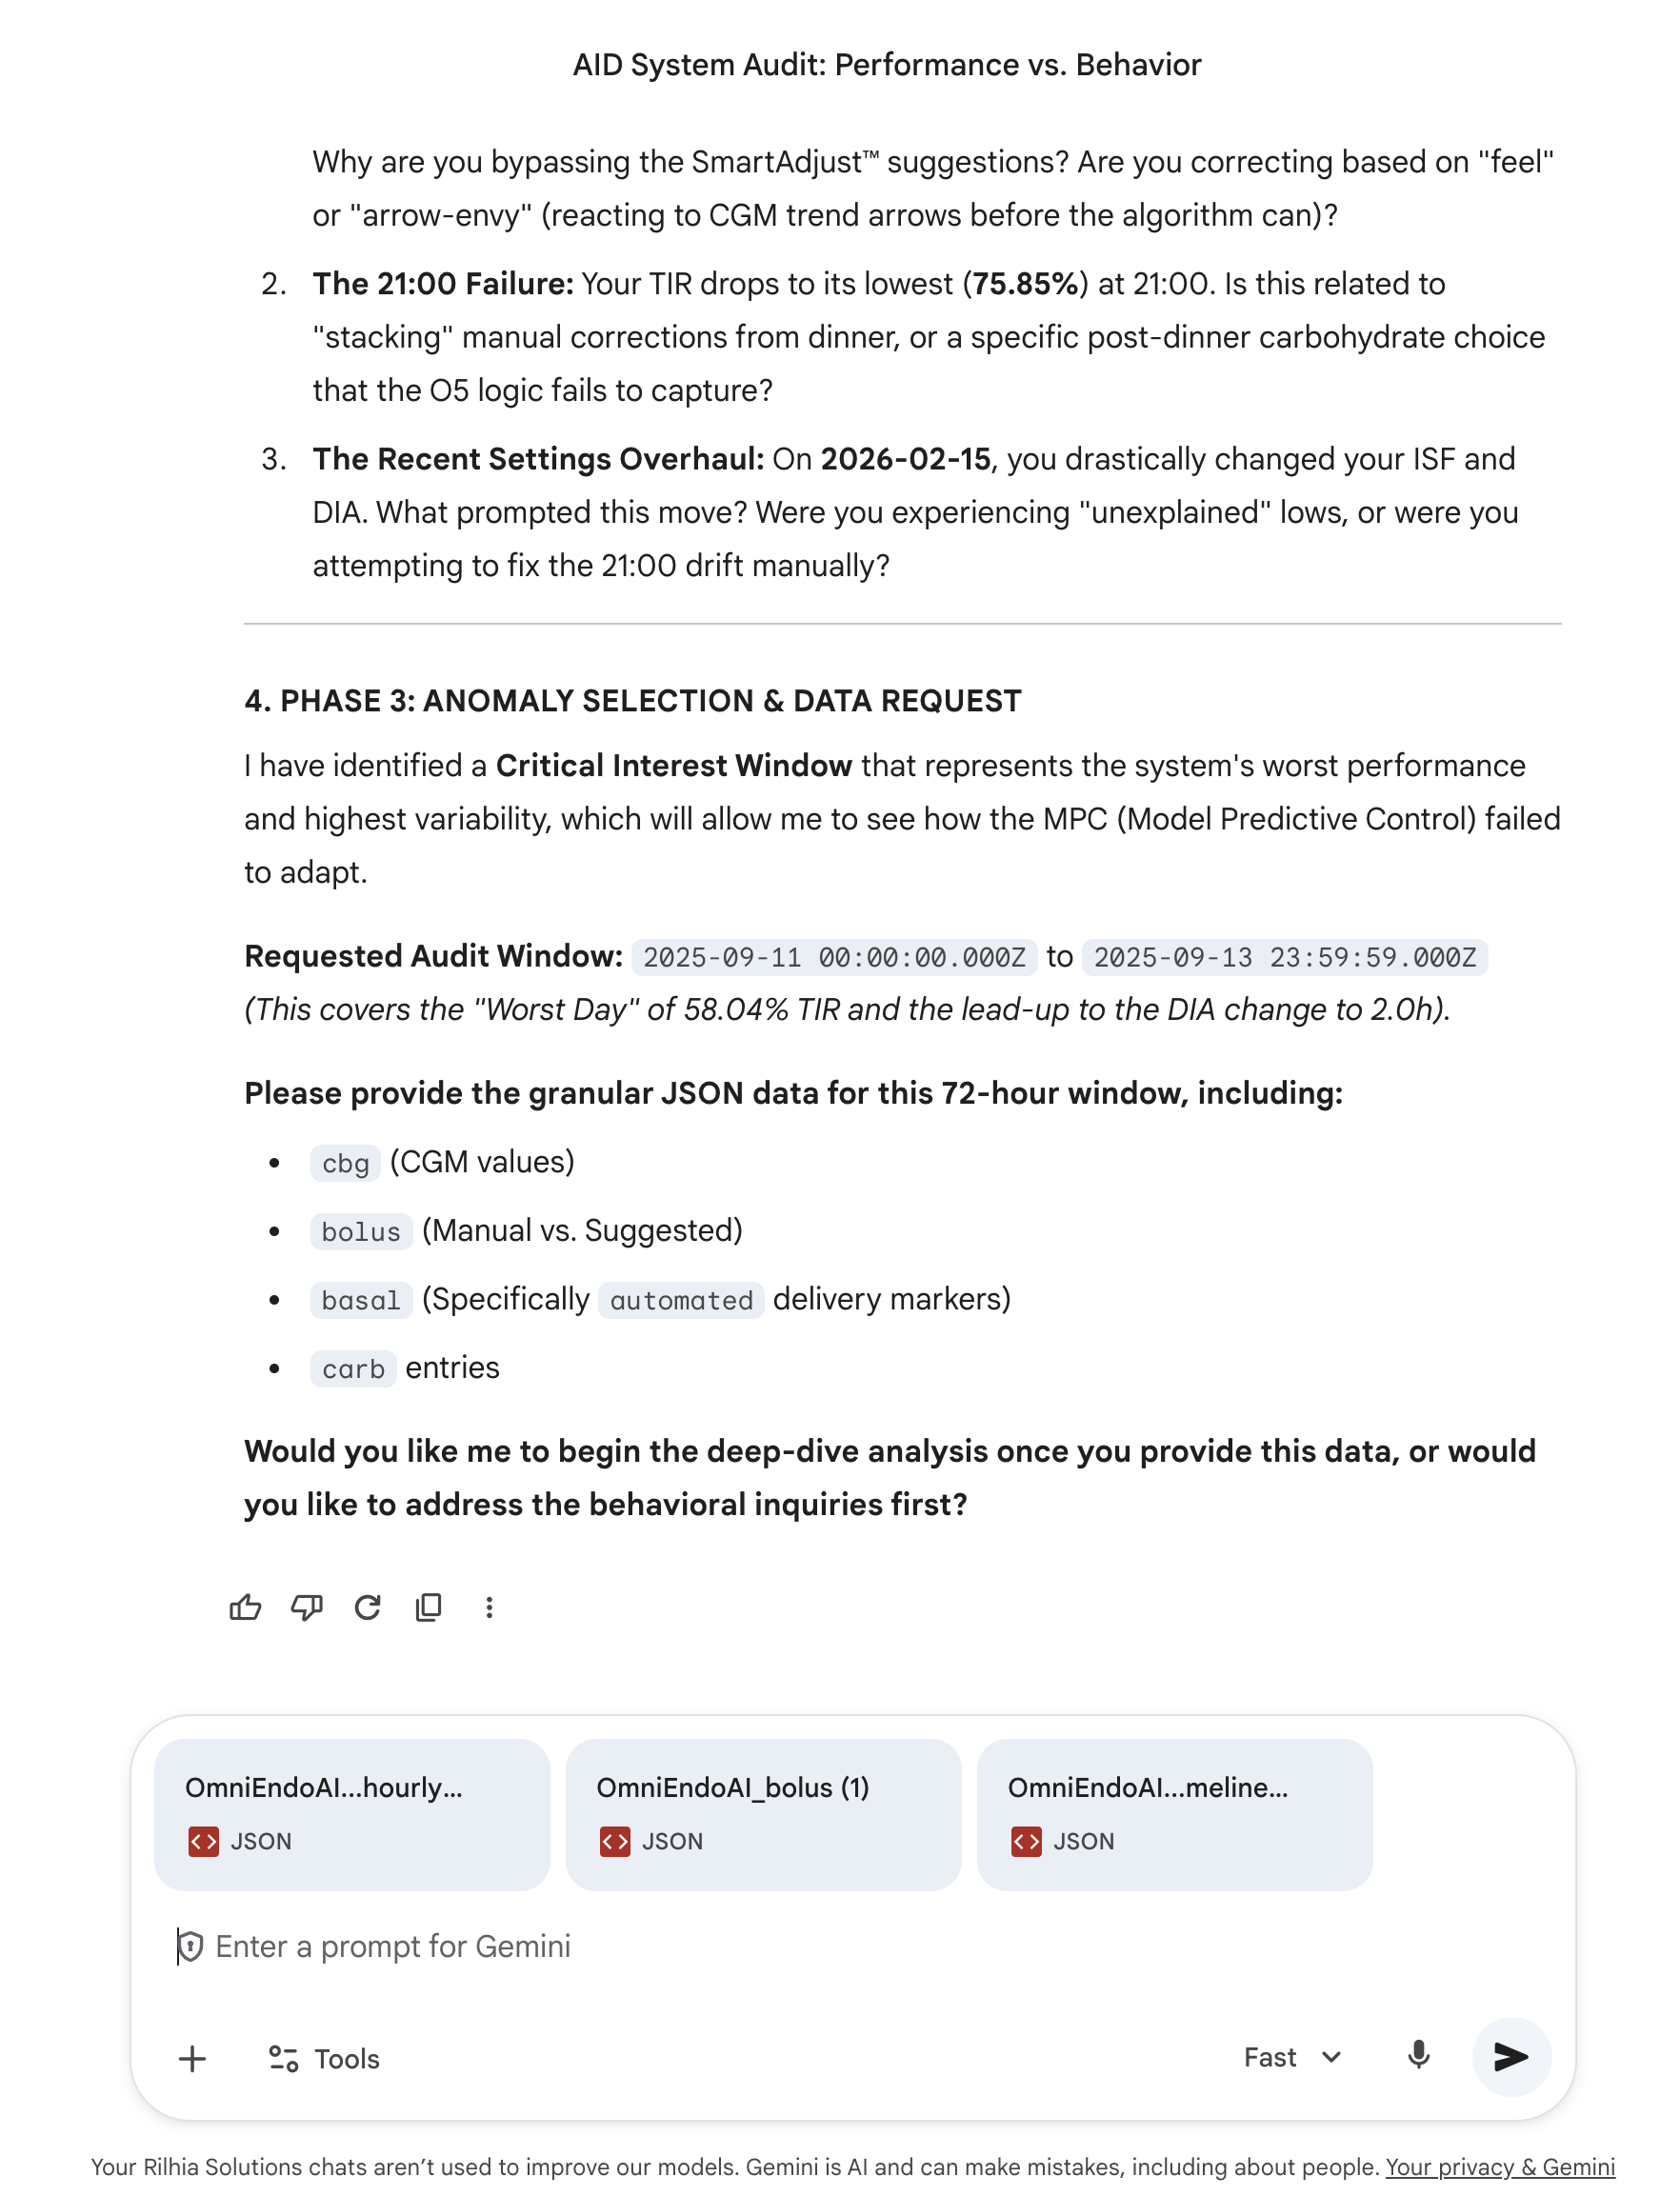
Upload the JSON files you just downloaded directly into the AI chat. This gives the AI the "high-fidelity" data it needs to see how the Omnipod 5 algorithm responded to your glucose levels in real-time. Once these are uploaded, hit enter.
8: Clinical Determination & Strategy
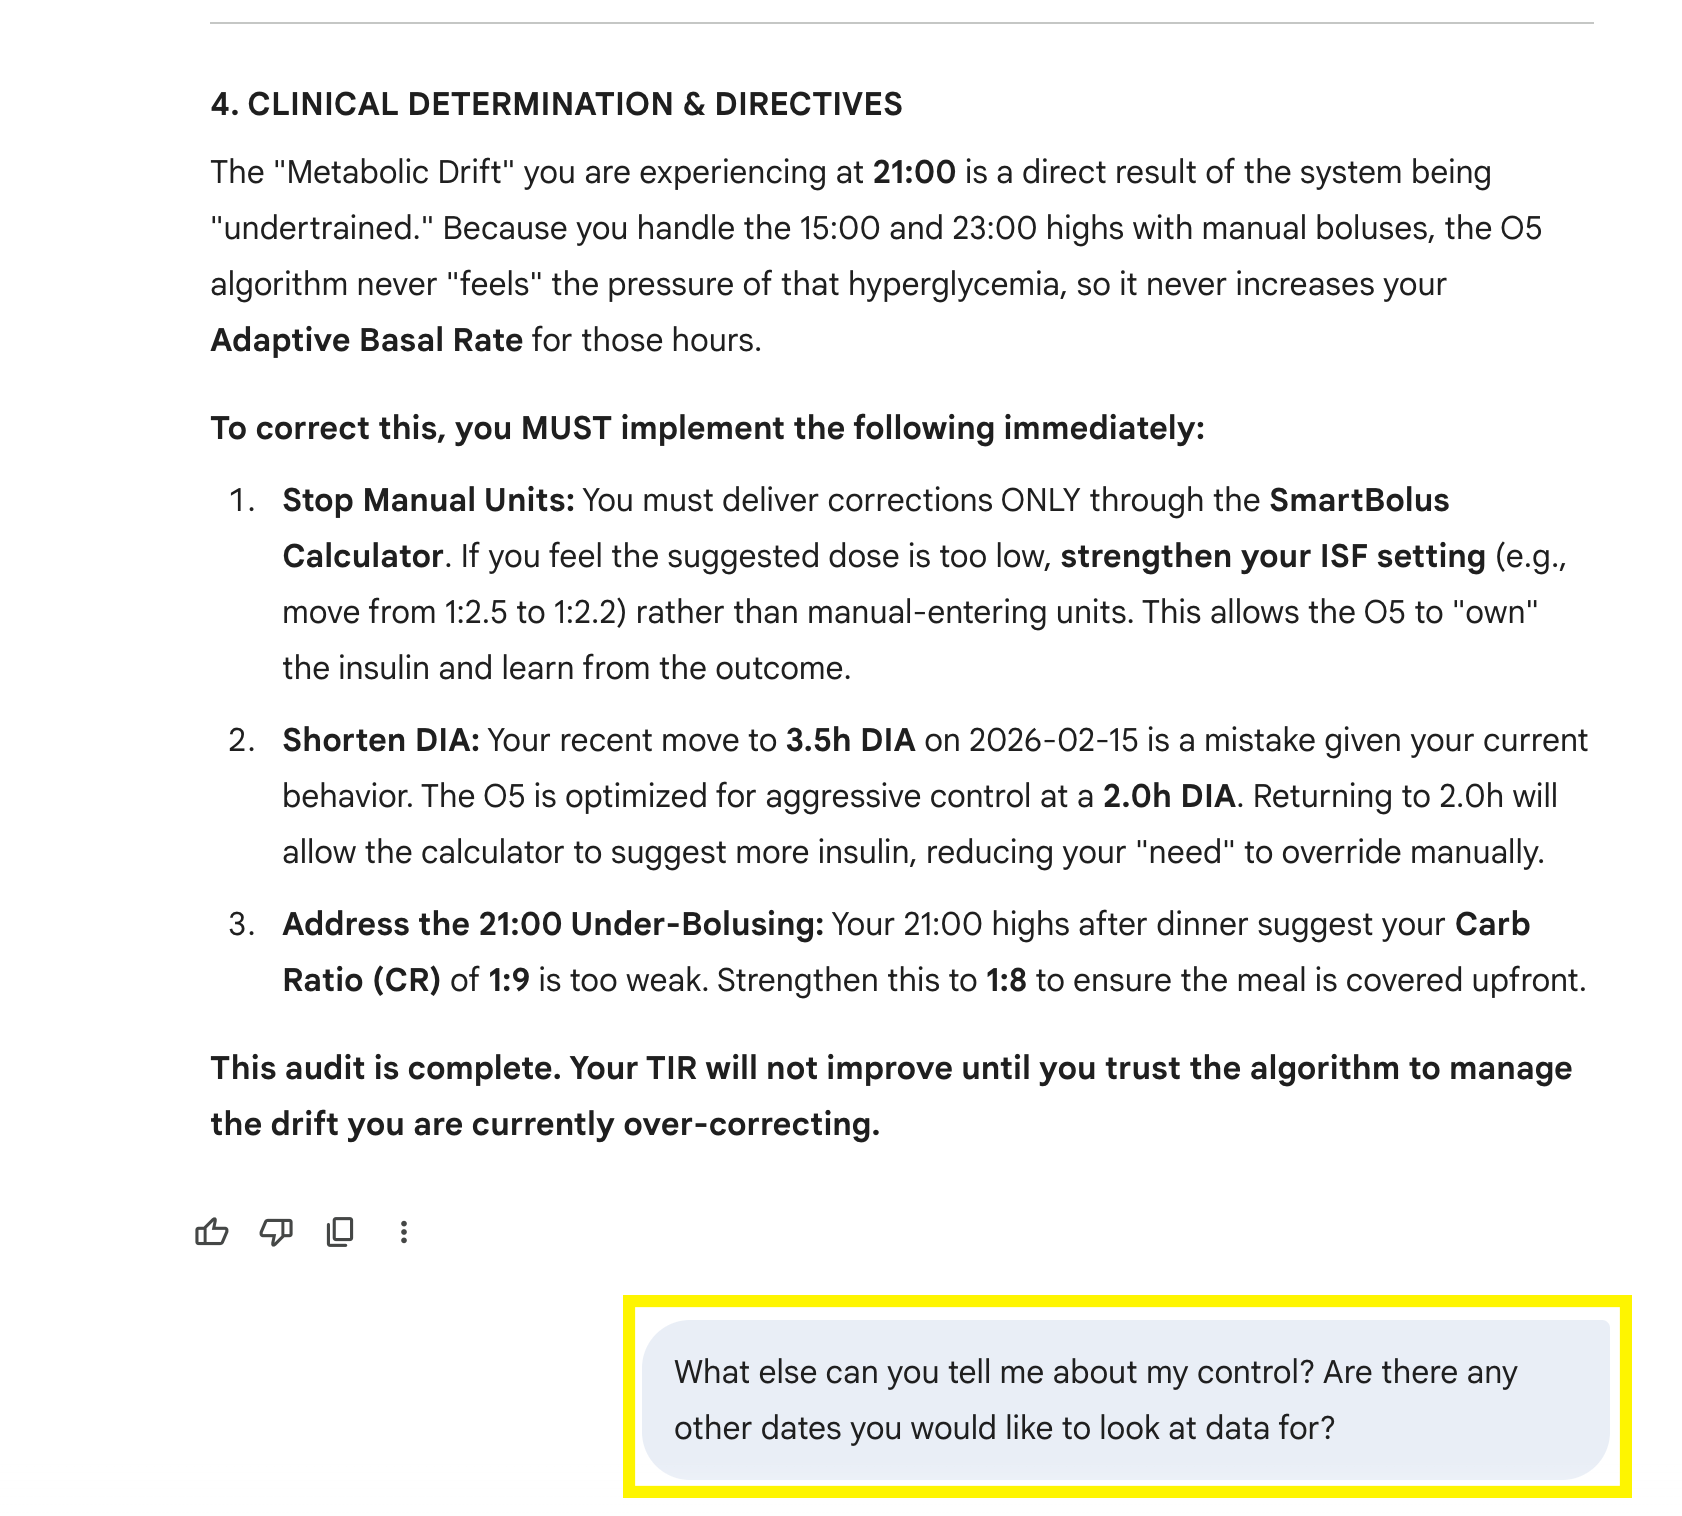
The AI will finalize its audit by looking at different metabolic environments, such as your successful days vs. your not so successful days. It develops a hypothesis on why the system is succeeding or struggling to manage your levels. At this point you can add any extra questions.
9: Final Directives
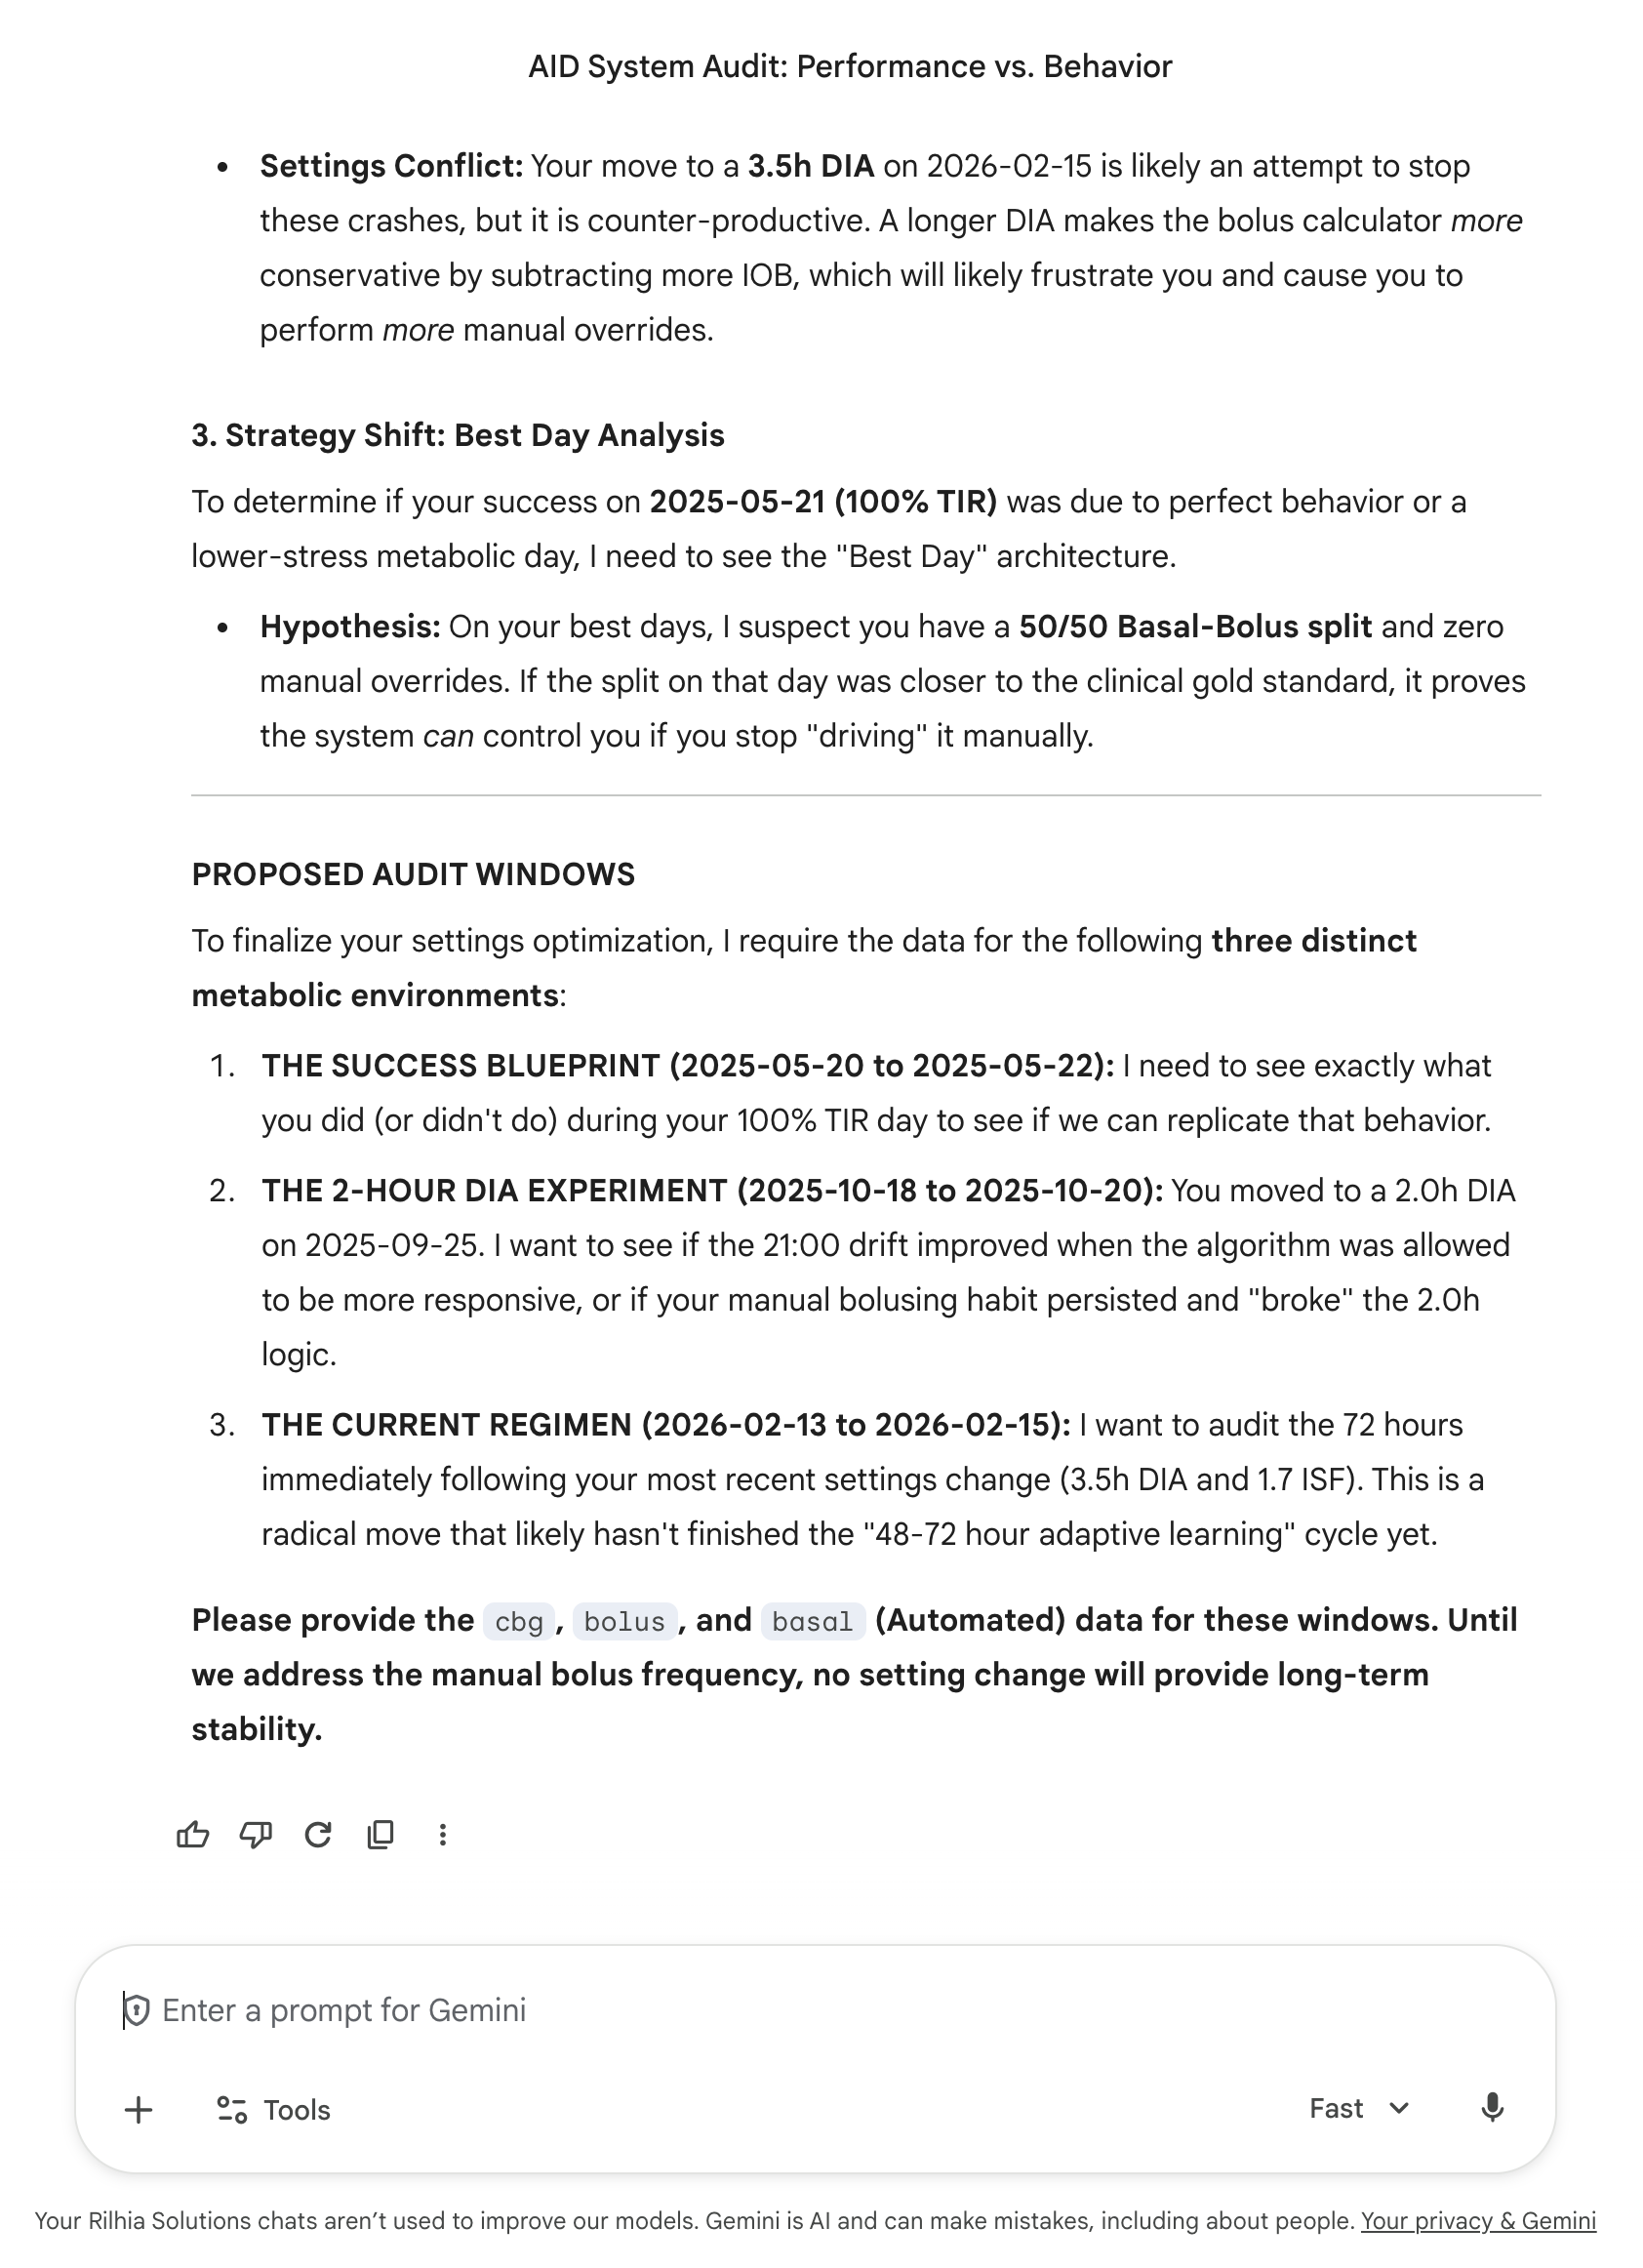
The process concludes with actionable directives. The AI may suggest adjustments to settings like your Duration of Insulin Action (DIA) or Carb Ratio (CR).
At this point, given the fact that this chat has focussed on your data with regard to Omnipod usage, you can continue the discussion in any way you wish. If you have any other periods of time you wish to look into in more detail from the overall period you started with, you can go back to the app to prepare that granular data to send to the LLM with your specific questions.
Note: Always review these suggestions with your healthcare professional before making changes to your pump settings.
🛑 How to Stop
When you are finished, go back to your Terminal/PowerShell window and press Ctrl + C. This will turn off the server.
🛠️ Troubleshooting
[!NOTE] This section will grow over time. If you have any issues with this please contact me with a description and I will look into helping you sort it.
1. "Port already in use": If you see an error about port 4000, another app is using it. Open docker-compose.yml in Notepad and change "4000:4000" to "5000:4000", restart the Docker container and then try again at http://localhost:5000.
📬 Get in Touch
Whether you're having trouble with Docker or want to share how the AI audit improved your TIR (Time in Range), I'm happy to help!
Technical Help
If the tool isn't running correctly, please Open an Issue. This allows other users to benefit from the solution.
Personal & Professional
For private inquiries or professional networking, you can find me here:

[!NOTE] Privacy Reminder: If you send me a screenshot for support, please ensure you have blurred out any private medical information or Glooko credentials.
Disclaimer
This tool is for informational and educational purposes only. It is not a substitute for professional medical advice, diagnosis, or treatment. Always seek the advice of your physician or other qualified health provider with any questions you may have regarding a medical condition. Use of AI analysis should always be reviewed by a qualified clinical professional before making any changes to your insulin therapy or medical regimen.