
Omni-Endo AI (MCP)
The first iteration of Omni-Endo AI showed me that handing Glooko data to an LLM could produce some interesting ideas and give some great insights. But it required a manual copy-and-paste handoff. This was done to avoid LLM tie-in and also to avoid API costs.
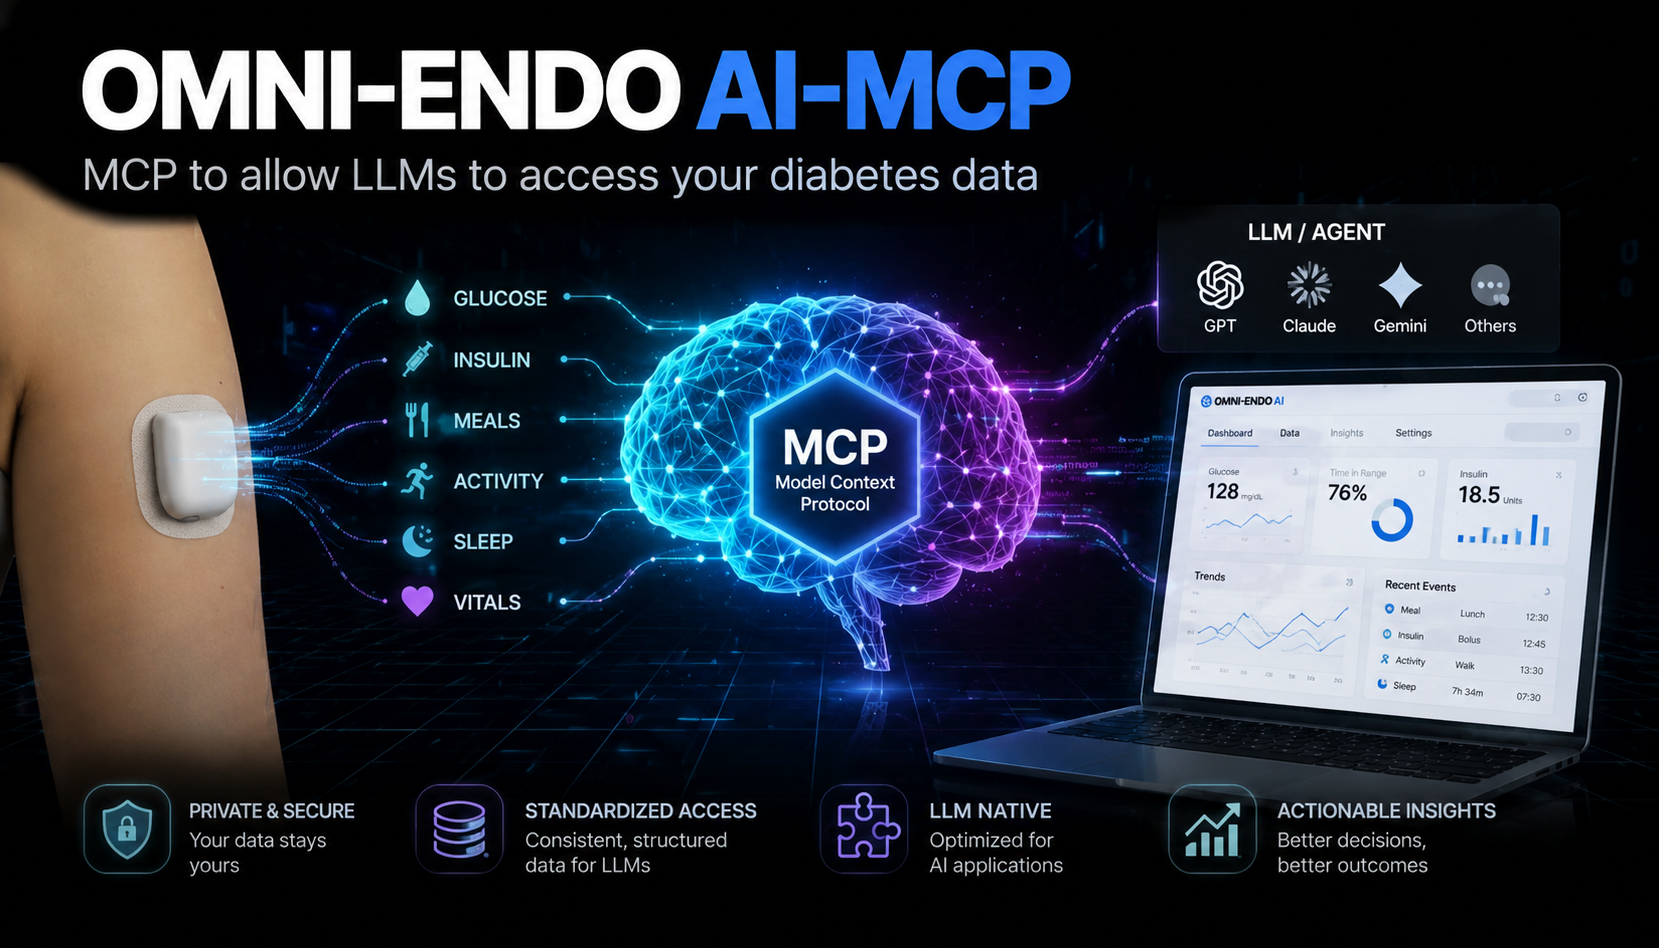
OMNI-ENDO AI (MCP)
Clinical Audit & Triage Tool: connect your diabetes data directly to an AI assistant
[!IMPORTANT] Not medical advice. This tool is for understanding your data and helping you ask better questions of your diabetes care team. It is not a medical device and must never be used to make changes to your therapy. See the full disclaimer.
[!TIP] Allergic to instructions? Let an AI do the talking. 🤖 This README is thorough, but nobody actually enjoys reading setup docs. So here's a little experiment: I've written a prompt that turns any decent AI assistant (Claude, ChatGPT, Gemini) into a personal install guide. Paste it in and it'll hold your hand through the whole thing, going as fast or as slow as you need, from "what's a terminal?" to "just give me the commands". Grab it here: the conversational install prompt. It's genuinely a bit of an experiment, and I would love to hear how it went for you, what worked, what didn't, where it got confused. Drop me a note (see Get in Touch). Your feedback makes the next person's install smoother.
📖 Table of Contents
- What is Omni-Endo AI (MCP)?
- Who This Is For
- Privacy & Security
- The "Tough Love" AI Persona
- Step 1: Getting Ready (Installing Docker)
- Step 2: Getting the Files
- Step 3: Configure Your Settings (
.env) - Ports (only if one is already in use)
- Step 4: Build and Start the Tool
- Section A: Use it with Claude Desktop
- Section B: Use it with Open WebUI
- Section C: Use it with the OpenAPI interface
- How to Stop
- Troubleshooting
- Get in Touch
- API Reference
- How the Code is Organised
- License
- Disclaimer
🌟 What is Omni-Endo AI (MCP)?
Omni-Endo AI is a bridge between your diabetes data and an AI assistant. The original version was written as a web app. It can be found here. This is an MCP server (Model Context Protocol) version, which is a standard way of giving an AI a set of tools it can use on your behalf. No need to copy and paste content between a website and an LLM and no need to pay for API use. The previous version was purposefully designed not to be tied to an LLM and to not mean that API calls needed to be paid for. Since it is now easy to use an MCP with Claude for free, I figured why not try it out.
With this version you simply talk to your assistant. You ask a question in plain language, and the assistant reaches into your data, pulls exactly what it needs, and analyses it for you, all within the conversation.
[!NOTE] Built for Claude first. This was designed and tuned for Claude Desktop (Section A), and that is where it works best, fully featured and the most reliable. I have since added the option to run it with other LLMs through Open WebUI (Section B): that path works, but it is not as polished, so treat it as "good, not perfect". A happy side effect of wiring up Open WebUI is that the tools also became available as a plain web API, so you can poke around your data directly through the OpenAPI interface (Section C) with no AI at all. In short: Claude for the best experience; Open WebUI if you would rather use another model; OpenAPI if you just want to explore the raw functions.
You ask things like:
- "How was my time in range last month?"
- "Why do I keep going high in the evenings?"
- "Show me my worst day and tell me what happened."
🚀 What does it actually do?
Omni-Endo AI exposes your diabetes history as a set of analytical tools the AI can call:
- Summaries and trends: time in range, GMI, variability, best and worst days and hours, basal/bolus balance, over any period you ask about.
- High-fidelity CGM data: every 5-minute reading is captured, so no spike or dip is missed, but the AI is guided to pull aggregates first and only fetch raw readings when it genuinely needs them.
- Enriched bolus analysis: each bolus is matched with the glucose at the time and the pump settings (ISF, carb ratio, target) that were active, so the AI can judge whether a dose made sense.
- Omnipod 5 behaviour: when the algorithm was suspending, running at max, or running blind after losing signal.
The assistant does all of this itself, live, by calling these tools while it talks to you.
The "Aha!" Moment
This project started with a personal frustration. While trying to integrate my diabetes data into a Home Assistant dashboard, I discovered that the wealth of historical data stored in Glooko (especially from the Omnipod 5) is a goldmine. I realised that if I gave that data to an AI assistant and let it query the data directly, it could uncover patterns that months of manual logging never showed.
Why I Built This
I built this to put the power back into the hands of the patient. We often only get 15 minutes with a consultant every few months. This tool lets you:
- Be Proactive: spot trends before your next appointment.
- Be Private: your data and credentials stay on your own machine.
- Be Flexible: use it with Claude Desktop, or with a local or cloud AI through Open WebUI.
👤 Who This Is For
This project is built for people who use the Omnipod 5 hybrid closed-loop insulin delivery system and sync their data to Glooko. If that is not you, you can still explore the project using the three months of included sample data (my data) — no Omnipod 5 or Glooko account required for that path.
Prerequisites
Required by everyone
- Docker — the entire stack runs inside Docker. Install it from docker.com. See Step 1 below.
Required to analyse your own data
- An Omnipod 5 — the insulin delivery device whose data this project analyses.
- A Glooko account — with your Omnipod 5 synced to it. This is how the MCP server retrieves your data.
Required — you need at least one AI to talk to
| Option | What you need | Data leaves your machine? |
|---|---|---|
| Claude Desktop | Free download from claude.ai/download | Yes, to Anthropic |
| Google Gemini (via Open WebUI) | Free API key from Google AI Studio | Yes, to Google |
| Ollama (via Open WebUI) | Ollama installed locally | No |
ChatGPT / OpenAI: MCP support may be possible in principle, but this project has not been tested with it. The free tier does not support MCP configuration and it is not a supported path here. But try it out and let me know!
🔒 Privacy & Security: Your Data, Your Control
Because this involves sensitive medical credentials and data, it is designed with a "local-first" architecture.
- No Middle Man: your Glooko username and password never leave your machine. They are sent directly from your local Docker container to Glooko's servers. No third-party server ever sees them.
- It runs on your computer: the server, the database, and the analysis tools all run locally in Docker.
- You choose the AI: connect it to Claude Desktop, to Google Gemini via Open WebUI, or to a local model through Open WebUI. With a local model, your data never leaves your machine at all.
[!IMPORTANT] If you use a cloud AI assistant (Claude, Gemini), most providers have a setting that allows them to "train" on your conversations. Before discussing your clinical data, consider turning off chat history / model training in that assistant's privacy settings, so your medical history stays private.
[!TIP] Want to try it before connecting your own account? This repository ships with a small example database of real data so you can explore everything offline, with no Glooko login at all. Follow the "example data" path through Steps 2 and 3 below.
🧐 The "Tough Love" AI Persona
The tool ships with a built-in AI persona: a "Tough Love" Endocrinologist.
Managing Type 1 Diabetes is hard, and placating a user doesn't improve Time in Range. The persona is direct, analytical, and uncompromising. It won't sugar-coat the data; it will tell you where your bolus timing is off, where you are over-correcting, or where your basal is failing to catch a drift. It is also built to work efficiently, pulling summaries first and only drilling into granular data when it needs to.
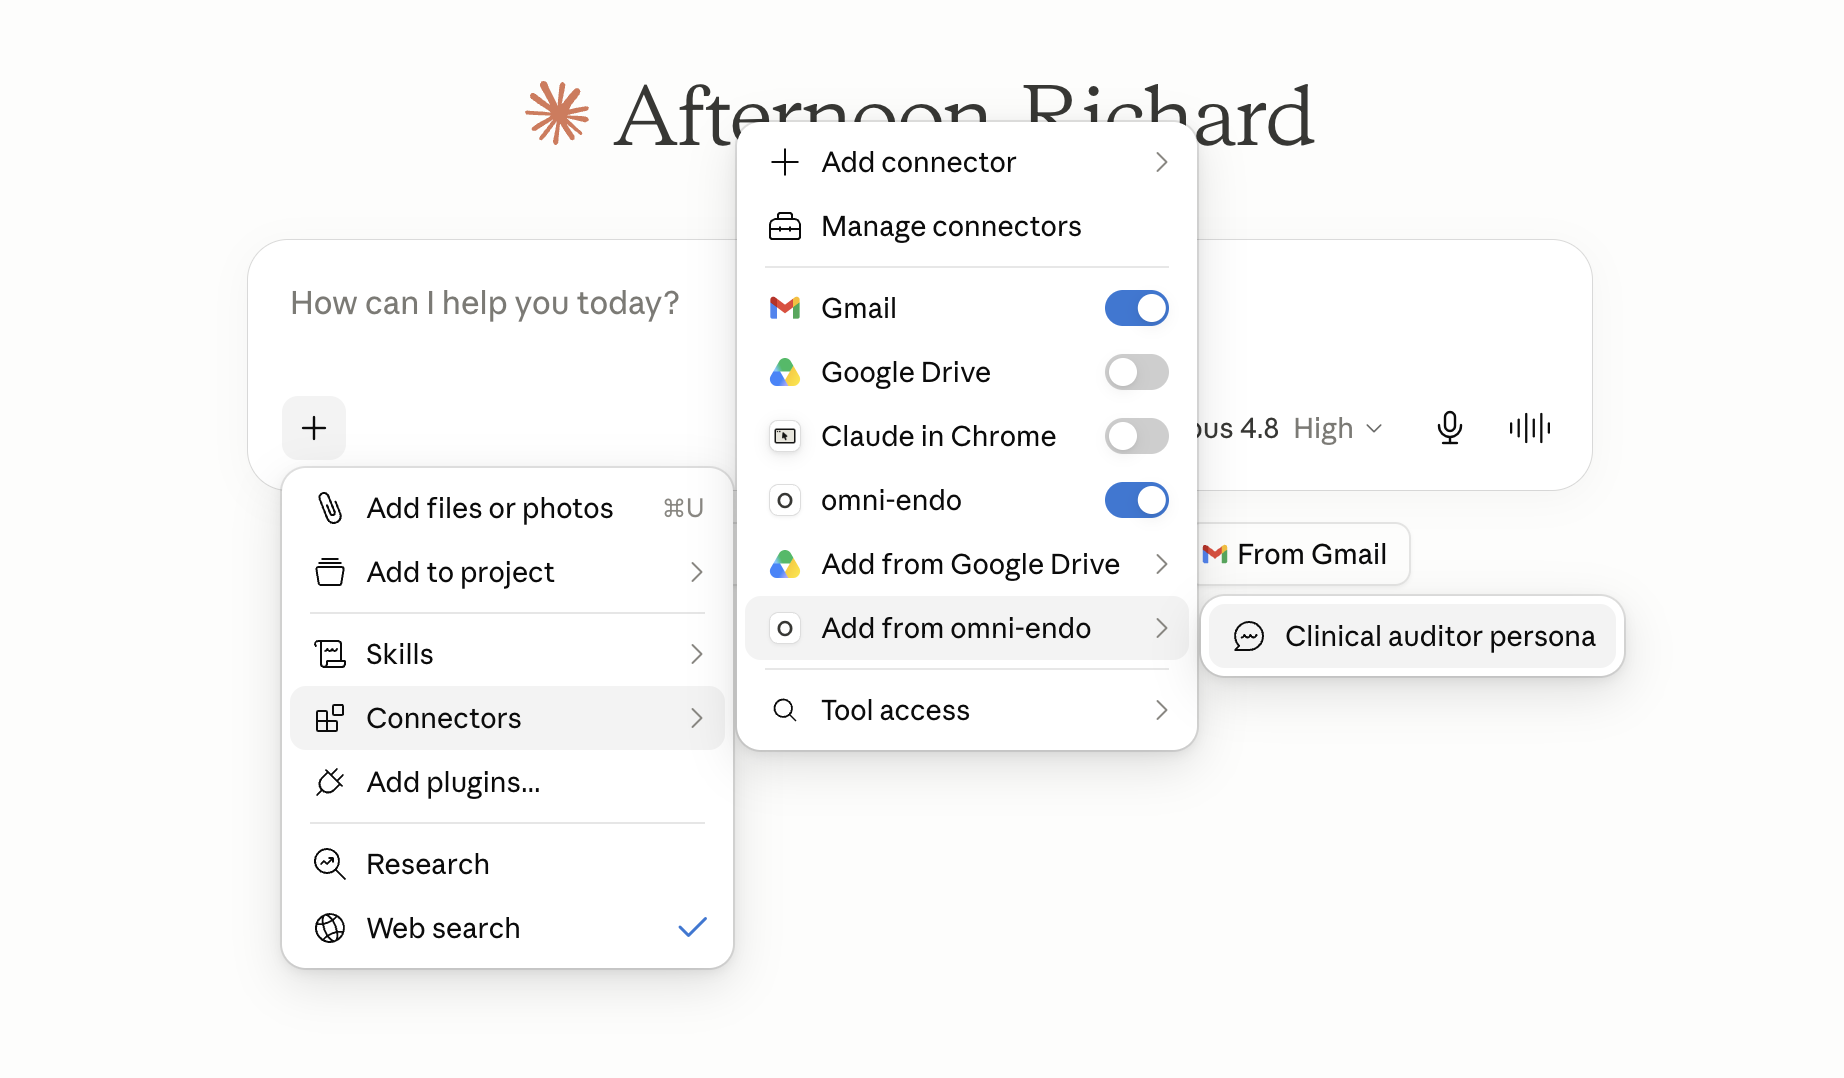
When you connect the tool, this persona is available as a selectable prompt called "Clinical auditor persona". Selecting it is what turns the AI into the endocrinologist.
Its directness is a deliberate style, not authority. Everything it says is to help you understand what is happening and ask better questions of your diabetes care team. It does not, and should not, tell you to change settings such as your DIA or carb ratios. Any change to your therapy is a conversation for you and your healthcare professional.
[!WARNING] Be aware that links in this document may take you away from this page. To open in a new tab, right-click and select Open Link in New Tab.
🛠️ Step 1: Getting Ready (Installing Docker)
To run this tool we use Docker. Think of Docker as a "shipping container" for software: it lets Omni-Endo AI (MCP) run perfectly on your computer without you installing complicated code libraries by hand.
This may require a restart, so make sure you are ready for that before starting.
For Windows Users
- Download: Go to the Docker installation instructions for Windows, read the options, and download the one that suits your machine. For most users this is Docker Desktop for Windows - x86_64.
- Install: Run the
.exe. Important: during installation, ensure "Use WSL 2 instead of Hyper-V" is checked. - Restart: Your computer will likely ask to restart.
- Start: Open "Docker Desktop" from the Start Menu and accept the terms.
[!WARNING] If you see a WSL version issue, see this guide to resolve it.
For Mac Users
- Download: Go to the Docker installation instructions for Mac.
- Choose "Apple Chip" for a newer Mac (M1, M2, M3, M4).
- Choose "Intel Chip" for an older Mac.
- Install: Open the
.dmgand drag Docker into your Applications folder. - Start: Open Docker from Applications. You may need to enter your Mac password to grant permission.
[!NOTE] Make sure Docker Desktop is actually running (you'll see its whale icon in your menu bar or system tray) before continuing.
📂 Step 2: Getting the Files
- Download the Code: On this GitHub page, click the green "<> Code" button, then "Download ZIP".
- Extract: Open your Downloads folder, right-click the zip, and choose "Extract All".
- Move: Move the extracted folder somewhere easy to find and remember, this location matters for the steps below. For example:
/Users/richard/Development/Docker/omni-endo-ai-mcp-main
Inside, you should see:
src/(the application code)examples/(the example database)docker-compose.ymlDockerfile.env.example- ...and a few other small files.
Create the data folder
The tool keeps its database in a folder called data, which sits at the same level as the src folder. You need to create it now, and what you put in it depends on whether you want to explore the included example data or use your own.
Create the folder. In your project folder (the one containing
src/), create a new, empty folder called exactlydata.Now follow the line that matches you:
To use the included example data (no Glooko account needed): Copy the database file out of the
examplesfolder and into your newdatafolder, so you have:examples/omni-endo.db -> data/omni-endo.dbThat is all the
datafolder needs. The tool will read this example database and never contact Glooko.To use your own Glooko data: Leave the
datafolder completely empty. The tool will download your own data into it from Glooko on the first run. (If you copied the example database in earlier to try it, deletedata/omni-endo.dbnow, so your real data is not mixed with mine.)
[!NOTE] The example data is my own real diabetes data, shared on purpose so people have something genuine to explore. Either way, your data lives in this
datafolder and stays on your machine.
⚙️ Step 3: Configure Your Settings (.env)
The tool reads its settings from a file called .env. The repository includes a template called .env.example, you make your own copy and fill it in.
Before you start: making hidden files visible
Files whose names start with a dot (like .env) are hidden by default on both Mac and Windows. You need to make them visible before you can see, copy, or rename them.
On a Mac
- Open Finder and navigate to your project folder.
- Press Cmd + Shift + . (Command, Shift, and the full stop key together). Hidden files will appear, shown in a slightly greyed-out style.
- Press the same shortcut again to hide them when you are done.
Alternatively, you can do everything from Terminal without needing to see the file at all:
cp .env.example .env
Run this from inside your project folder. It copies the template to .env in one step.
On Windows
- Open File Explorer and navigate to your project folder.
- Click the View tab at the top of the window.
- Check the box labelled "Hidden items". Hidden files will now appear, shown with a slightly faded icon.
- On Windows 11, go to View → Show → Hidden items instead.
To rename the copy: right-click .env.example, choose Copy, then Paste, then right-click the new copy and choose Rename. Type .env and press Enter. Windows may warn you that changing the extension could make the file unusable — click Yes.
[!NOTE] Windows can be reluctant to save a file with no name before the dot. If your text editor saves it as
.env.txtby default, rename it and remove the.txtpart, confirming the extension change when prompted. In Notepad, use File → Save As, set Save as type to All Files (.), and type.envas the filename.
- Copy the template: Make a copy of
.env.exampleand rename the copy to exactly.env(just.env, nothing before the dot). - Open
.envin any text editor and edit it for one of the two scenarios below.
There are two ways to run the tool: with the included example data (no Glooko login, the quickest way to try it), or with your own Glooko data. Pick the scenario that applies to you. Each one tells you how to set .env here in Step 3; the matching data folder setup was already covered in Step 2.
Scenario 1: Just trying it with the example data (no Glooko login)
This is the easiest way to start, and it never contacts Glooko.
GLOOKO_EMAILandGLOOKO_PASSWORD: leave both blank. Blank credentials put the tool in offline mode, so it only ever reads the example database.GLOOKO_GLUCOSE_UNIT: set tommol. The example data is mine, and I am British, so it is recorded in mmol/L.OMNI_TOKEN: set any hard-to-guess phrase. It is only used by the Open WebUI path (Section B) and the OpenAPI interface (Section C); the Claude Desktop path does not use it. It is simplest to set it anyway so it is ready if you try those paths.- The display settings (
OMNI_UNITS,OMNI_LOWER,OMNI_UPPER) can be left at their mmol defaults to view it the way I do.
The example .env below is ready to use for a test against the provided data. Copy it as-is to use it:
# ============================================================================
#  Omni-Endo AI: configuration
# ============================================================================
#  Copy this file to ".env" (same folder) and fill in the two REQUIRED values
#  below. Everything else has sensible defaults you can leave alone.
#
#  Docker reads this file literally: do NOT put quotes around values, and a
#  line starting with "#" is a comment.
# ============================================================================

# --- Glooko login (OPTIONAL) ------------------------------------------------
#  Your Glooko email and password let the server download YOUR data and keep it
#  up to date. They stay on your machine and are never shared.
#
#  LEAVE THESE BLANK to run in OFFLINE mode: the server will NEVER contact
#  Glooko and will serve only the data already in its database (for example, a
#  sample database shipped with the project). This is the safe way to explore
#  with example data, or to run against a database you have already built.
#
#  Fill them in to download and refresh your own data.
GLOOKO_EMAIL=
GLOOKO_PASSWORD=

# --- IMPORTANT if you provide a Glooko login: your Glooko account's unit ------
#  Glooko sends your data in whatever glucose unit your Glooko ACCOUNT is set to
#  (often mg/dL for US accounts, mmol/L elsewhere). Set this to match your Glooko
#  account so the data is interpreted correctly as it is downloaded. Getting this
#  wrong corrupts the stored data (e.g. a 162 mg/dL reading stored as 162 mmol/L).
#
#  This is SEPARATE from OMNI_UNITS below: this one is how your data ARRIVES from
#  Glooko; OMNI_UNITS is how you want to SEE it. They can differ (e.g. a US user
#  whose Glooko is mg/dL could still choose to view everything in mmol/L).
#
#  Values: "mmol" (mmol/L, default) or "mgdl" (mg/dL). Only matters when you have
#  a Glooko login; ignored in offline mode.
GLOOKO_GLUCOSE_UNIT=mmol

# --- A secret token --------------------------------------------------------
#  Any hard-to-guess phrase. It protects the data endpoint used by Open WebUI
#  and the OpenAPI interface, so only you (and the tools on your own machine)
#  can reach it. The Claude Desktop path does not use it, but it is simplest to
#  set it anyway so it is ready if you try the other paths.
#  To generate a strong one, run:  openssl rand -hex 16
OMNI_TOKEN=change-me-to-a-secret

# --- OPTIONAL: your preferred glucose unit and target range ----------------
#  Set these once to your preference and every tool uses them by default, so you
#  never have to specify them per question. You (or the AI) can still override
#  them for a one-off query without changing this file.
#
#  OMNI_UNITS:  "mmol" (mmol/L, default) or "mgdl" (mg/dL).
#  OMNI_LOWER:  low/hypo boundary, IN THE UNIT ABOVE. Readings below = time-low.
#  OMNI_UPPER:  high/hyper boundary, IN THE UNIT ABOVE. Readings above = time-high.
#
#  IMPORTANT: the boundaries must be in the same unit as OMNI_UNITS. For mmol the
#  usual range is 3.9 to 10.0; for mgdl it is 70 to 180. If you leave these blank
#  the defaults are 3.9/10.0 for mmol or 70/180 for mgdl.
OMNI_UNITS=mmol
OMNI_LOWER=3.9
OMNI_UPPER=10.0

# --- OPTIONAL: how far back to load on first run ---------------------------
#  Only used when you HAVE provided a Glooko login above. On first use the
#  server downloads your history from this date to now. If you leave it blank,
#  it defaults to 3 MONTHS before today, which is fast and is the amount in the
#  example database. Set an earlier date to capture more history.
#  Format: YYYY-MM-DD.
OMNI_OLDEST_DATE=
When your .env is ready, the data folder you created in Step 2 should contain the example database (data/omni-endo.db).
Scenario 2: Using your own Glooko data
To connect your own account and download your own history, set these in .env:
- Add your Glooko login: set
GLOOKO_EMAILandGLOOKO_PASSWORDto your normal Glooko credentials. - Set the remaining values to match you:
GLOOKO_GLUCOSE_UNIT— the unit your Glooko account is set to (mmolormgdl). Get this right, it is how your data is read as it downloads.OMNI_TOKEN— your secret token (any hard-to-guess phrase).OMNI_UNITS— how you want to see your data (mmolormgdl).OMNI_LOWER/OMNI_UPPER— your target blood sugar range, in the unit you chose forOMNI_UNITS.OMNI_OLDEST_DATE(optional) — how far back to load on the first run; blank limits it to the last 3 months.
When your .env is ready, the data folder you created in Step 2 should be empty, ready for your download.
[!IMPORTANT]
GLOOKO_GLUCOSE_UNIT(how your data arrives from Glooko) andOMNI_UNITS(how you want to see it) are different settings. They can be the same, but they do not have to be.
🔌 Ports (only if one is already in use)
[!NOTE] You can skip this for now. You do not need to change anything here to get started, the defaults work for almost everyone. This section is here next to the other configuration so it is easy to find. Come back to it only if, when you later start the stack (Section B or C), you see an error like "port is already allocated" or a page won't load. If you only use Claude Desktop (Section A), you can ignore ports entirely.
The Open WebUI and OpenAPI paths run a small stack of containers, and that stack uses three ports on your machine. These are set in docker-compose.yml, not in .env. You only need to touch them if one of these ports is already being used by another program on your computer.
The three ports
| Purpose | Default | You open it at |
|---|---|---|
| Data server (MCP / SSE / API) | 3033 |
used internally; also reachable at http://localhost:3033 |
| API explorer + Ollama API bridge | 8000 |
http://localhost:8000/docs |
| Open WebUI chat interface | 8083 |
http://localhost:8083 |
[!NOTE] The Claude Desktop path (Section A) does not use these ports at all, it talks to its own container directly. So a port clash only ever affects the Open WebUI and OpenAPI paths.
How to change a port
In docker-compose.yml each port appears as a mapping in the form "HOST:CONTAINER", for example:
ports:
  - "8083:8080"
The left number is the port on your machine (the host). The right number is the port inside the container.
[!IMPORTANT] Only ever change the left (host) number. Never change the right (container) number. The container-side port is referenced by other parts of the stack (for example, the bridge reaches the data server at
http://omni-endo:3033/mcp, and Open WebUI listens internally on8080). Changing a right-hand number will break those internal connections.
So if something else on your machine is already using 8083, you would change only the host side:
ports:
  - "8090:8080"      # changed 8083 to 8090; the 8080 stays
Pick any free port you like (adding a few hundred is a safe bet, e.g. 8083 → 8090, 8000 → 8200, 3033 → 3133).
What changing a host port affects
This is the part to be careful about, because a host port appears in more than one place:
- The address you type in your browser changes to match. If you change Open WebUI to
"8090:8080", you now open http://localhost:8090 instead ofhttp://localhost:8083. The same applies to8000(the OpenAPI page) and3033. Anywhere in this README that mentions the old port, mentally substitute your new one. - The internal address does not change. The URL you enter inside Open WebUI to reach the tools,
http://omni-endo:3033/mcp, stays exactly the same even if you remapped the host3033. That address uses Docker's internal network (the container port and service name), which the host port does not affect. Do not change it. - If you use the Claude Desktop path, nothing changes there either — it does not go through these ports.
If you change a port after you have already started the stack, restart it so the change takes effect (docker compose down then docker compose up -d). If you have not started it yet, there is nothing to restart, your change will simply be used when you first start it in Section B or C.
▶️ Step 4: Build and Start the Tool
Now we build the Docker image that the tool uses, and start the stack. This one command does both: it builds the local image, downloads the other containers the stack needs, and starts everything.
- Open a Terminal:
- Windows: open "PowerShell" from the Start Menu.
- Mac: open "Terminal" (Cmd + Space, type Terminal).
- Go to the folder: type
cdthen a space, then drag your project folder into the terminal window so the path fills in, and press Enter. For example:cd /Users/richard/Development/Docker/omni-endo-ai-mcp-main - Build and start it: run this command and press Enter:
The first time, Docker builds the local image and downloads the other containers, then starts all of them in the background. This can take a few minutes. Subsequent starts are justdocker compose up -d --builddocker compose up -d(no rebuild needed).
To check that everything is running:
docker compose ps
You should see the containers listed as running (omni-endo, mcpo, and open-webui). You can also watch the logs with docker compose logs -f omni-endo.
[!IMPORTANT] If you ever download a newer version of this tool, rebuild and restart with
docker compose up -d --build. A plain start can reuse an old cached image and run outdated code.
[!NOTE] Claude Desktop users: the Claude Desktop path (Section A) launches its own container on demand and does not actually need this stack running. Running it does no harm, but if you only plan to use Claude Desktop, you can stop the stack again with
docker compose downafter confirming the build worked. The Open WebUI (Section B) and OpenAPI (Section C) paths do need the stack running.
You now have everything built and running. There are three ways to use it: Claude Desktop (Section A), Open WebUI (Section B), or the OpenAPI interface (Section C). You can use all three or just pick a favourite.
[!NOTE] First query on your own data may be slow. If you set this up with your own Glooko account (an empty
datafolder), the very first question you ask (or the first call you make in Section C) triggers a download of your history from Glooko before it can answer. This can take from a few seconds to a minute or so depending on how much history you requested. It only happens once; after that your data is stored locally and answers are fast. (If you are using the example data, there is no download and the first query is immediate.)
Switching from the example data to your own data later
If you started with the example data and now want to use your own Glooko account, do this:
- Stop the tool. If you are running the Open WebUI / OpenAPI stack, run
docker compose downin the project folder. If you only use Claude Desktop, fully quit Claude Desktop. - Edit
.env: add yourGLOOKO_EMAILandGLOOKO_PASSWORD, and set the other values to match you (see Scenario 2 in Step 3). - Empty the
datafolder: delete (or move elsewhere as a backup)data/omni-endo.db, so the example data is not mixed with yours. - Start again: run
docker compose up -d(Open WebUI / OpenAPI), or reopen Claude Desktop. On the next query the tool downloads your own history into the now-emptydatafolder.
💬 Section A: Use it with Claude Desktop
With Claude Desktop, Claude launches its own copy of the tool on demand and reads your data directly. You do not need to keep anything running in the terminal for this — Claude starts and stops the container itself.
A1. Find your Claude config file
Claude Desktop is configured by a file called claude_desktop_config.json.
- Mac:
/Users/<yourname>/Library/Application Support/Claude/claude_desktop_config.json - Windows:
%APPDATA%\Claude\claude_desktop_config.json
The easiest way to open it: in Claude Desktop go to Settings → Developer → Edit Config. That opens the right file for you.
A2. Add the omni-endo server
Add an mcpServers entry to the file. The block below is an example using my own folder paths — it will not work as-is on your machine, because the two paths point at where the project lives on my computer. Use it as a template and change those two paths to match your setup.
{
  "mcpServers": {
    "omni-endo": {
      "command": "docker",
      "args": [
        "run",
        "-i",
        "--rm",
        "--env-file",
        "/Users/richard/Development/Docker/omni-endo-ai-mcp-main/.env",
        "-v",
        "/Users/richard/Development/Docker/omni-endo-ai-mcp-main/data:/data",
        "omni-endo-ai-mcp"
      ]
    }
  }
}
If the file already has an mcpServers section, add just the "omni-endo" block inside it rather than pasting the whole thing.
How this relates to your setup — change these two paths:
Both paths above start with my project folder, /Users/richard/Development/Docker/omni-endo-ai-mcp-main. Yours will be wherever you moved the extracted folder in Step 2. Replace my path with yours in both places:
- The
--env-fileline must point to your.envfile:<your project folder>/.env - The
-vline must point to yourdatafolder:<your project folder>/data:/data
The part after the colon (:/data) is the path inside the container and must be left exactly as it is — only change the part before the colon.
The last line, omni-endo-ai-mcp, is the name of the Docker image you built in Step 4, and stays the same for everyone.
[!TIP] Easiest way to get your exact path: in a terminal,
cdinto your project folder and runpwd(Mac) orcdwith no arguments (Windows shows the path). Copy what it prints and use it in both lines above.
[!NOTE] Always use the full path. On Mac it starts with
/Users/yourname/...; on Windows it looks likeC:\\Users\\YourName\\...(note the double backslashes, which JSON requires).
A3. Restart Claude Desktop
Fully quit Claude Desktop (on Mac, Cmd + Q, not just closing the window) and open it again, so it picks up the new config.
A4. Make sure the tools are loaded
In a chat, open the connector / tools menu. You should see omni-endo with its tools.
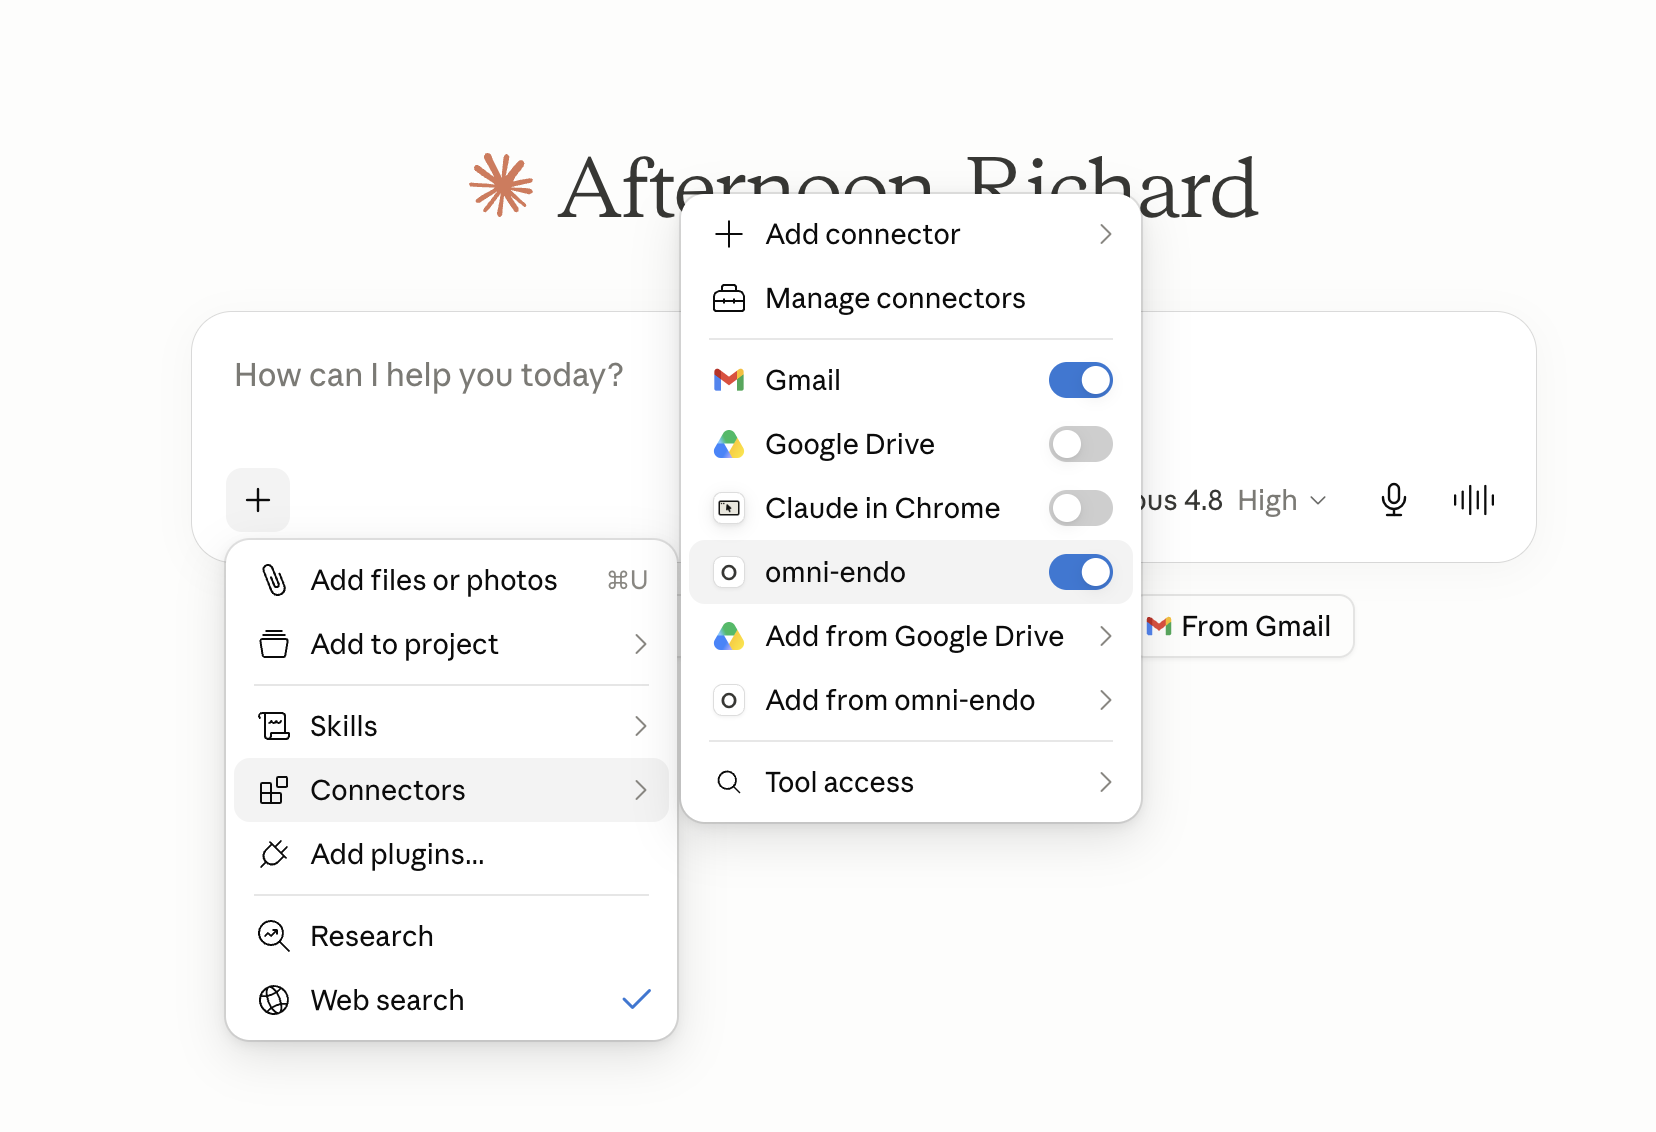
[!IMPORTANT] Claude Desktop has a setting for how it loads tools. If it is set to "Load tools when needed", it may not show the summary and trend tools straight away. For the best experience, set it to "Tools already loaded" so every tool is available immediately. This is the single most common setup snag.
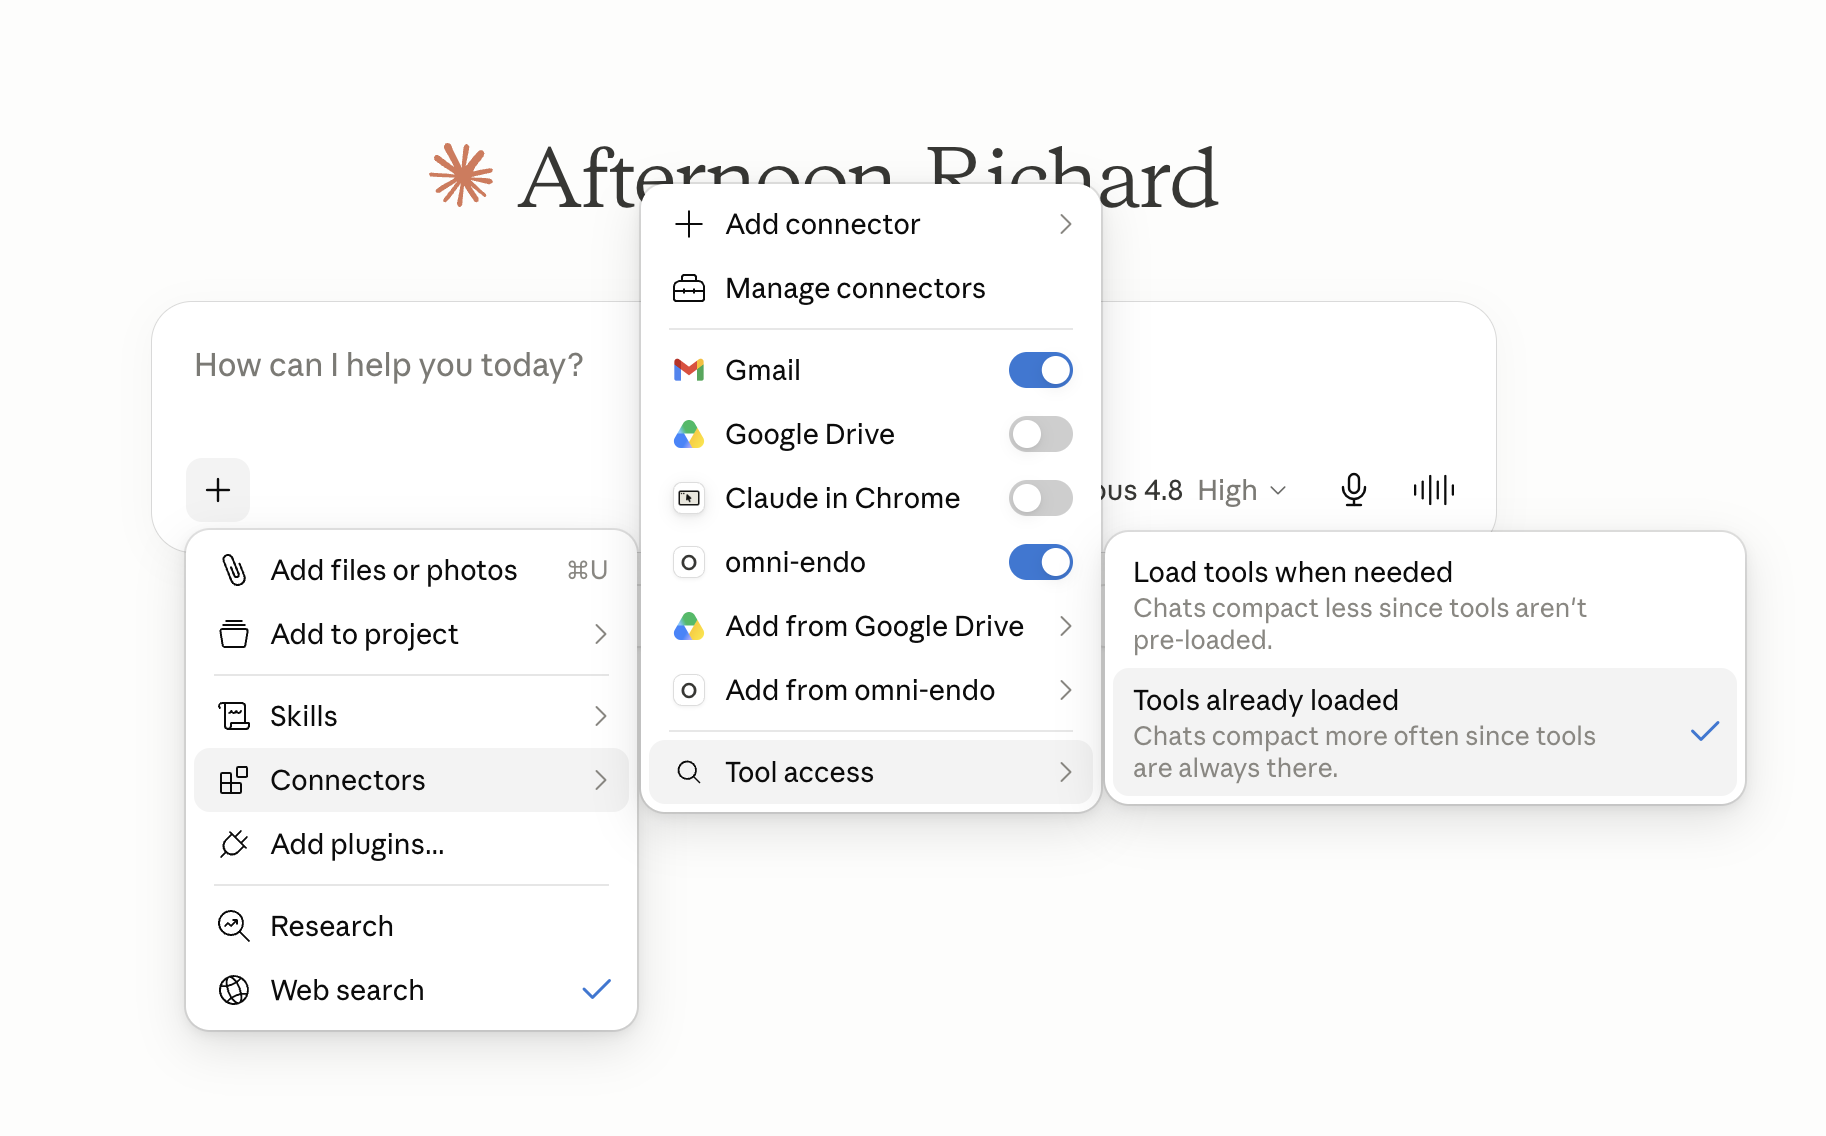
(Image: the Claude Desktop connector menu showing "Tool access" set to "Tools already loaded".)
A5. Select the persona and ask away
From the same menu, choose the "Clinical auditor persona" prompt, then ask your question.
An example using the data I have given you...:
"Tell me about my diabetes data."
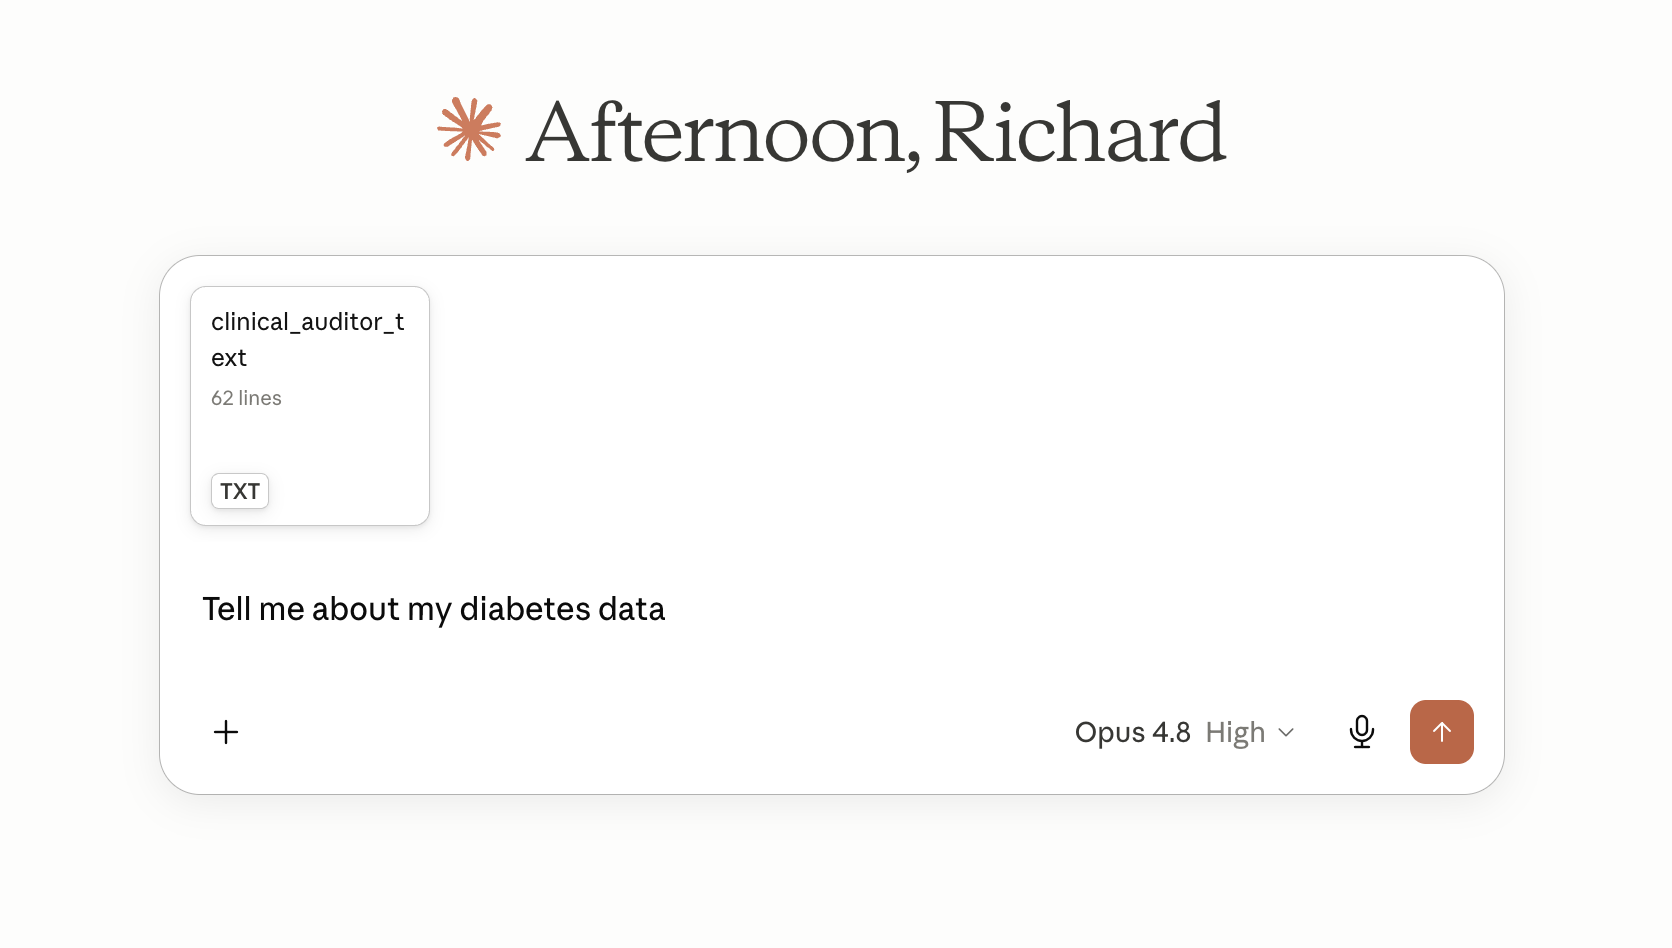
Claude pulls the data and gives you it's interpretation. You can then discuss the findings...
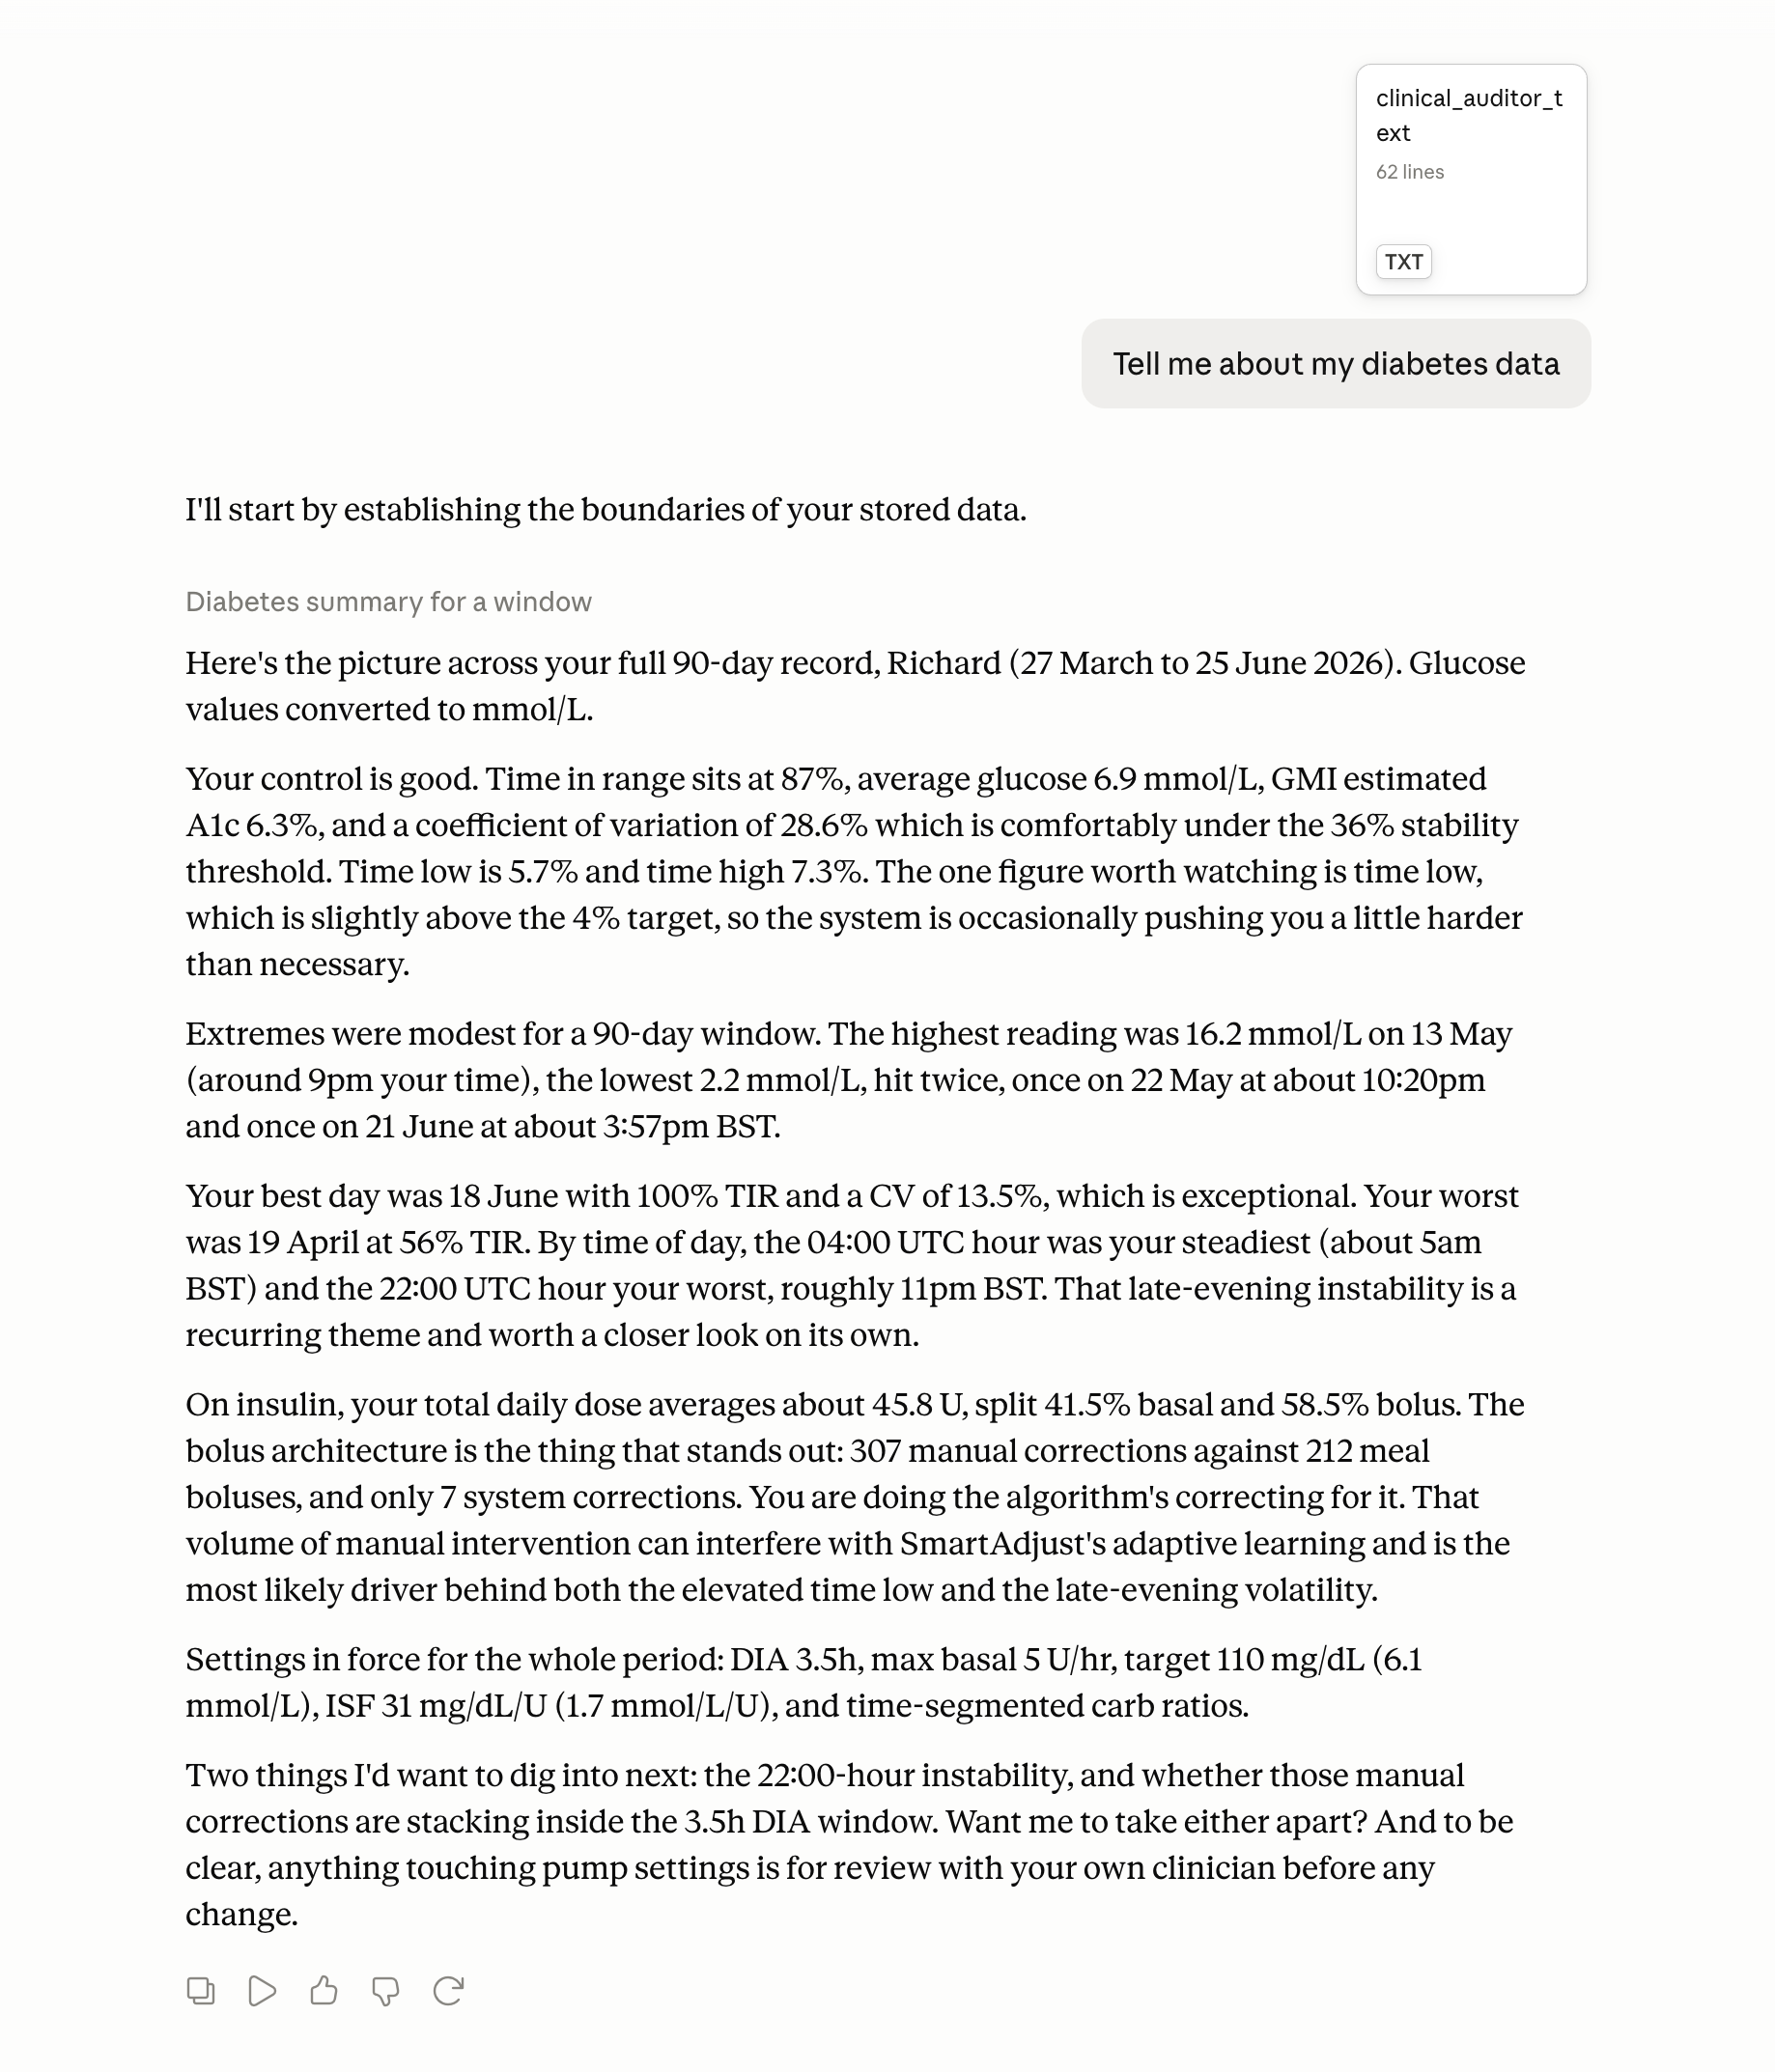
(Image: Claude using the tools to answer a question about your data.)
🌐 Section B: Use it with Open WebUI
This path lets you use either a local AI model running on your own machine via Ollama, or a cloud model via Google Gemini, through a browser-based chat interface. It uses the full Docker stack, which also includes a bridge that turns the tools into a normal web API.
[!NOTE] This is the "other LLMs" path. It works, but the tool was tuned for Claude (Section A), so expect the analysis here to be a little less slick, especially with smaller local models. If you have Claude Desktop, that remains the smoothest experience.
B1. Make sure the stack is running
If you followed Step 4, the stack is already running and you can skip straight to B2. If you stopped it (or you are returning later), start it again from your terminal, in the project folder:
docker compose up -d
This runs three things: the data server, a bridge (so web tools can reach it), and Open WebUI. The first question you ask may take a little longer while it loads your data.
To check it is running:
docker compose ps
B2. Create your Open WebUI account
Open http://localhost:8083 in your browser. On first launch, Open WebUI will ask you to create an account.
- Click Sign up and enter a name, email address, and password. This account is local — it does not connect to any external service.
- The first account you create automatically becomes the admin account.
B3. Connect an AI model
You need to connect Open WebUI to an AI backend. Choose one of the options below.
Option A: Google Gemini (cloud, free tier available)
Get a Gemini API key
- Go to Google AI Studio and sign in with your Google account.
- Click Get API Key, then Create API key.
- Copy the key and keep it somewhere safe.
Configure the connection in Open WebUI
- Click the button in the top-right of the screen (your initials) and select Admin Panel.
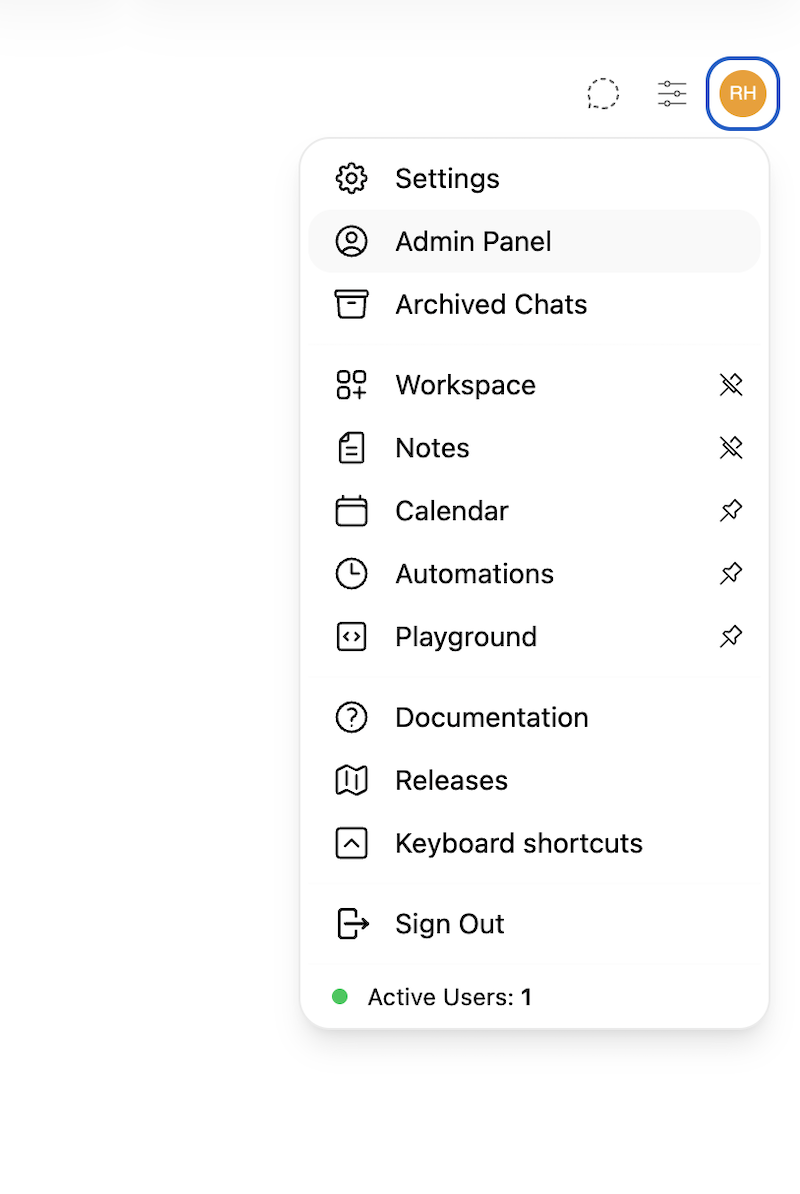
- Select the Settings tab.
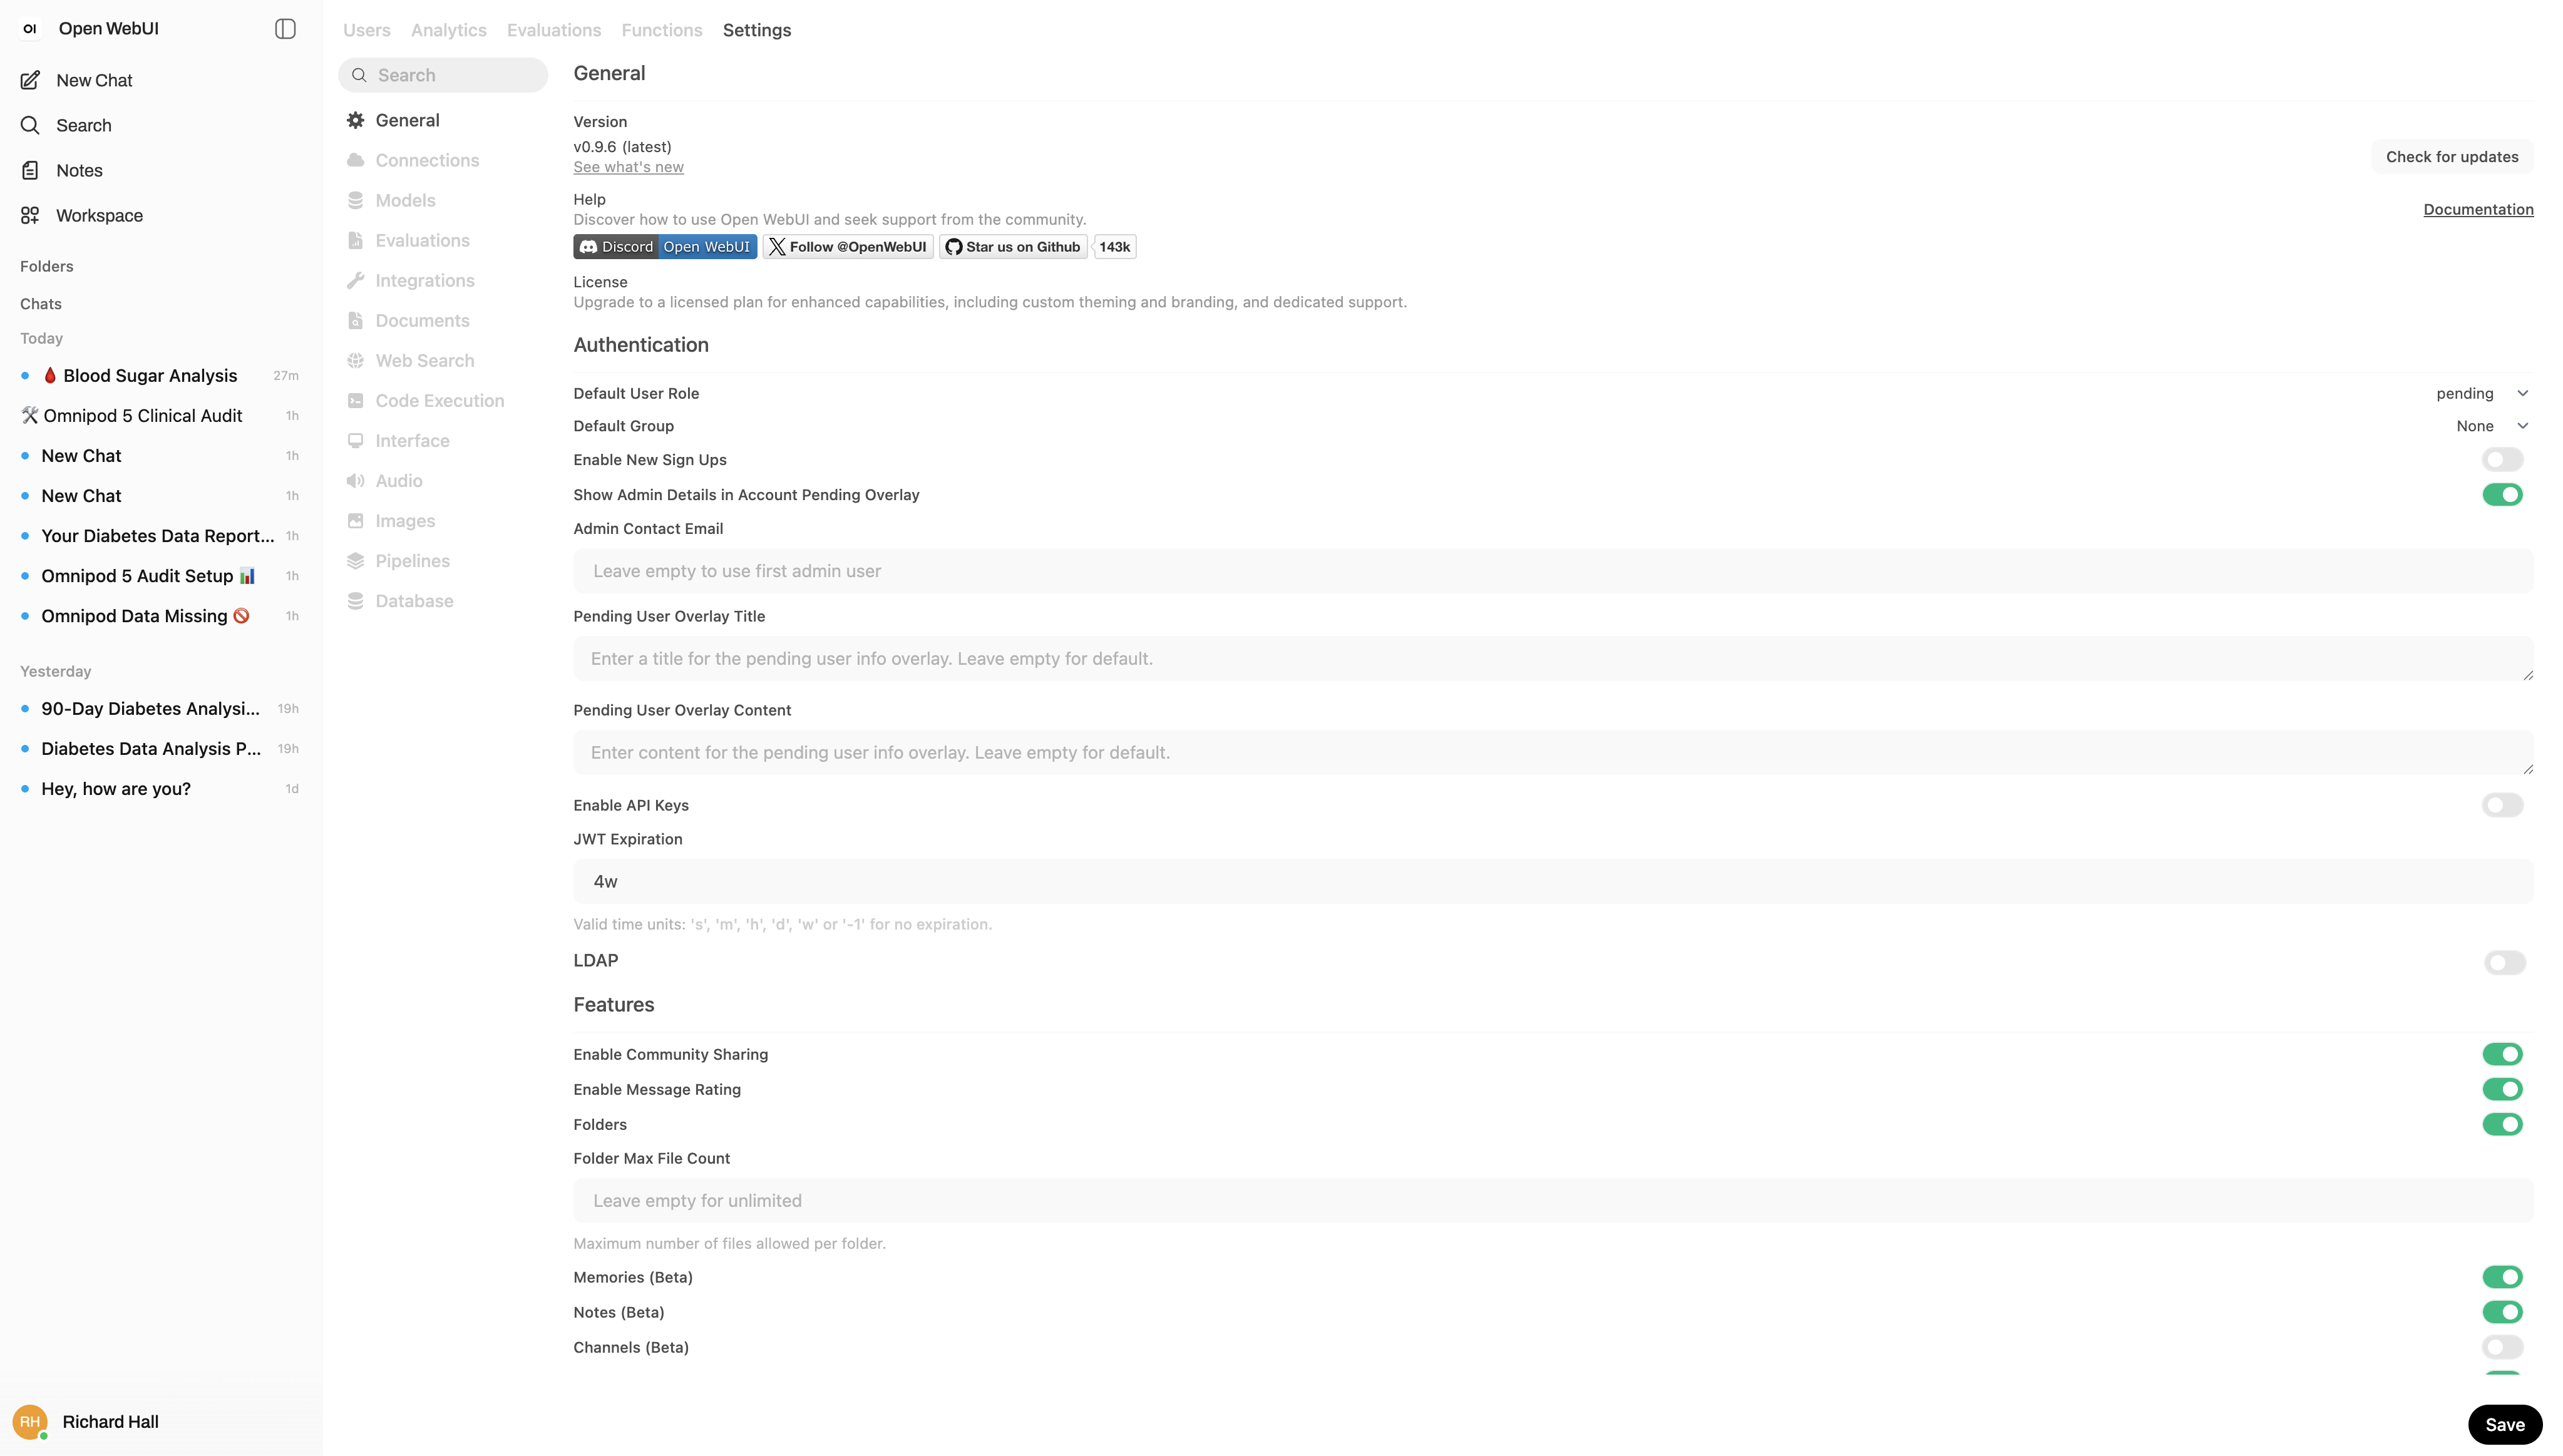
- Select Connections on the left, then click the + symbol to the right of OpenAI API.
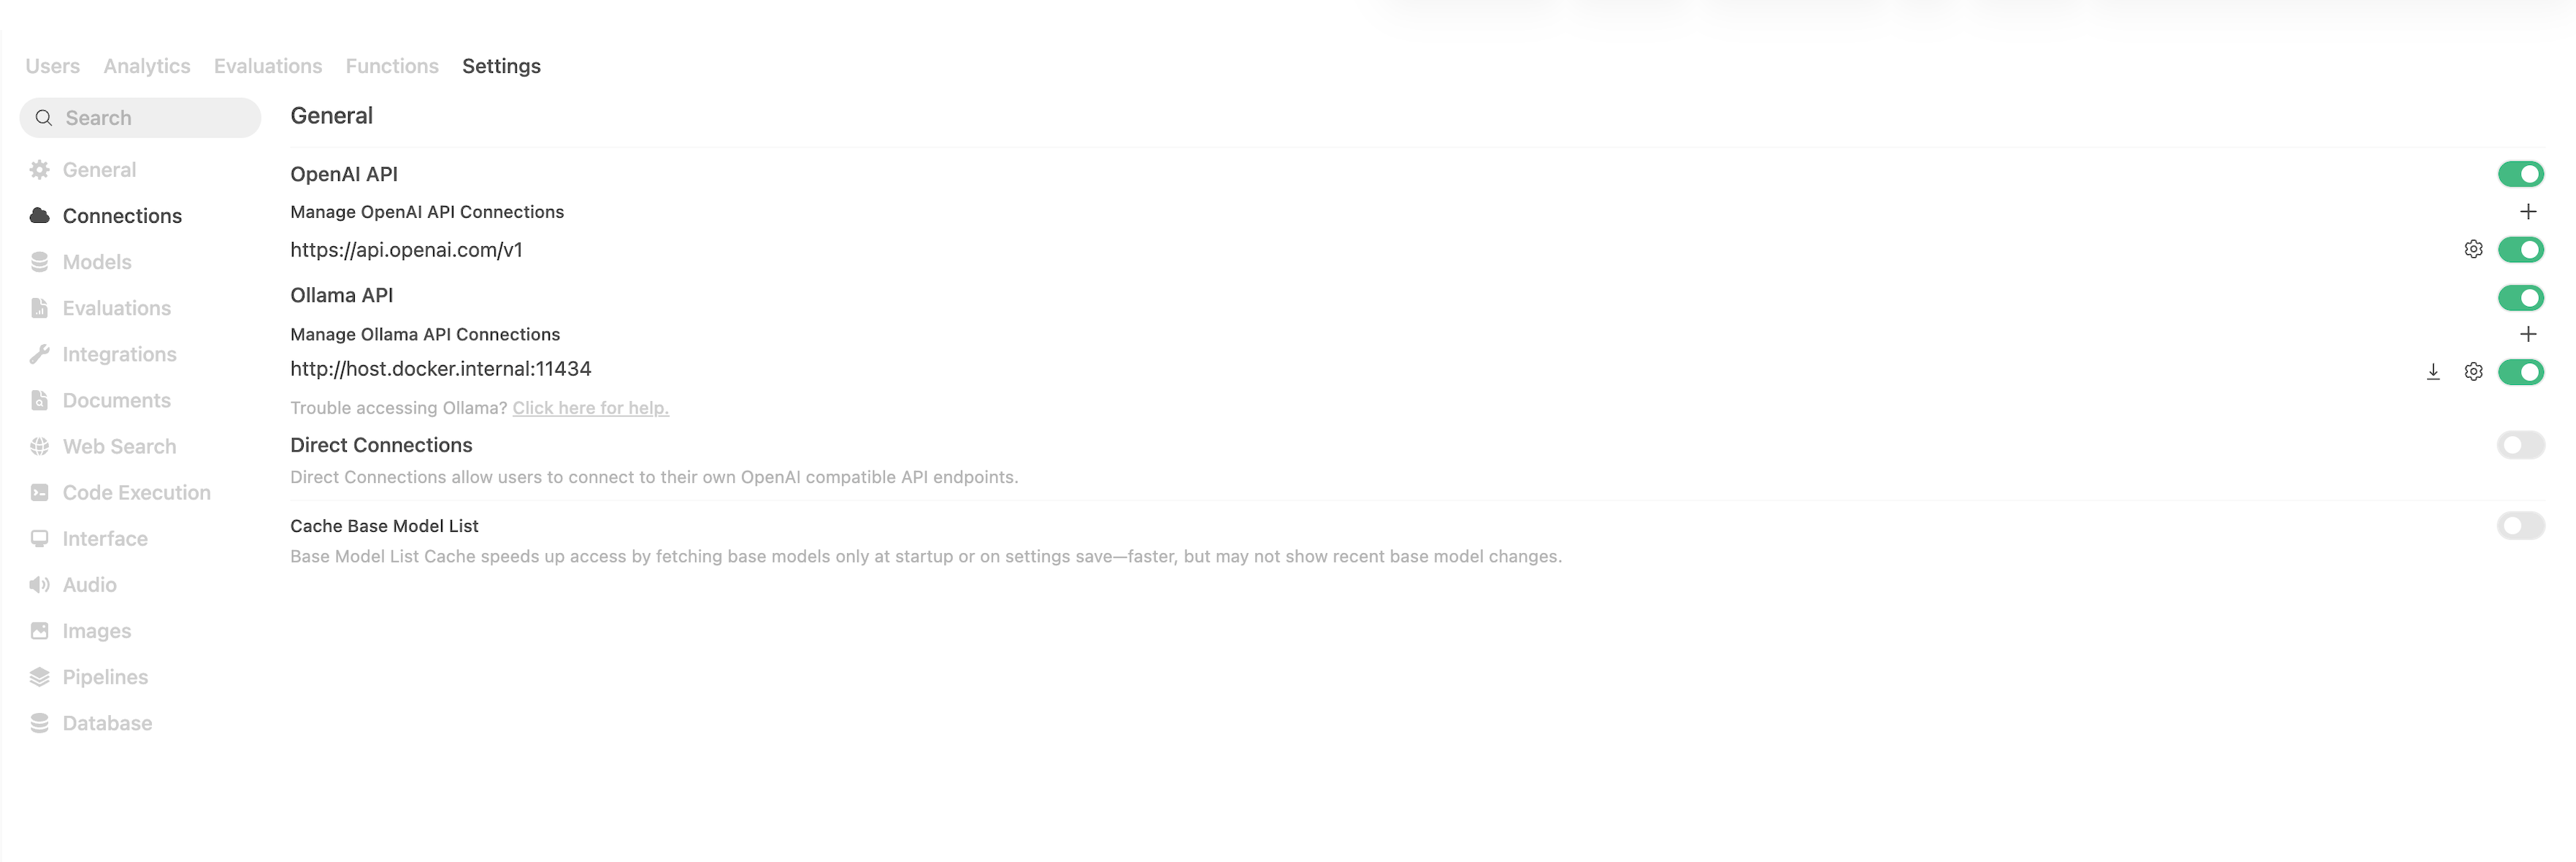
- An Add Connection popup appears.
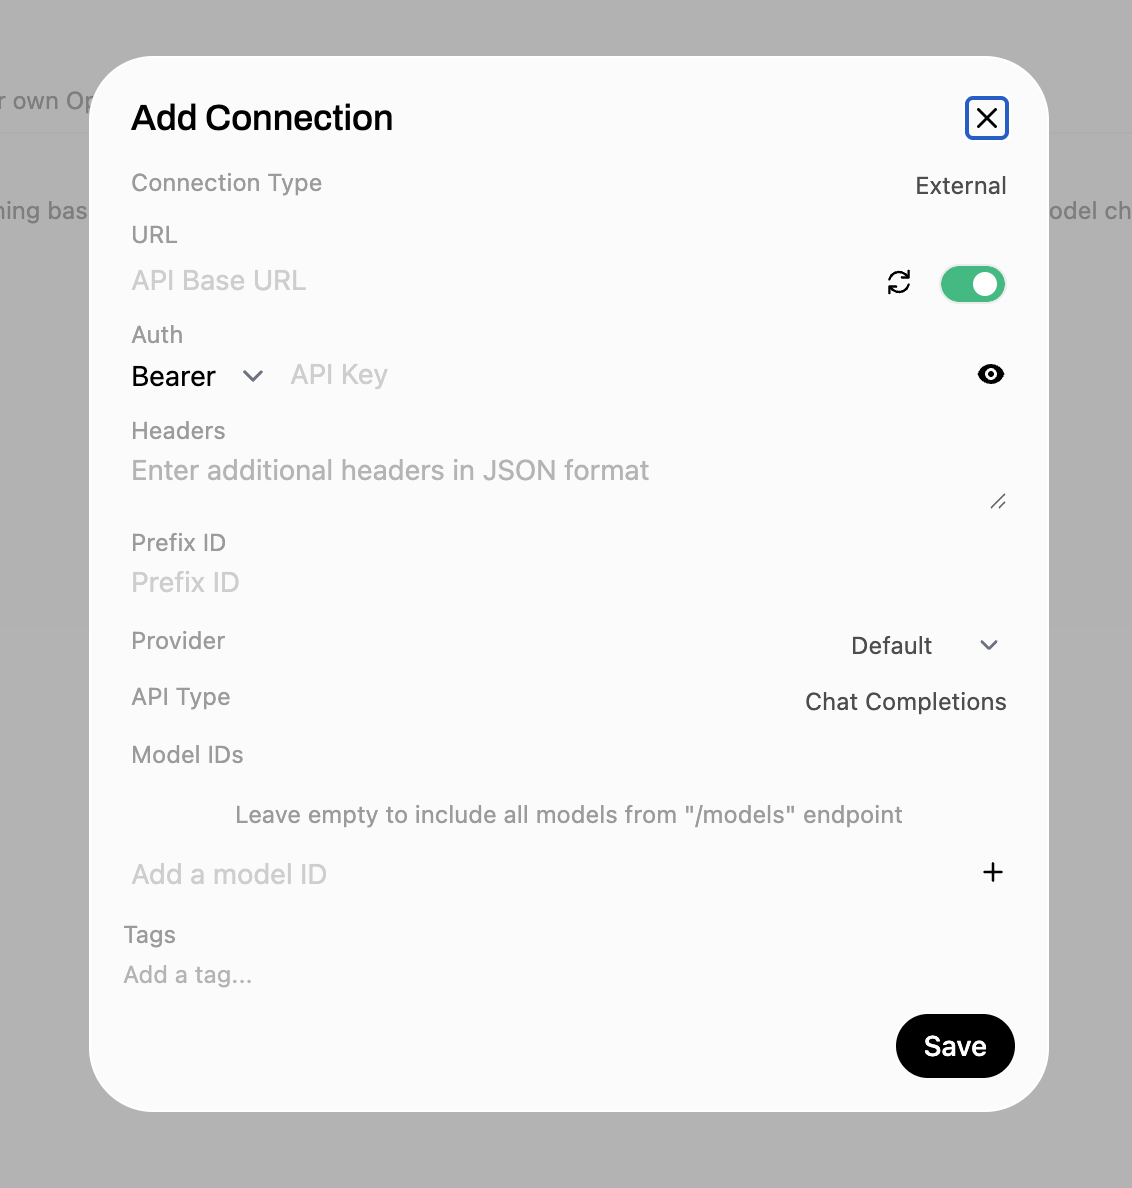
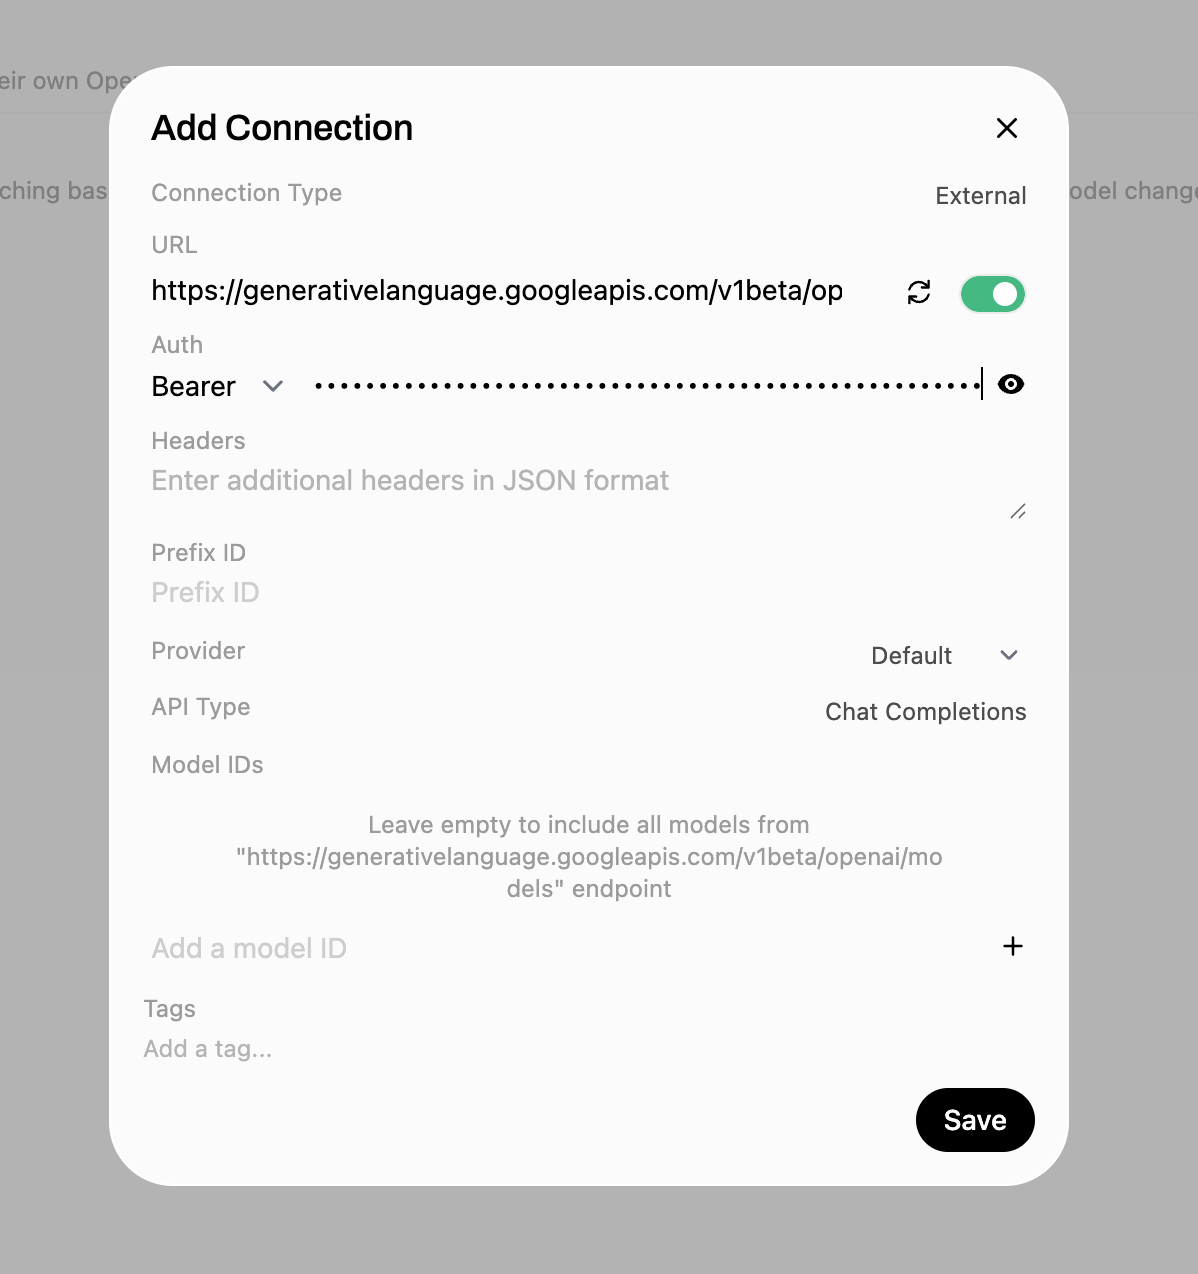
- In the URL box enter
https://generativelanguage.googleapis.com/v1beta/openai, and in the Auth section (set to Bearer) paste your Gemini API key. Then click Save.
Select a Gemini model
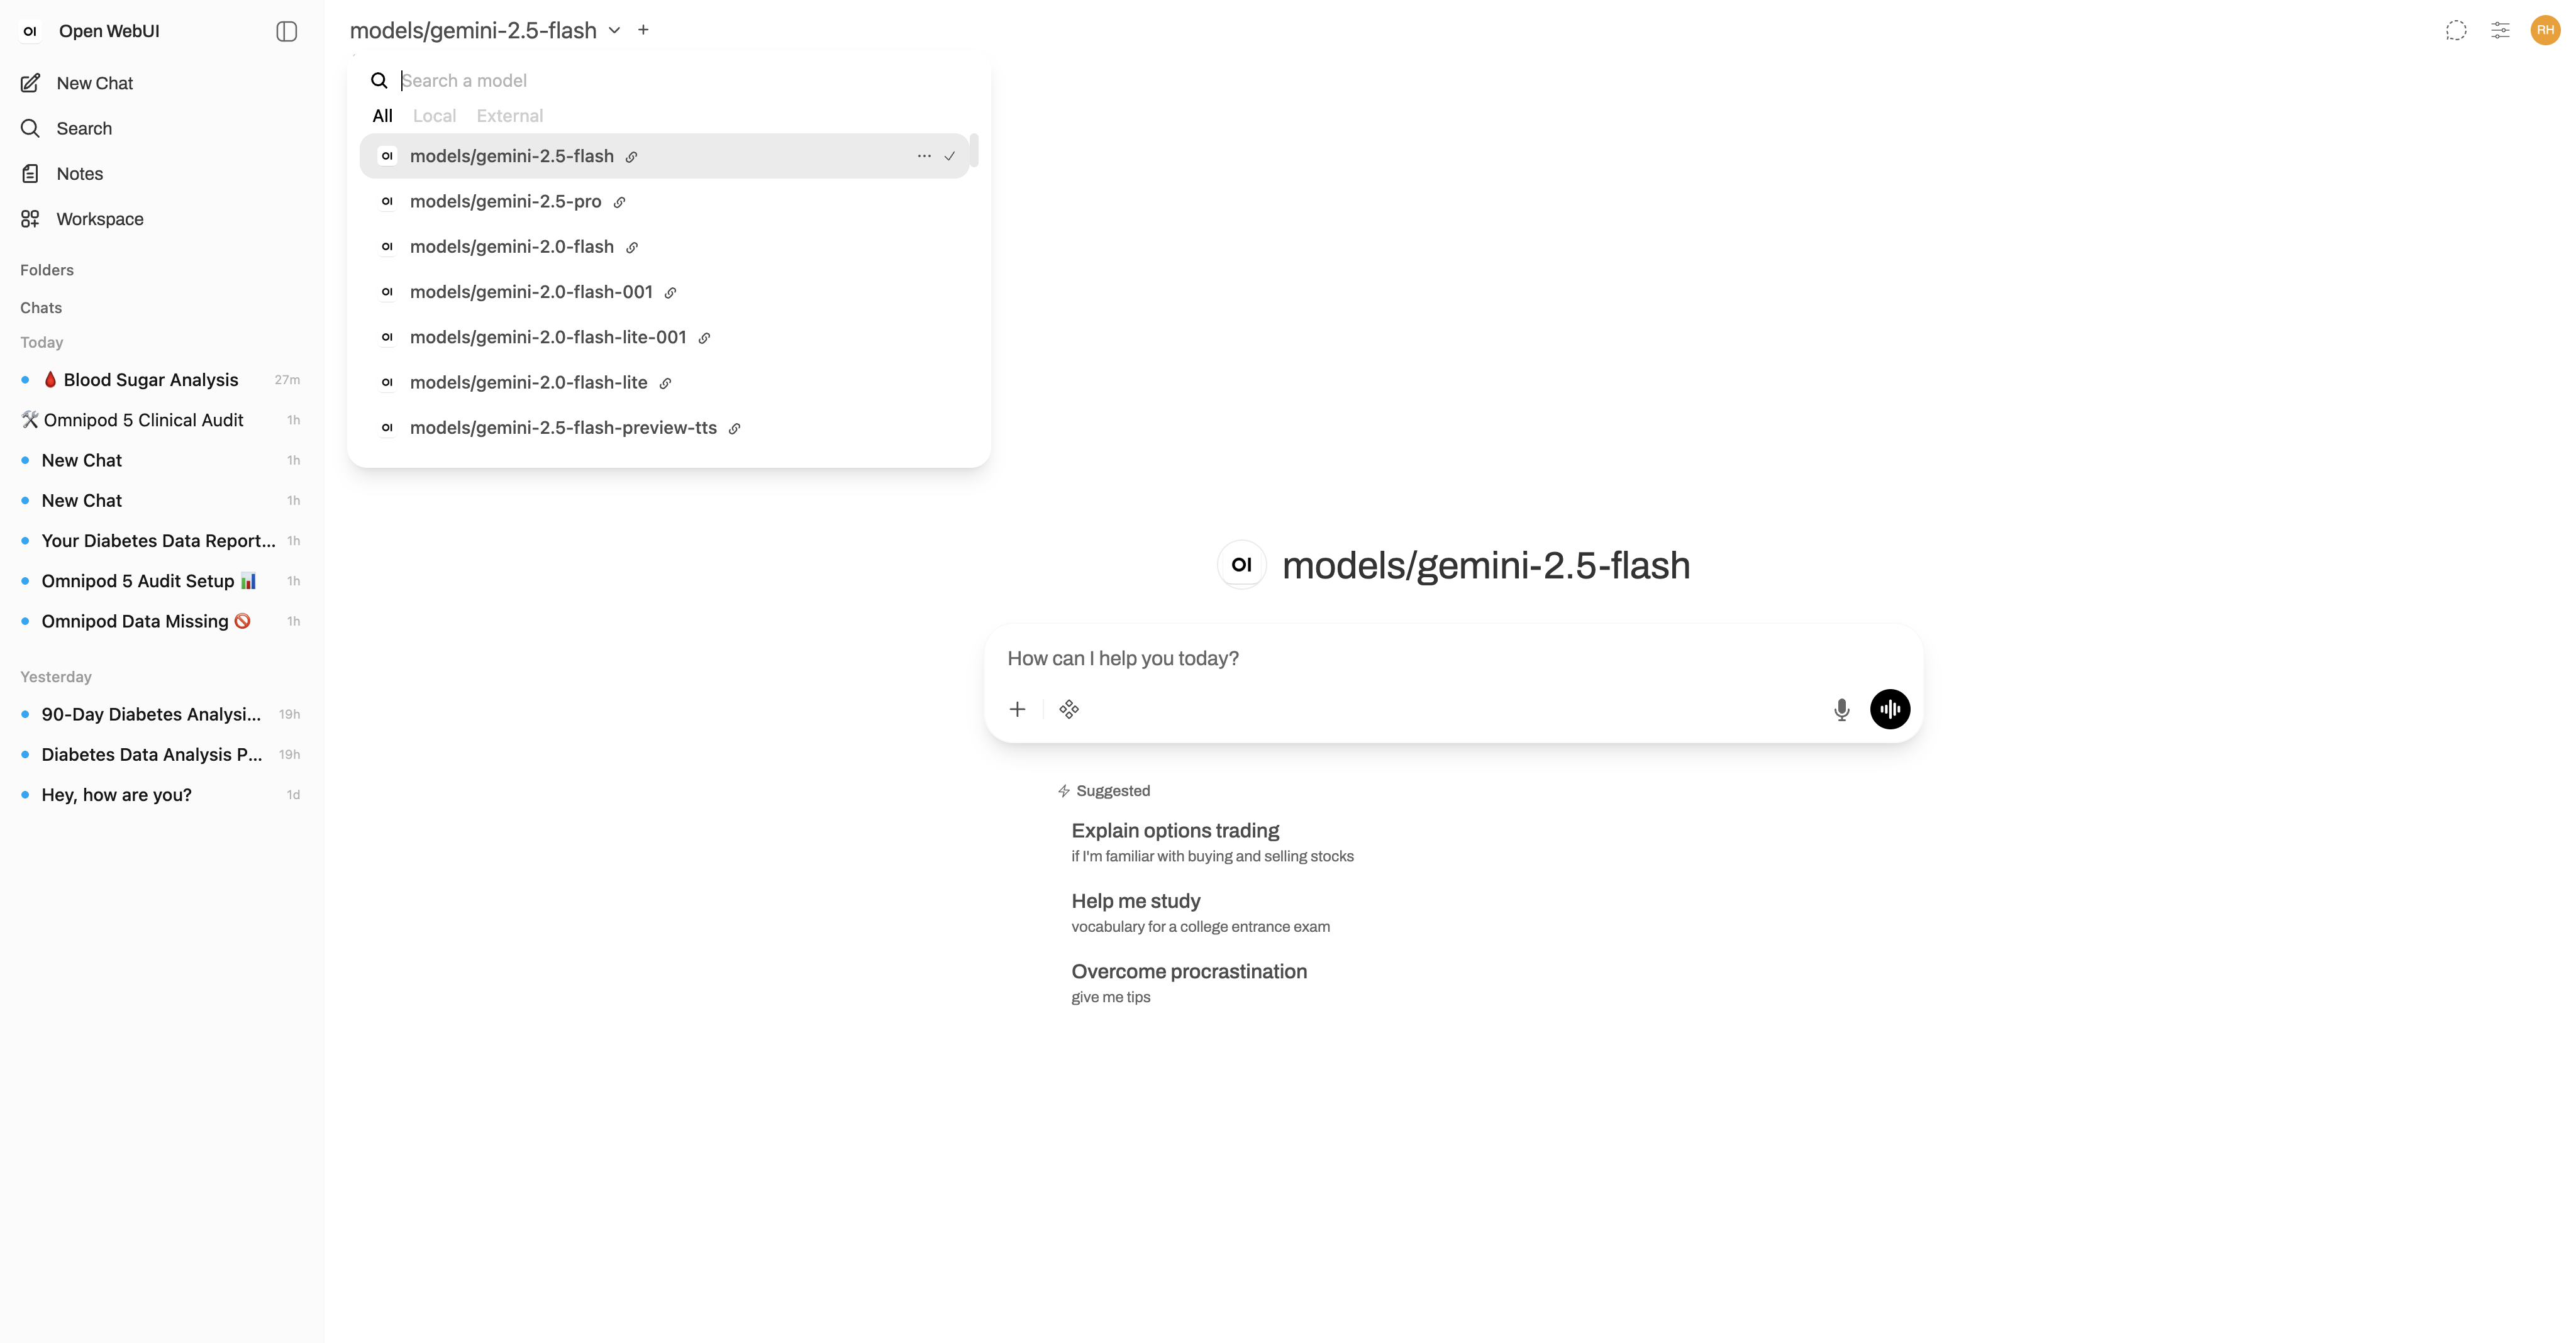
- Back on the main screen, click the model dropdown at the top and you can now select a Google Gemini model to use (search
gemini, not "google"; models are listed by engine name such asgemini-2.5-flash).
[!IMPORTANT] If you use Gemini, your glucose and insulin data is sent to Google's servers as part of the conversation. Consider disabling chat history / model training in your Google AI Studio privacy settings before discussing your clinical data.
Option B: Ollama (local models, nothing leaves your machine)
Install Ollama, then pull a model that supports tools. For example:
ollama pull qwen2.5
Then go to Admin Panel → Settings → Connections and add your Ollama endpoint (typically http://host.docker.internal:11434). Your locally available models will appear in the model dropdown.
[!NOTE] Local models vary a lot in how well they use tools.
qwen2.5is a reliable starting point; very small models often struggle to call tools correctly.
B4. Enable the MCP server in Open WebUI
This connects Open WebUI to the omni-endo MCP server so the AI can call the data tools.
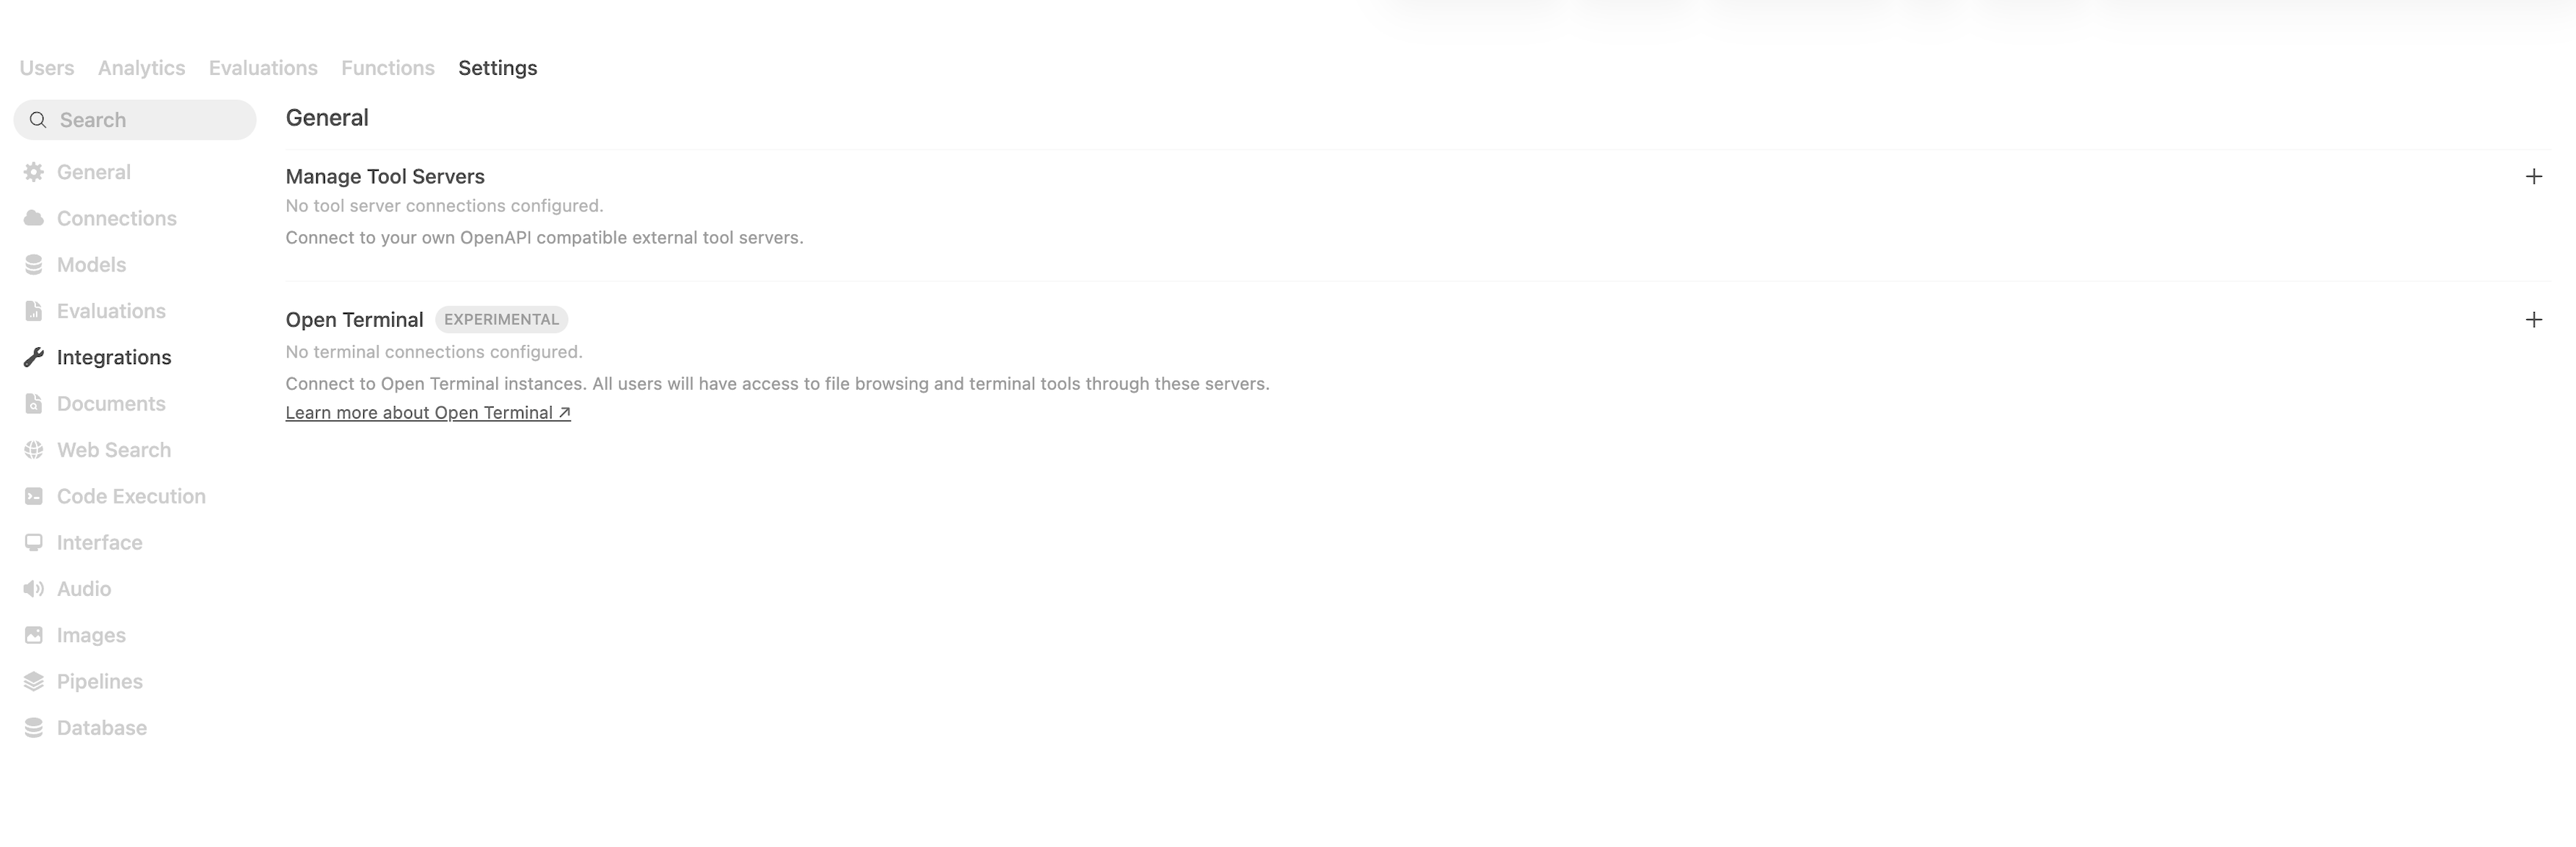
- As before, go from the Admin Panel to the Settings tab, then click Integrations. Click the + symbol to the right of Manage Tool Servers.
- An Add Connection window pops up. Set the Type to MCP Streamable HTTP.
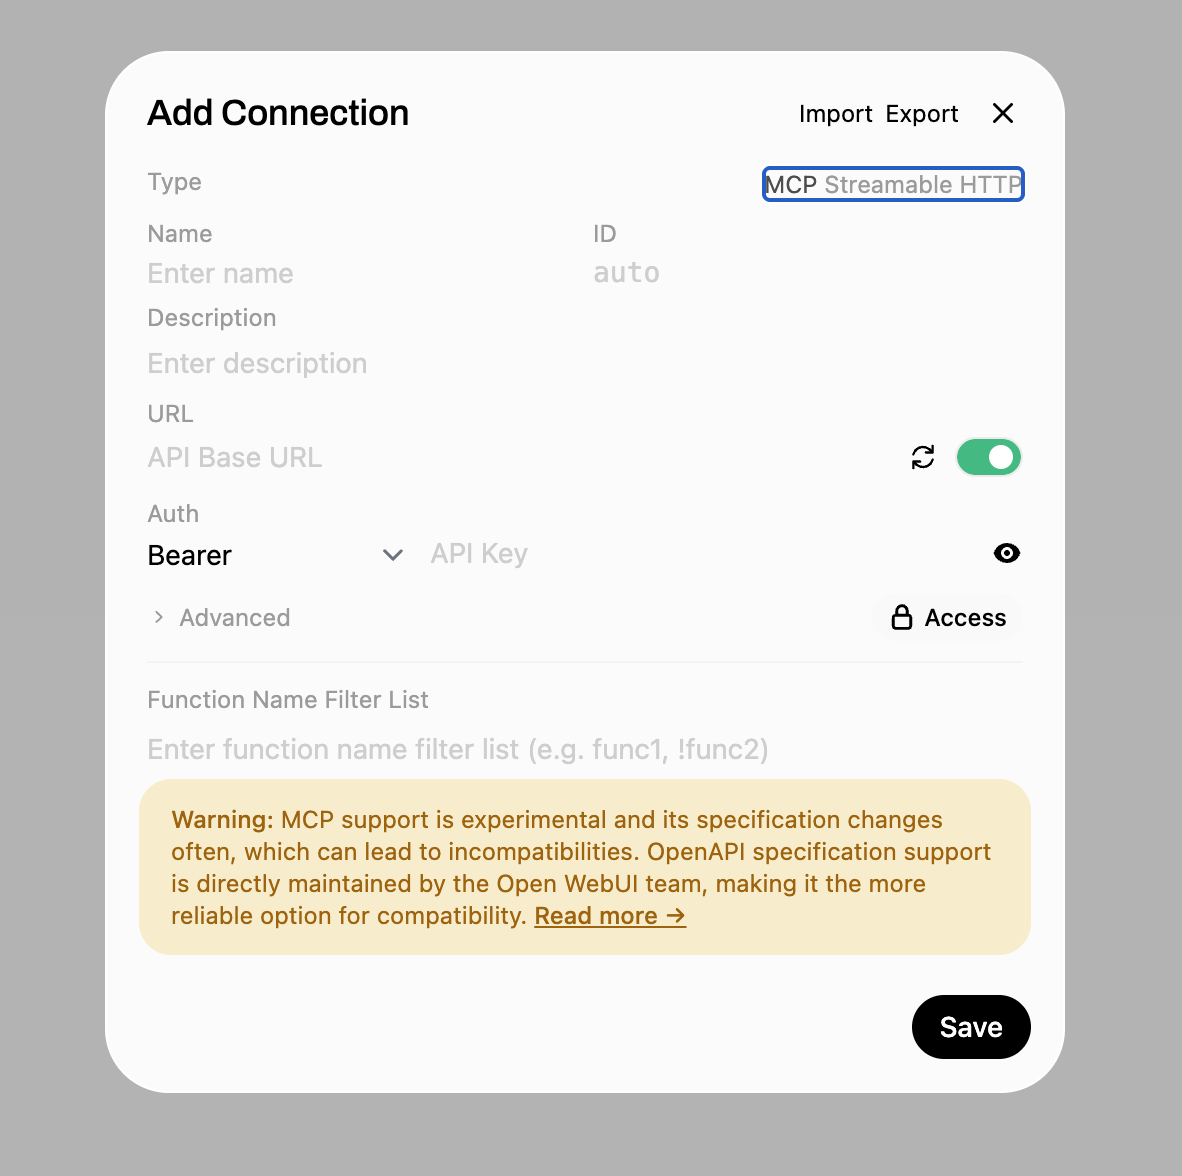
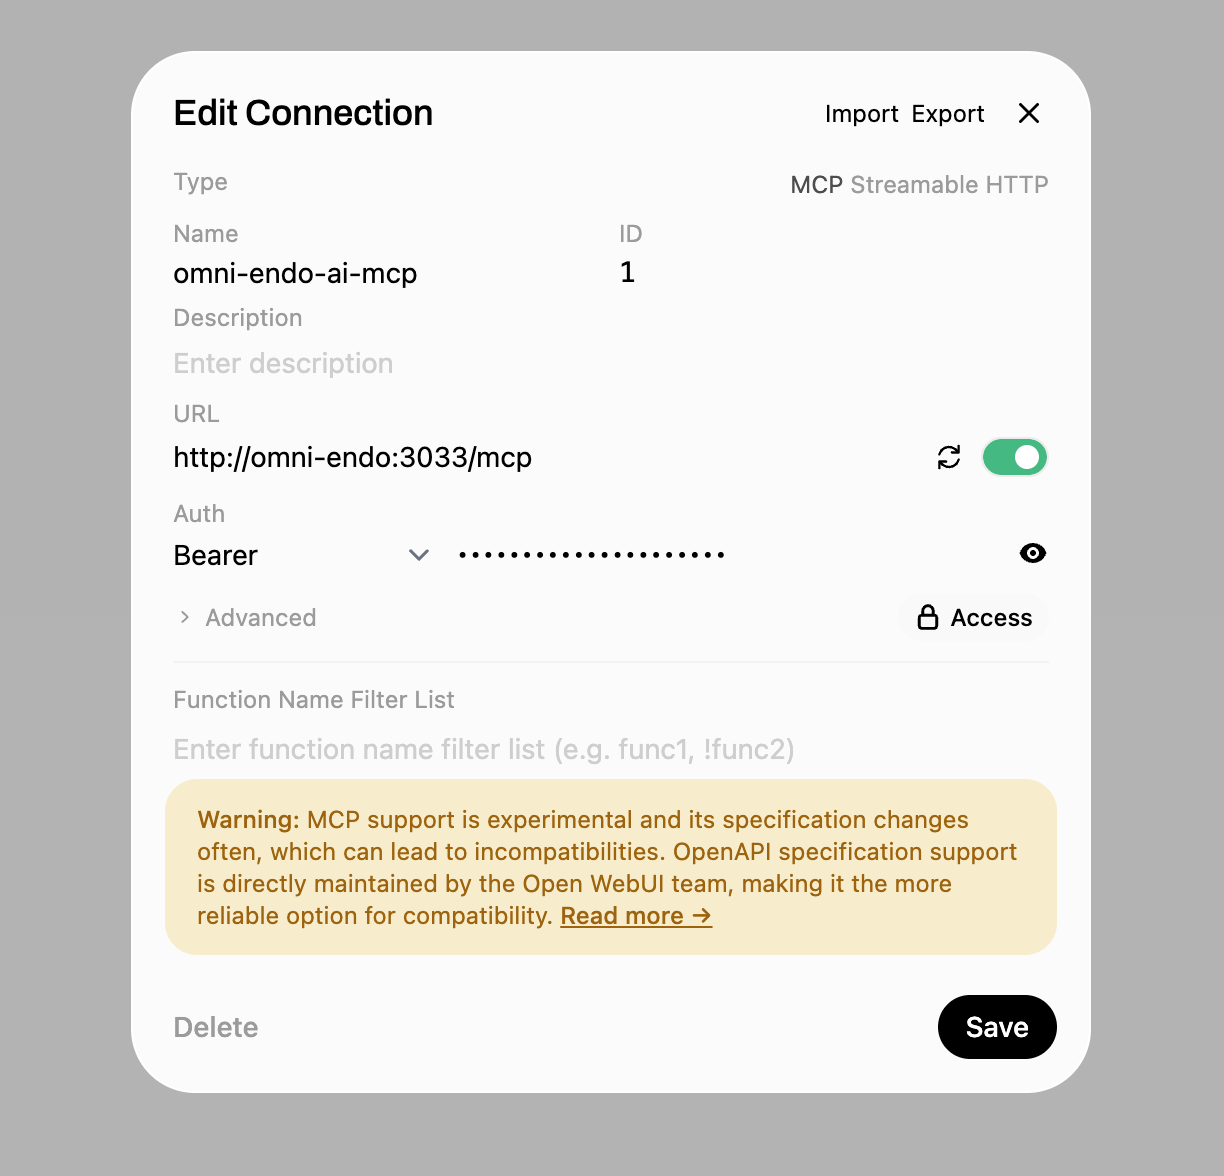
- Give it a Name (anything) and ID (anything), set the URL to
http://omni-endo:3033/mcp(as long as the port has not been changed), and in the Auth box (set to Bearer) add your token, the sameOMNI_TOKENvalue from your.envfile. Then click Save.
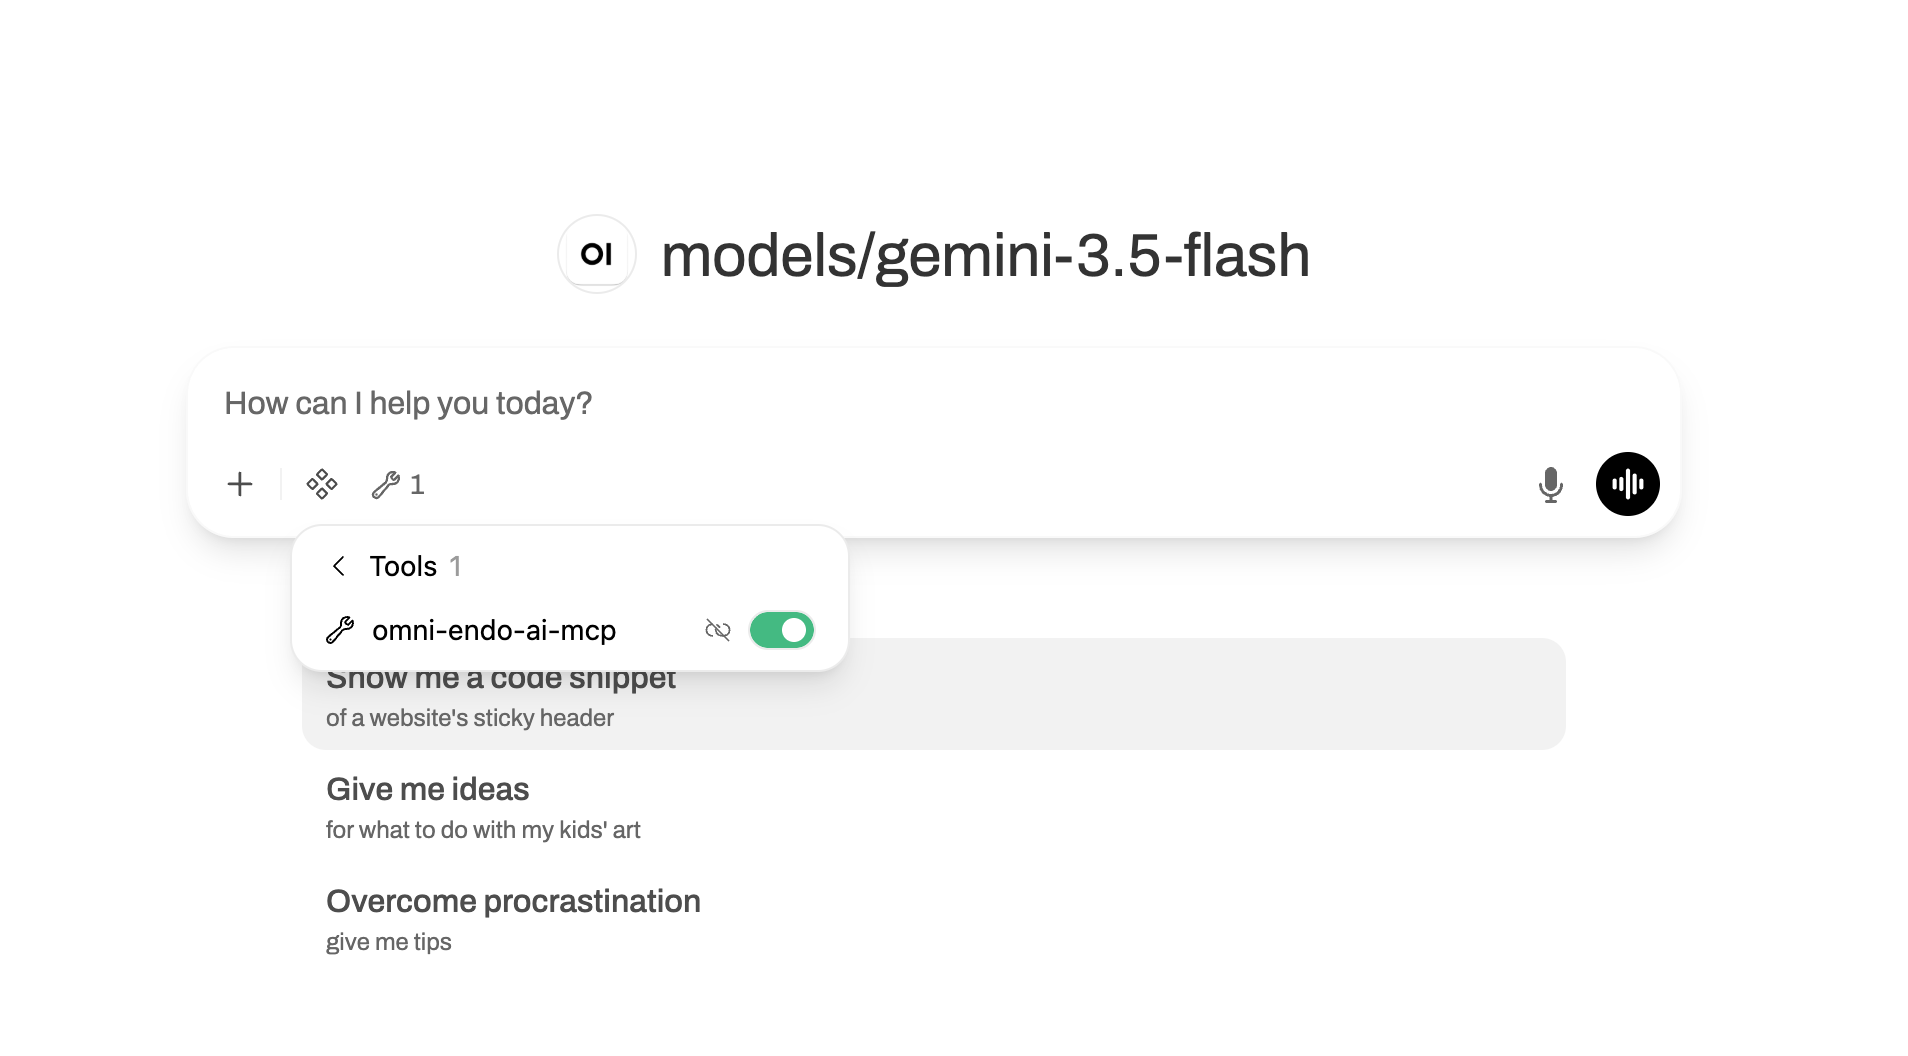
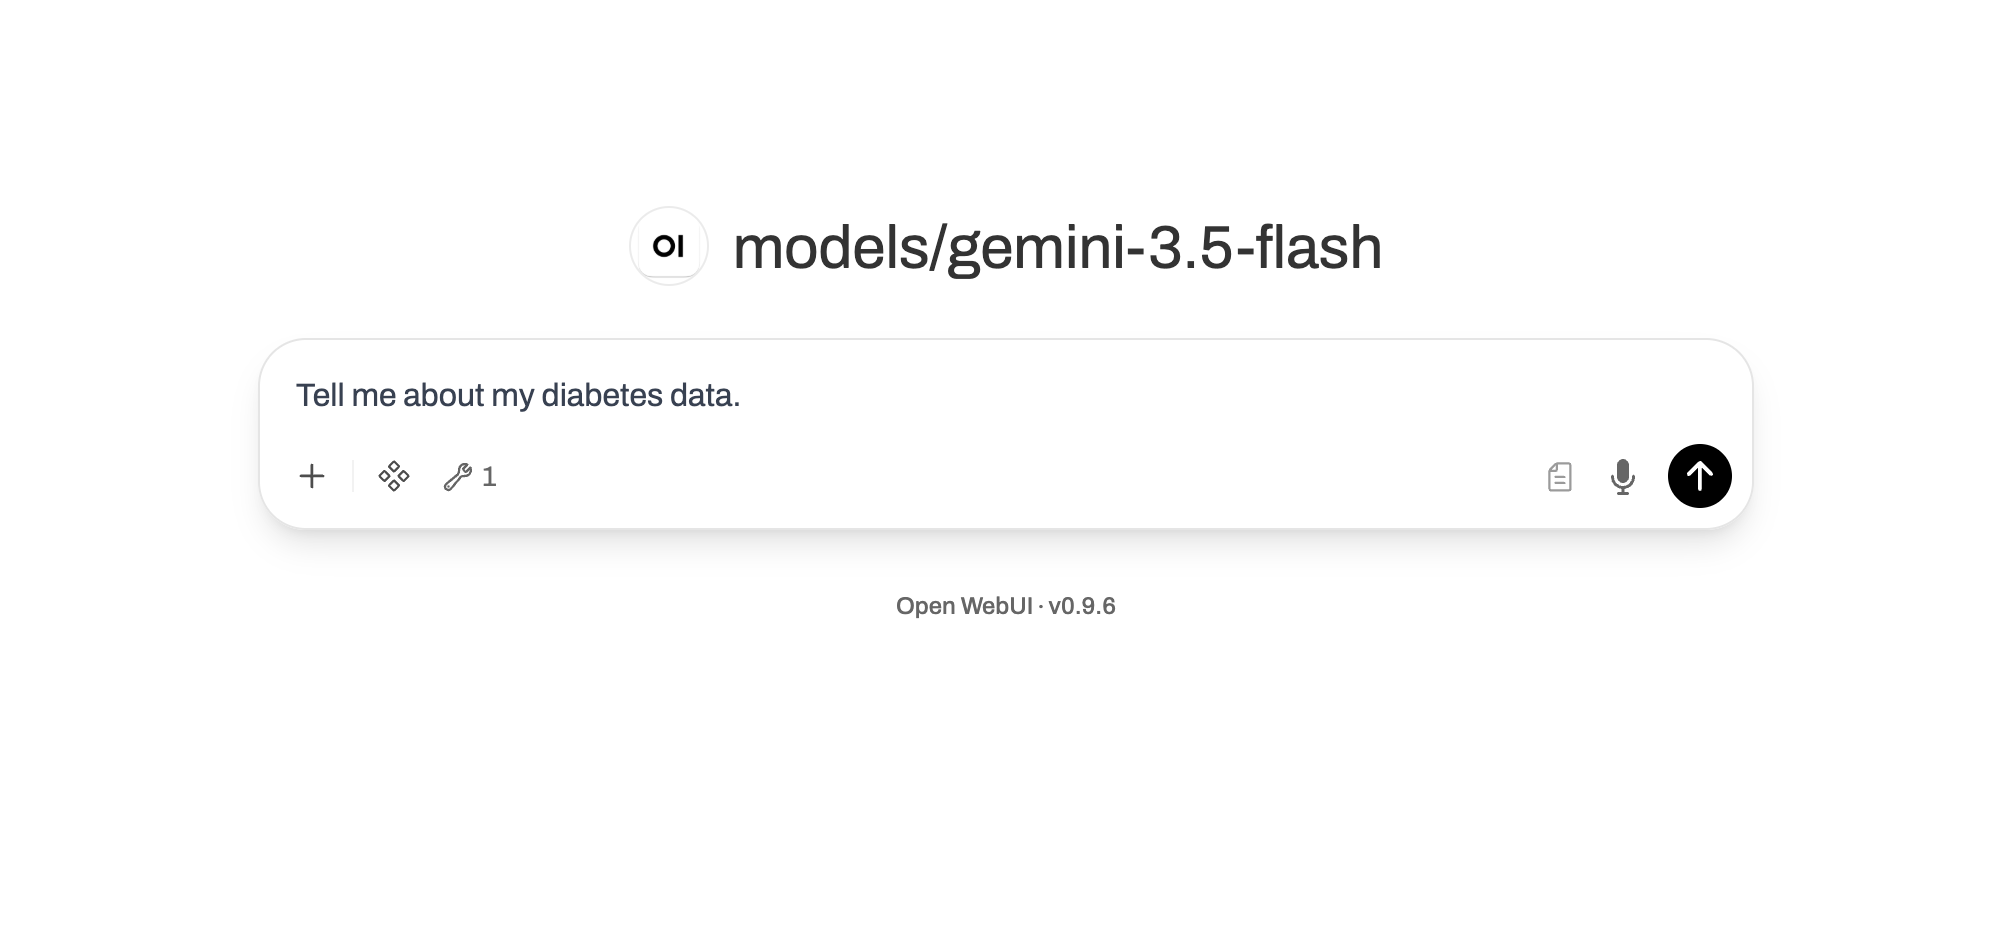
- Go to a chat window and click the Integrations button, then switch the omni-endo-ai-mcp tool on.
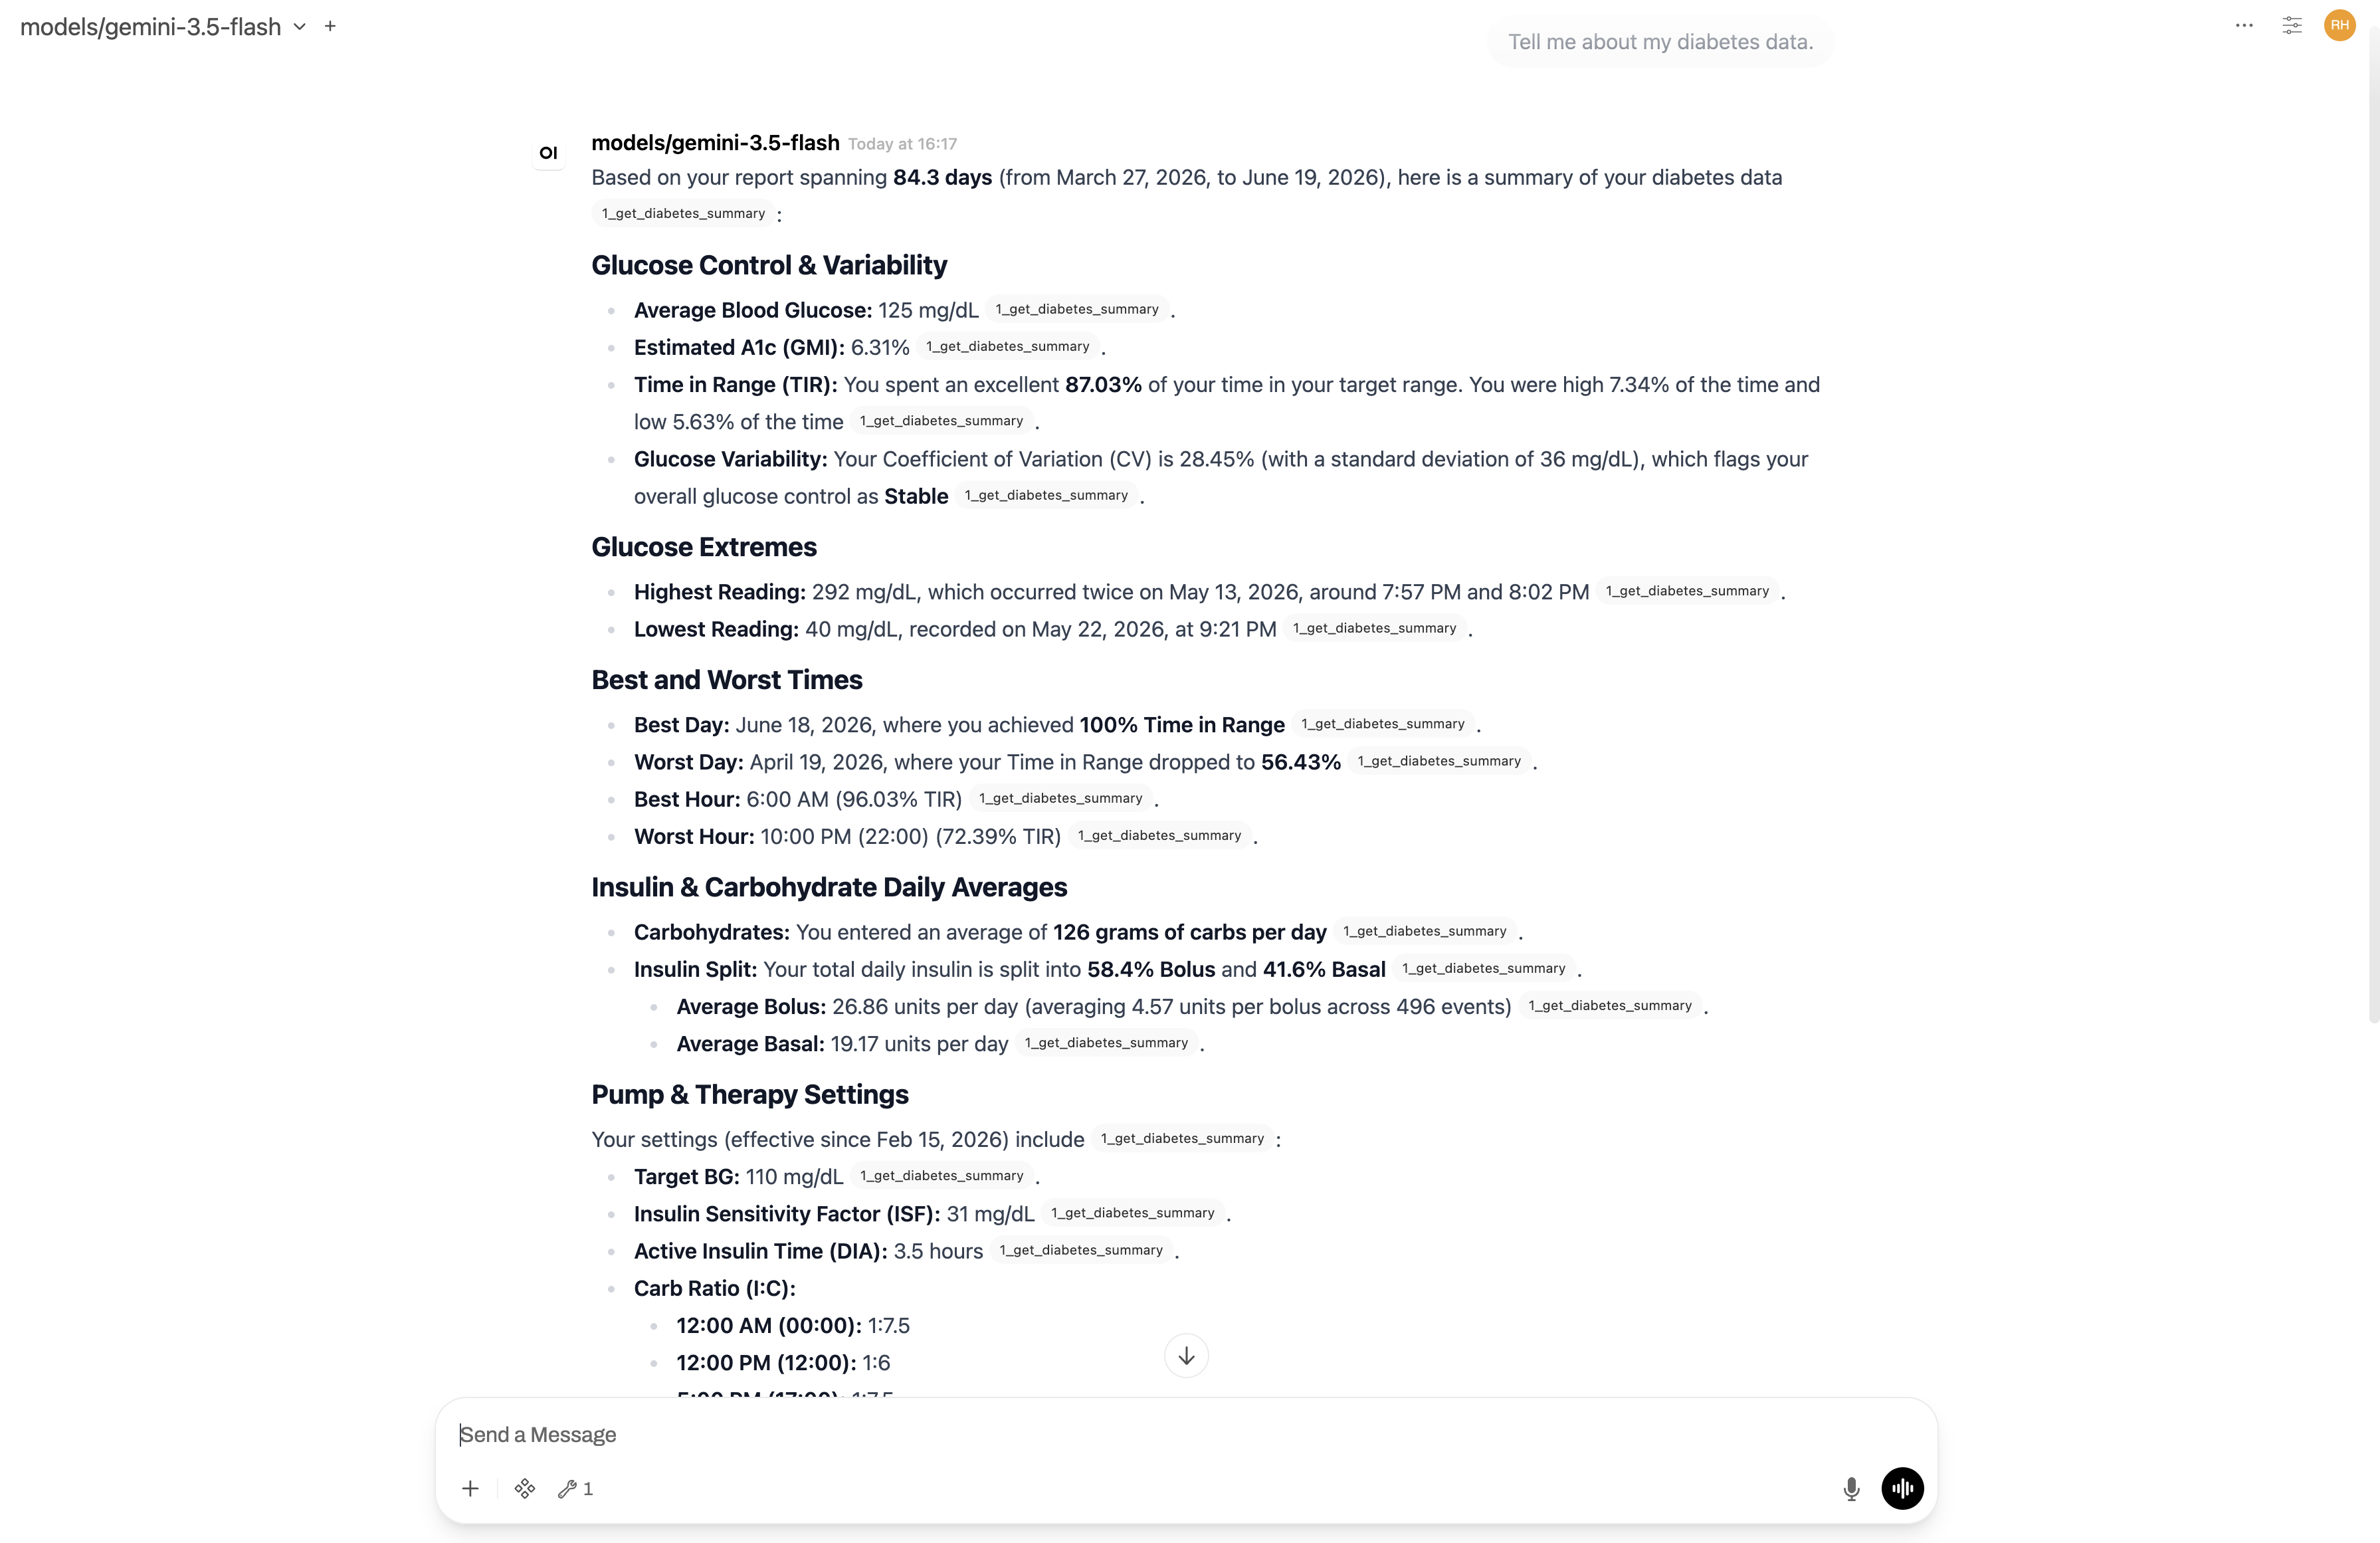
- Ask your first question. A simple example is "Tell me about my diabetes data."
- Take a look at the output.
[!NOTE] Open WebUI's MCP support is experimental and the specification changes periodically. If you encounter connection errors after an Open WebUI update, check the project's issues page for compatibility notes.
B5. Chat
That's it, you are connected. From here, start a new chat any time, select your model, make sure the omni-endo-ai-mcp tool is enabled for the chat (step 4 above), and ask away. A good first question:
"Check what date ranges you have in my diabetes data, then give me an overview of how I'm doing."
🔧 Section C: Use it with the OpenAPI interface
Every tool is also available as a normal web API, with a built-in interactive page (Swagger UI) where you can read what each function does, see exactly what it accepts, and run it live in your browser. This is the easiest way to explore the tools by hand, to check what the AI is actually calling on your behalf, or to build your own integration.
You do not need an AI for this path at all — it talks to the data tools directly.
C1. Make sure the stack is running
The API runs as part of the Docker stack, so if you followed Step 4 (or already started it for Section B) it is already running and you can skip to C2. Otherwise, start it from your terminal, in the project folder:
docker compose up -d
C2. Open the interactive API page
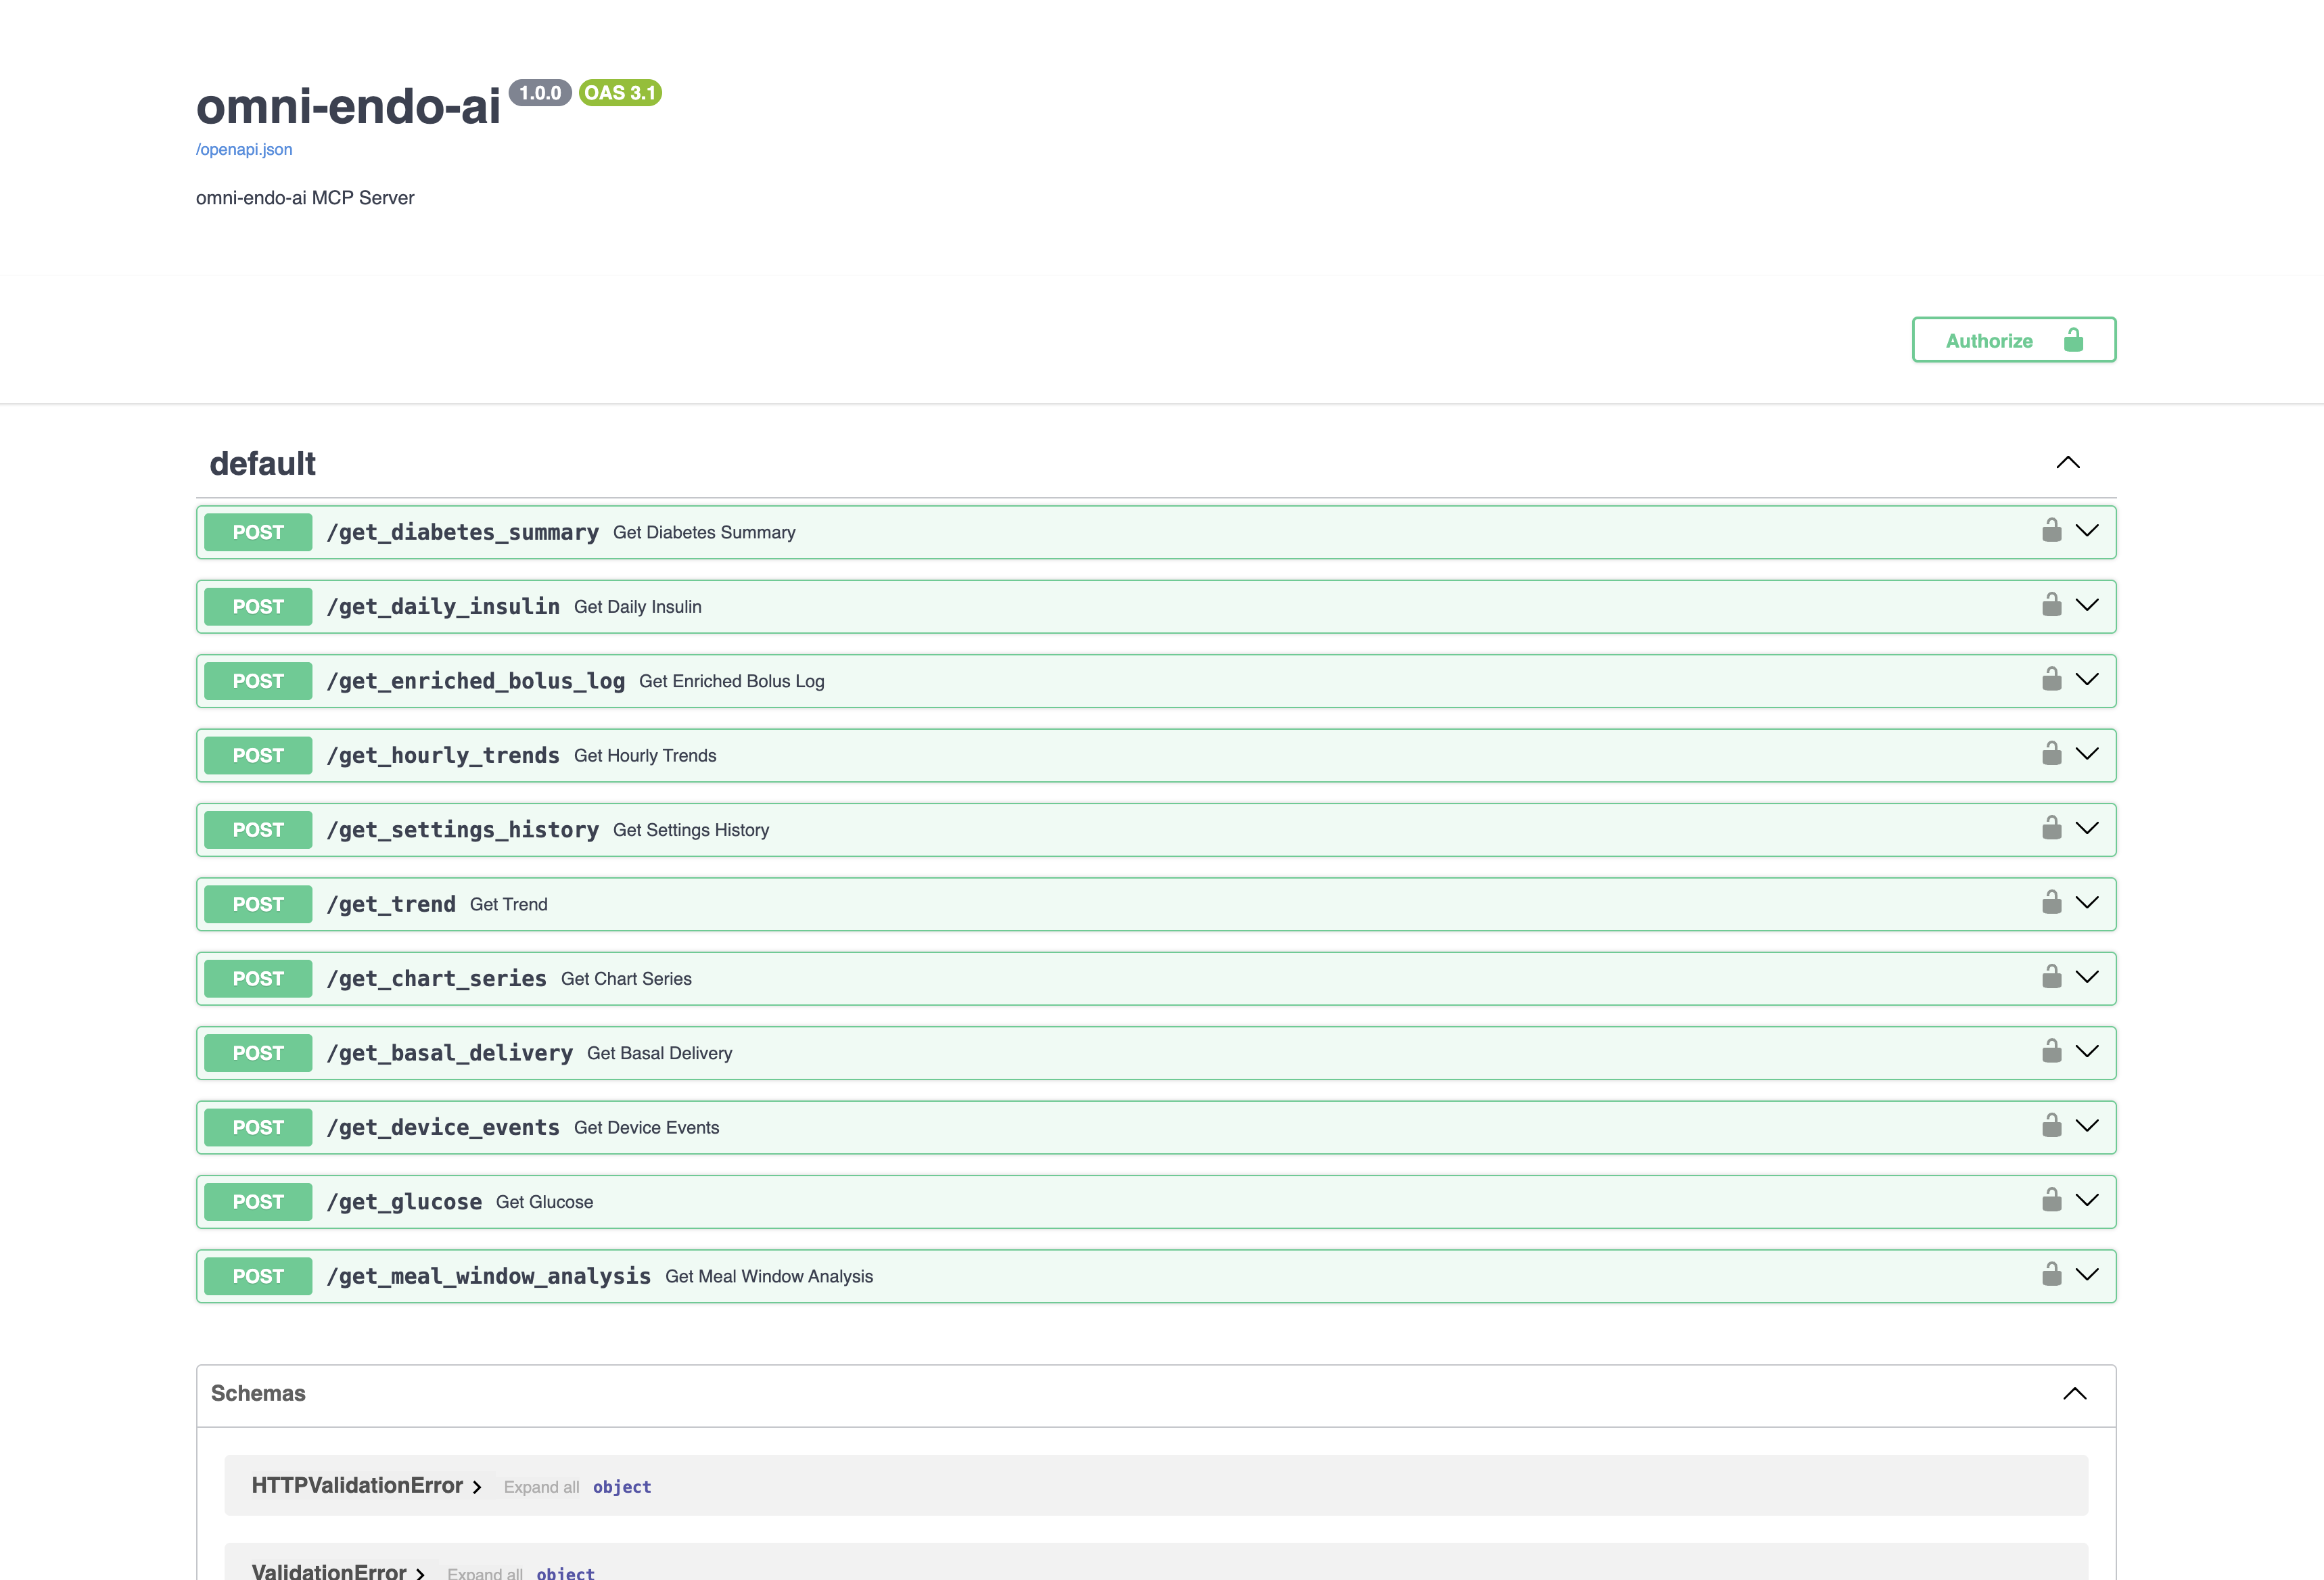
In your browser, go to:
http://localhost:8000/docs
You will see every tool listed, each with a description and a "Try it out" button.
C3. Authorise with your token
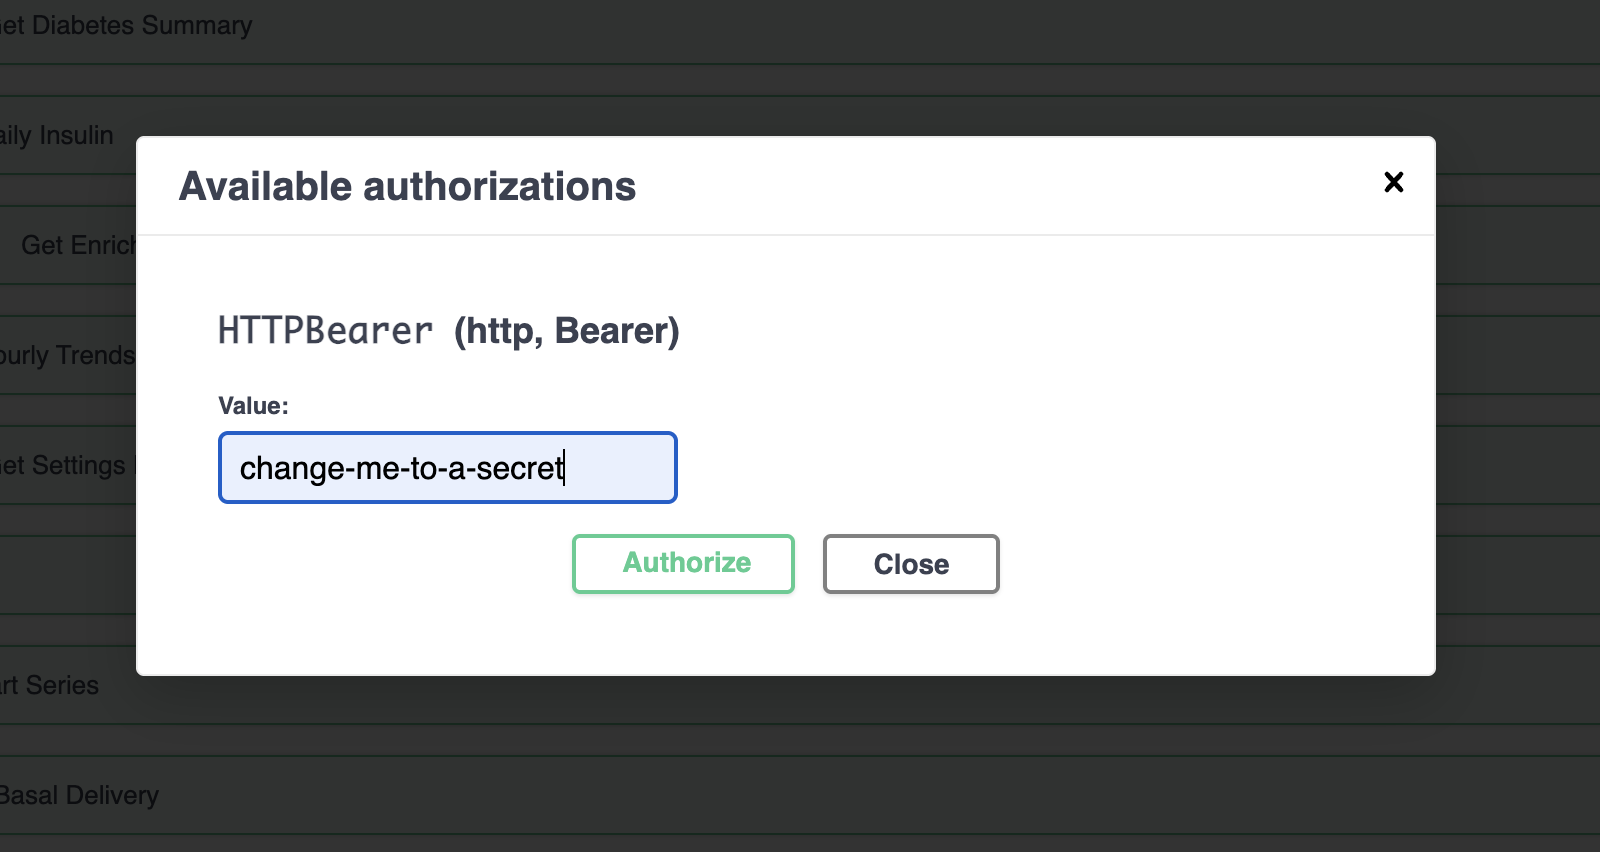
The functions are protected by your secret token, so you authorise once before using them.
- Open the http://localhost:8000/docs URL in your browser.
- Click the Authorize button, add your token (the same
OMNI_TOKENvalue from your.envfile), and click Authorize.
You can now run any function on the page.
C4. Try a function
A good first one is get_diabetes_summary, which gives an overview and also tells you the date range the database holds.
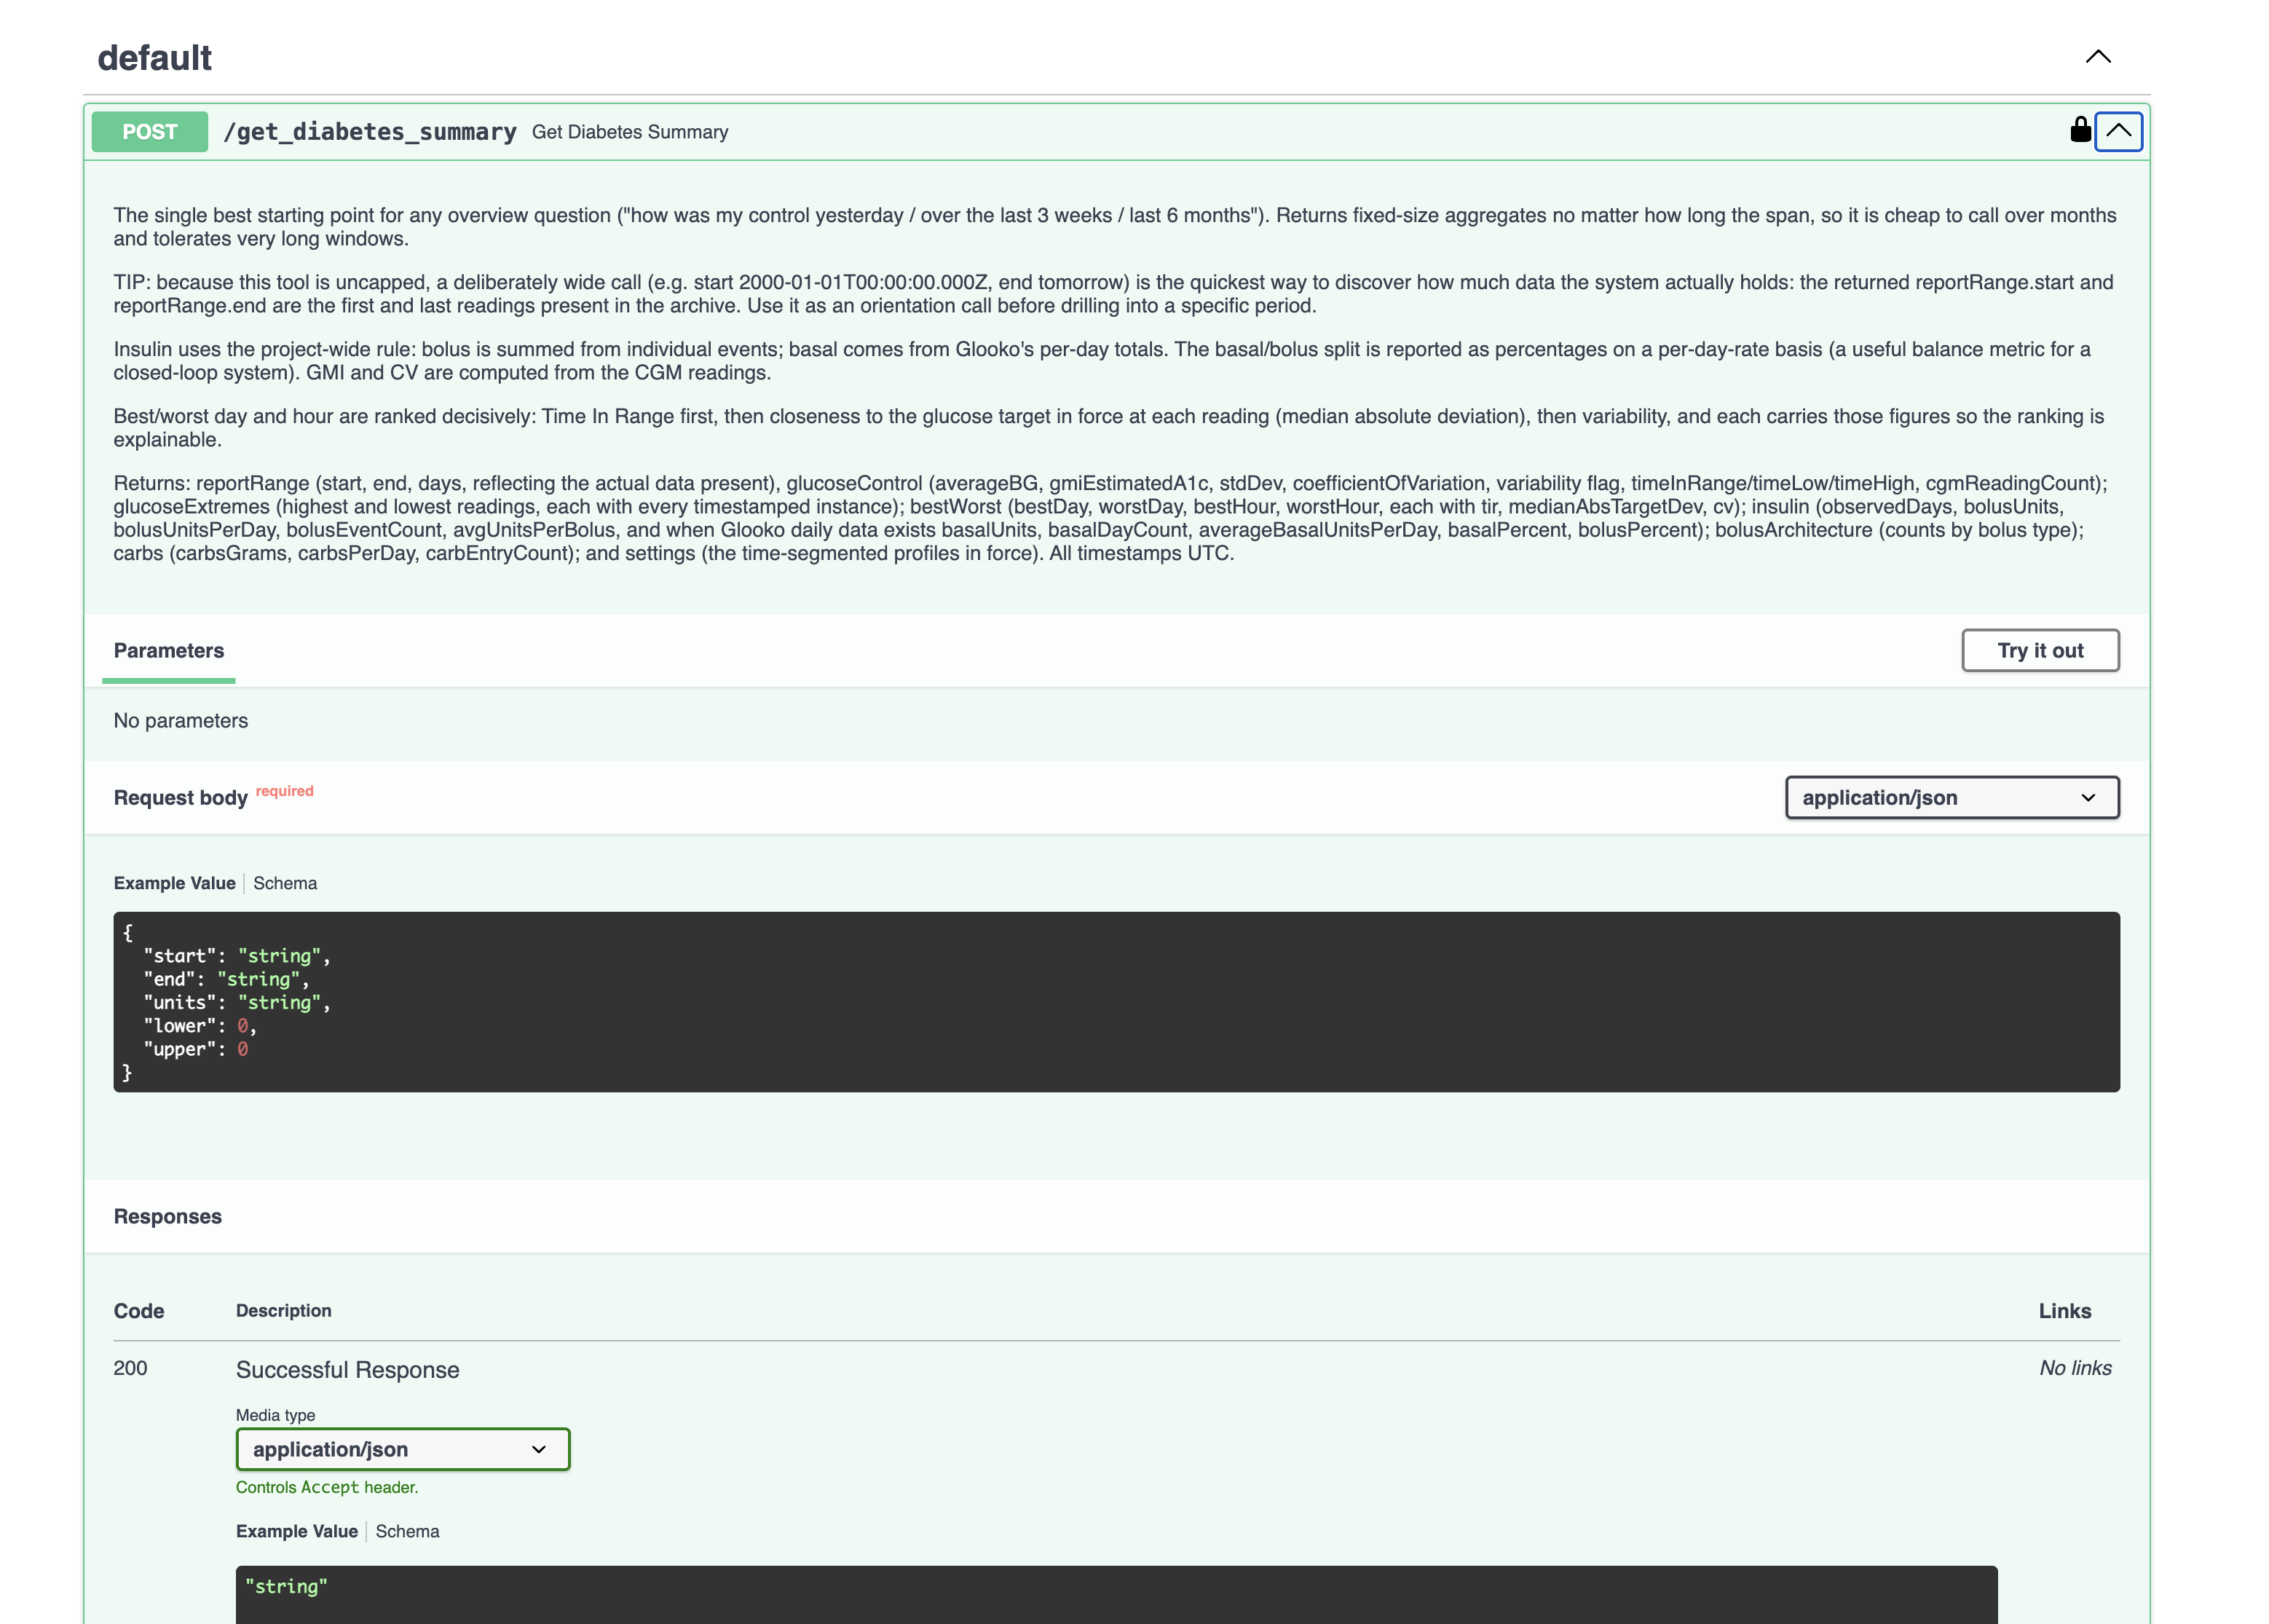
- Click on
get_diabetes_summaryto expand it (shown above). - Click "Try it out".
- In the request body, enter a wide window so you can see everything held, for example:
{ "start": "2000-01-01T00:00:00.000Z", "end": "2030-01-01T00:00:00.000Z" } - Click Execute. The response appears below, including a
reportRangeshowing the first and last data the database actually holds.
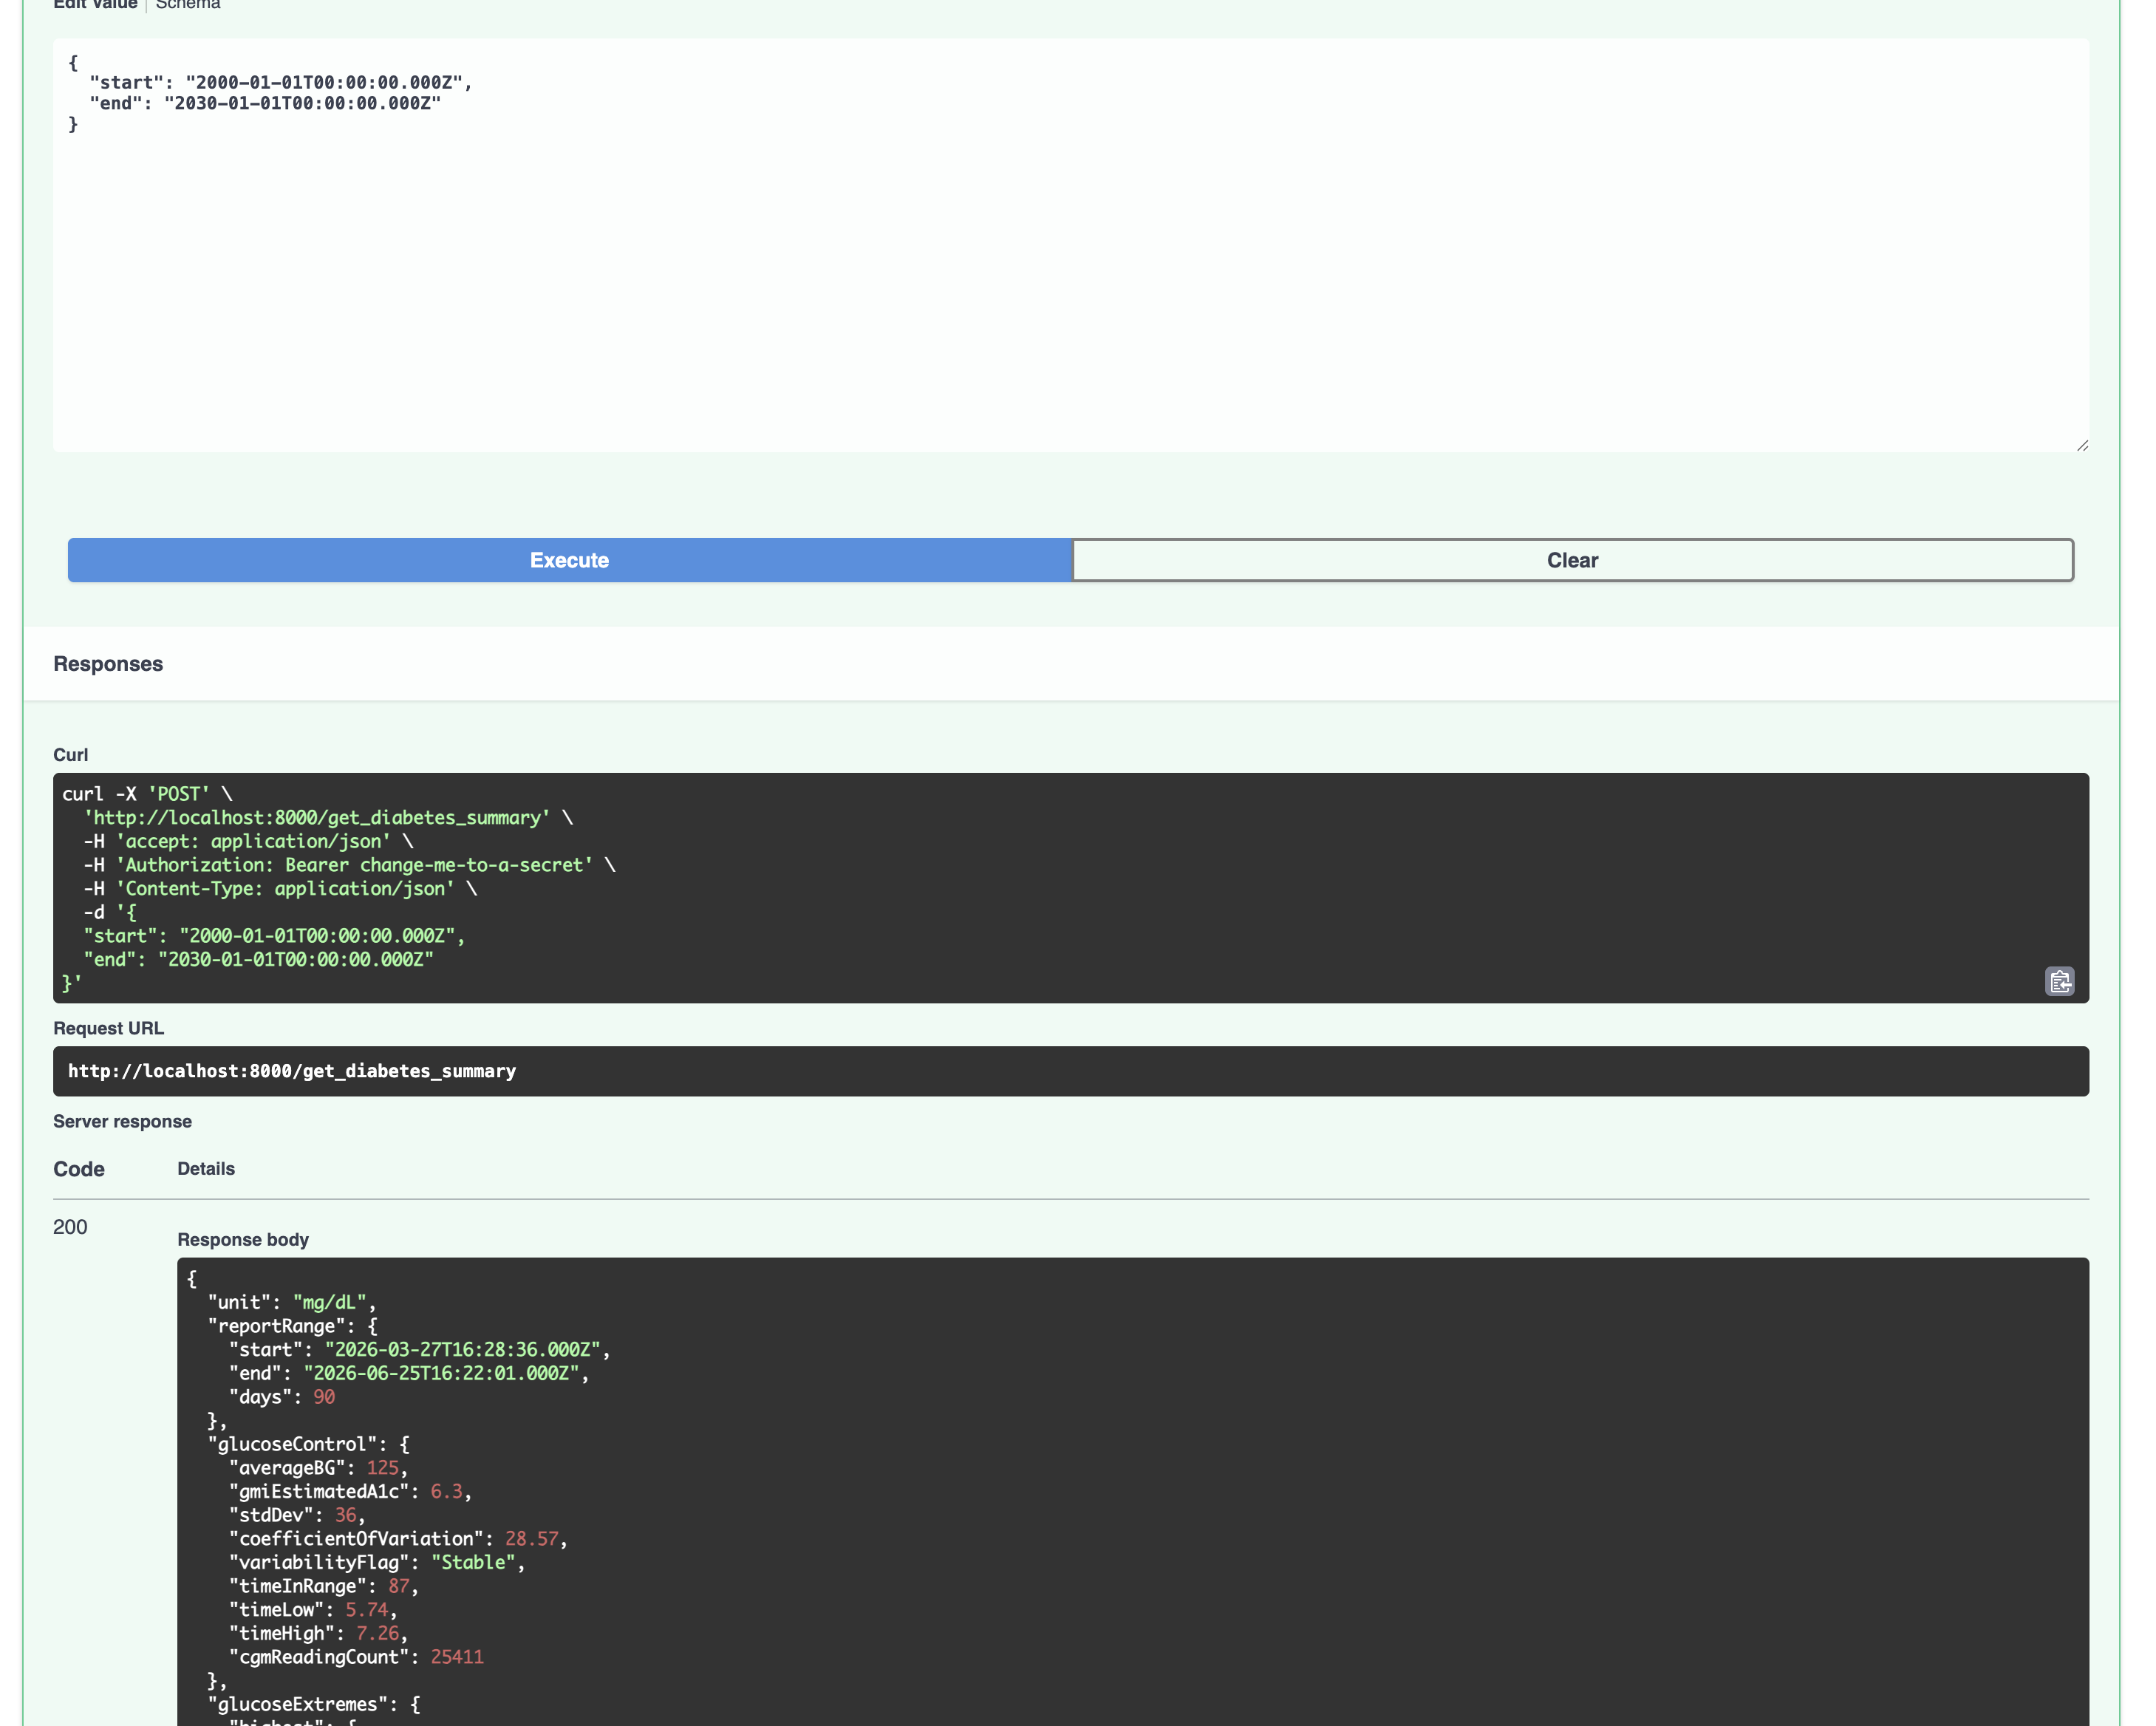
[!NOTE] All times in the API are UTC (the trailing
Z). Send UTC, and expect UTC back. See the API Reference at the end of this document for every endpoint, its parameters, and what it returns.
C5. Call it from a script (optional)
You can also call the API from the command line or your own code. Send the token as a header:
curl -X POST http://localhost:8000/get_diabetes_summary \
  -H "Authorization: Bearer YOUR_OMNI_TOKEN" \
  -H "Content-Type: application/json" \
  -d '{"start":"2026-01-01T00:00:00.000Z","end":"2026-04-01T00:00:00.000Z"}'
Replace YOUR_OMNI_TOKEN with the token from your .env.
🛑 How to Stop
- Claude Desktop path: nothing to stop — Claude shuts the container down itself when it's done.
- Open WebUI or OpenAPI path: in your terminal, in the project folder, run:
docker compose down
🛠️ Troubleshooting
[!NOTE] This section will grow over time. If you hit something not covered here, please open an issue and I'll help.
Only some tools show up in Claude (e.g. just two). Set Claude's tool loading to "Tools already loaded" (Section A4). In "Load tools when needed" mode Claude may not surface the summary/trend tools for a given question.
Claude seems to be running old behaviour after an update.
Rebuild and restart the image: docker compose up -d --build. A cached image can keep running old code.
"Port already in use".
Another app is using a port (3033, 8000, or 8083). See Ports (only if one is already in use) for how to change it safely: change only the host (left) number of the mapping in docker-compose.yml, restart, and use the new port in your browser. Claude-Desktop-only users are unaffected.
Open WebUI can't reach the MCP tools.
Check the URL is http://omni-endo:3033/mcp (not localhost) and that the bearer token matches your OMNI_TOKEN exactly.
The OpenAPI page rejects my requests (401 / unauthorised).
Click Authorize at the top of http://localhost:8000/docs and paste your OMNI_TOKEN. The token must match the one in your .env exactly.
I asked about a date and got nothing back.
If you're using the example data (offline mode), only the example's date range is available. Ask the assistant what date range it holds first, or call get_diabetes_summary with a wide window and read reportRange.
Gemini models don't appear in the model dropdown.
Search for gemini, not google. The models are prefixed by engine name. If nothing appears, go back to Admin Panel → Settings → Connections and use the verify button to confirm the API key and base URL are accepted.
📬 Get in Touch
Whether you're stuck on Docker or want to share how the audit improved your Time in Range, I'm happy to help.
Technical Help
If something isn't working, please Open an Issue so others can benefit from the solution too.
Personal & Professional

[!NOTE] Privacy Reminder: if you send me a screenshot for support, please blur out any private medical information or Glooko credentials first.
🔌 API Reference
When running the Open WebUI stack (docker compose up -d), the full API is available at http://localhost:8000 with an interactive Swagger UI at http://localhost:8000/docs.
The Swagger UI lets you read every endpoint's description, see exactly what parameters it accepts, and try it live — useful for debugging, building integrations, or just understanding what the AI is actually calling on your behalf.
Authentication
Every endpoint requires a Bearer token. This is the OMNI_TOKEN value from your .env file.
In the Swagger UI, click Authorize at the top of the page and paste your token. In direct API calls, send it as an HTTP header:
Authorization: Bearer <your OMNI_TOKEN>
A note on timestamps
All timestamps in this API are UTC ISO 8601. A timestamp looks like this:
2026-01-01T00:00:00.000Z
The T separates the date (2026-01-01) from the time (00:00:00.000), and the trailing Z means the time is in UTC. This applies in both directions: the timestamps you send must be UTC, and all timestamps the API returns are UTC.
If you are calling the API directly, convert your local times to UTC before sending them. For example, 9pm BST (UTC+1) is 2026-06-27T20:00:00.000Z.
A note on glucose units
Most endpoints accept optional units, lower, and upper parameters. If you omit them, the server uses the values you configured in .env (OMNI_UNITS, OMNI_LOWER, OMNI_UPPER). Only pass them if you want to override the defaults for a single call — for example, to check time below 3.5 mmol/L without changing your normal threshold.
Endpoints
All endpoints use POST. The request body is JSON.
POST /get_diabetes_summary
The best starting point for any overview question. Returns fixed-size aggregates over any window, no matter how long, so it is cheap to call across months or years.
Tip: call it with a very wide window, for example start of 2000-01-01T00:00:00.000Z and an end far in the future such as 2030-01-01T00:00:00.000Z, to discover the full date range held in the database — the returned reportRange.start and reportRange.end are the first and last readings actually present.
Parameters
| Parameter | Type | Required | Description |
|---|---|---|---|
start |
string | Yes | Window start, UTC ISO 8601 |
end |
string | Yes | Window end, UTC ISO 8601 |
units |
string | No | "mmol" or "mgdl" — overrides server default for this call |
lower |
number | No | Hypo boundary in the chosen unit — overrides server default |
upper |
number | No | Hyper boundary in the chosen unit — overrides server default |
Returns
reportRange— the actual data span present (start,end,days)glucoseControl— average BG, GMI (estimated HbA1c), standard deviation, coefficient of variation, variability flag, time in range / time low / time high, CGM reading countglucoseExtremes— highest and lowest readings, each with every timestamped instancebestWorst— best and worst day and hour, each with TIR, median absolute target deviation, and CV so the ranking is explainableinsulin— bolus summed from individual events; basal from Glooko daily totals; basal/bolus percentages on a per-day-rate basisbolusArchitecture— counts by bolus type (meal, manual correction, system correction, meal with correction)carbs— total grams, grams per day, entry countsettings— the time-segmented pump profiles in force during the window
POST /get_trend
Multi-period comparison. Splits a span into time buckets and computes each independently from raw readings — so a year by month gives you 12 correct rows in a single call, not averaged averages.
Parameters
| Parameter | Type | Required | Default | Description |
|---|---|---|---|---|
start |
string | Yes | Window start, UTC ISO 8601 | |
end |
string | Yes | Window end, UTC ISO 8601 | |
mode |
string | No | "calendar" |
"calendar" for day/week/month/quarter buckets; "fixed" for equal-length buckets |
granularity |
string | No | "month" |
Calendar bucket size: "day", "week", "month", or "quarter". Only used when mode is "calendar" |
fixedSizeDays |
integer | No | 7 |
Bucket length in days. Only used when mode is "fixed" |
units |
string | No | Overrides server default for this call | |
lower |
number | No | Overrides server default | |
upper |
number | No | Overrides server default |
Returns
bucketCount and a buckets array. Each row contains: bucket (period key), start, end, observedDays; glucose (avg, TIR, time low, time high, stdDev, CV, GMI, reading count); insulin (bolus and basal figures); carbs; and coverage (reading count, expected count, coverage percent, and a trustworthy flag — treat buckets where this is false with caution).
POST /get_glucose
Individual timestamped CGM readings for a window. Use band to filter to only the part of the range you care about — pulling only hypos is far cheaper than pulling everything.
Capped to 21 days. For wider windows use get_chart_series; for aggregate stats use get_diabetes_summary or get_trend.
Parameters
| Parameter | Type | Required | Default | Description |
|---|---|---|---|---|
start |
string | Yes | Window start, UTC ISO 8601 | |
end |
string | Yes | Window end, UTC ISO 8601 | |
band |
string | No | "all" |
"low" (hypos only), "high" (hypers only), "target" (in range only), "all" (every reading, tagged with its band) |
units |
string | No | Overrides server default | |
lower |
number | No | Overrides server default | |
upper |
number | No | Overrides server default |
Returns
window, thresholdsUsed (lower, upper, unit), band, count, and a readings array — each reading has time (UTC), value, velocity (rate of change), and band when band="all".
POST /get_chart_series
Glucose downsampled to a target number of points for plotting, with a min/max band per point so spikes are not lost. Also returns bolus events as overlay markers.
Use this whenever you want to draw a chart. It is far cheaper than get_glucose for wide windows, and a chart cannot usefully display more points than its pixel width anyway.
Parameters
| Parameter | Type | Required | Default | Description |
|---|---|---|---|---|
start |
string | Yes | Window start, UTC ISO 8601 | |
end |
string | Yes | Window end, UTC ISO 8601 | |
maxPoints |
integer | No | 250 |
Target number of plotted points (20–1000). 200–400 is sufficient for most screen widths |
Returns
unit, a points array (t, avg, min, max, n per point), and an events array of bolus markers for overlay.
POST /get_enriched_bolus_log
Every bolus in the window, enriched with the CGM value at the moment of delivery and the pump settings (ISF, carb ratio, target, DIA) that were active at that time.
Each record also includes delivered vs programmed units (if delivered < programmed the bolus was interrupted, flagged interrupted: true), the calculator recommendation split into correction and carb components, whether the user overrode it, and the bolus class.
Capped to 92 days per call.
Parameters
| Parameter | Type | Required | Description |
|---|---|---|---|
start |
string | Yes | Window start, UTC ISO 8601 |
end |
string | Yes | Window end, UTC ISO 8601 |
classes |
array of strings | No | Filter to specific bolus types. Valid values: "Meal Bolus", "Manual Correction Bolus", "System Correction Bolus", "Meal With Correction Bolus". Omit to return all classes |
Returns
count, filterApplied, and a boluses array. Each record: time, units, delivered, programmed, interrupted, recCorrection, recCarbs, recTotal, override ("above" / "below" / null), bgInput, bgSource, cgm_val, class, isManual, and a context object with the settings in force at delivery.
POST /get_hourly_trends
Time in range and average glucose pooled by clock-hour across the entire window. Every reading that fell in the 07:00 hour on any day is combined into one 07:00 row — useful for identifying recurring time-of-day patterns such as the dawn phenomenon or consistent evening highs.
Hours are returned as UTC clock-hours. Convert to your local time when interpreting results.
Parameters
| Parameter | Type | Required | Description |
|---|---|---|---|
start |
string | Yes | Window start, UTC ISO 8601 |
end |
string | Yes | Window end, UTC ISO 8601 |
units |
string | No | Overrides server default |
lower |
number | No | Overrides server default |
upper |
number | No | Overrides server default |
Returns
A byHour array of up to 24 rows, each with hour (UTC, "HH:00"), averageBG, timeInRange, timeLow, timeHigh, and readings (count for that hour).
POST /get_basal_delivery
What the Omnipod 5 algorithm was doing with basal delivery over time, expressed as states rather than units.
Important: these are behavioural states, not insulin amounts.
suspendmeans basal was paused;maxmeans it was running at its ceiling. Neither is a unit figure. For basal units, useget_daily_insulin.
| State | Meaning |
|---|---|
normal |
Ordinary automated delivery |
suspend |
Algorithm paused basal, typically to prevent a predicted low |
max |
Algorithm delivering at its ceiling, typically fighting a rise |
limited |
CGM signal lost for more than 20 minutes; algorithm ran a fixed preset and was not adjusting |
Parameters
| Parameter | Type | Required | Default | Description |
|---|---|---|---|---|
start |
string | Yes | Window start, UTC ISO 8601 | |
end |
string | Yes | Window end, UTC ISO 8601 | |
includeIntervals |
boolean | No | true |
Set to false to return only the per-state summary totals without the full interval timeline — much smaller over long spans |
Returns
A summary with minutes and percentage per state, and (unless includeIntervals is false) an intervals array with state, start, end, and minutes for each contiguous period.
POST /get_daily_insulin
Glooko's own per-day insulin totals: basal units, bolus units, and combined total for each day, plus a window aggregate.
Use this when you want a day-by-day table of insulin delivery or total daily dose figures. Note that the bolus figure here is Glooko's pre-aggregated daily total; for bolus summed from individual events (the method used everywhere else in this API), use get_diabetes_summary or get_trend.
The most recent day may be flagged provisional if it has not yet been finalised.
Parameters
| Parameter | Type | Required | Description |
|---|---|---|---|
start |
string | Yes | Window start, UTC ISO 8601 |
end |
string | Yes | Window end, UTC ISO 8601 |
Returns
source ("glooko-daily"), a days array (date, basalUnits, bolusUnits, totalUnits, provisional), and an aggregate (daysWithData, basalUnits, bolusUnits, totalUnits, per-day averages, basalPercent). All dates are UTC days.
POST /get_settings_history
Every Omnipod 5 setting change that was in effect during the window, in chronological order: DIA, max basal rate, and the time-segmented target, ISF, and carb-ratio profiles.
Useful for establishing which settings were active at a specific point in time before judging a bolus or an excursion, or for reviewing how settings have been adjusted over a long span.
Glucose-based values (target, ISF) are returned in the configured unit. Per-segment from times are pump-schedule clock-hours, not UTC timestamps.
Parameters
| Parameter | Type | Required | Description |
|---|---|---|---|
start |
string | Yes | Window start, UTC ISO 8601 |
end |
string | Yes | Window end, UTC ISO 8601 |
Returns
A settings array. Each entry has effective (UTC timestamp when this setting took effect), DIA_hours, maxBasalRate, and three time-segmented profiles — targetBg, isf, and carbRatio — each a list of {from, value} segments.
POST /get_device_events
Pod changes and CGM sensor changes as timestamped events, in two separate lists.
These are point-in-time markers, not amounts. They are most useful as context for nearby glucose disruption: a fresh pod can run high for the first hours while the cannula settles, and a new sensor can read erratically during warm-up. Treat any correlation as a possible contributing factor — never assert it as a confirmed cause.
Parameters
| Parameter | Type | Required | Description |
|---|---|---|---|
start |
string | Yes | Window start, UTC ISO 8601 |
end |
string | Yes | Window end, UTC ISO 8601 |
Returns
podChanges and sensorChanges arrays of UTC timestamps, plus a count for each.
POST /get_meal_window_analysis
A focused look around a single bolus or meal event: 30 minutes before to 3 hours after the timestamp you pass.
Use it to judge a post-meal glucose excursion and assess how well a dose worked, without pulling whole days of data. Locate the event time first (for example from get_enriched_bolus_log), then pass it here.
Parameters
| Parameter | Type | Required | Description |
|---|---|---|---|
eventTimestamp |
string | Yes | UTC ISO 8601 timestamp of the meal or bolus event |
units |
string | No | Overrides server default for this call |
Returns
targetEvent (the timestamp you passed), unit, a glucoseTimeline array (time, value) across the 3.5-hour window, and an associatedBoluses array of enriched bolus records that fall within the window.
How the code is organised
(For developers reading the source. If you just want to use the tool, you can ignore this.)
The data flows: Glooko → sync → store → range → analytics → tools → your AI.
src/server.js— the MCP server and the tool definitions (what Claude launches over stdio). Thin wrappers around the analytics.src/http.js— an alternative HTTP/SSE front door to the same tools (used by Open WebUI via the bridge).src/analytics.js— the heart: all the clinical maths and data shaping, written as pure functions.src/store.js— the SQLite archive (normalised rows, not raw Glooko blobs).src/range.js— the layer the tools call; answers from the local archive and tops up from Glooko only when needed. Offline mode is gated here.src/sync.js— the engine that pulls Glooko data into the archive (cold start, top-up, startup warm-up).src/glooko.js— the Glooko API client (auth and fetching).src/prompt.js— the clinical-auditor persona.
A few invariants hold throughout: glucose is stored internally in one canonical unit (mmol/L) and only converted on output; bolus is summed from individual events while basal comes from Glooko's daily totals; all times are UTC; and per-day rates use the real observed span of data.
📄 License
This project is released under the MIT License — you are free to use, modify, and distribute it, including for commercial purposes, provided the copyright notice and licence text are retained. See the LICENSE file for the full text.
The MIT licence covers the code. The example database is the author's own data, shared for exploration; please be considerate in how you use it.
Disclaimer
This tool is for informational and educational purposes only. It is not a medical device and is not a substitute for professional medical advice, diagnosis, or treatment. Always seek the advice of your physician or other qualified health provider with any questions regarding a medical condition. Any analysis produced with the help of this tool, including AI-generated suggestions, must be reviewed with a qualified clinical professional before making any changes to your insulin therapy or medical regimen.